6.11.0
View Text alongside images, and Optimized Image Loading in Visual NER – Generative AI Lab 6.11.0
Generative AI Lab 6.11 brings an Image-Text Side-by-Side Annotation project, allowing users to view the original image or PDF alongside its OCR-extracted text for easier annotation. It also includes optimized Visual NER for faster PDF processing, enhanced zoom functionality, and a new licensing model for on-premises deployments.
Other minor improvements have been made to Generative AI Lab, specifically to model training and de-identification.
Annotate while referencing Orginal Documents
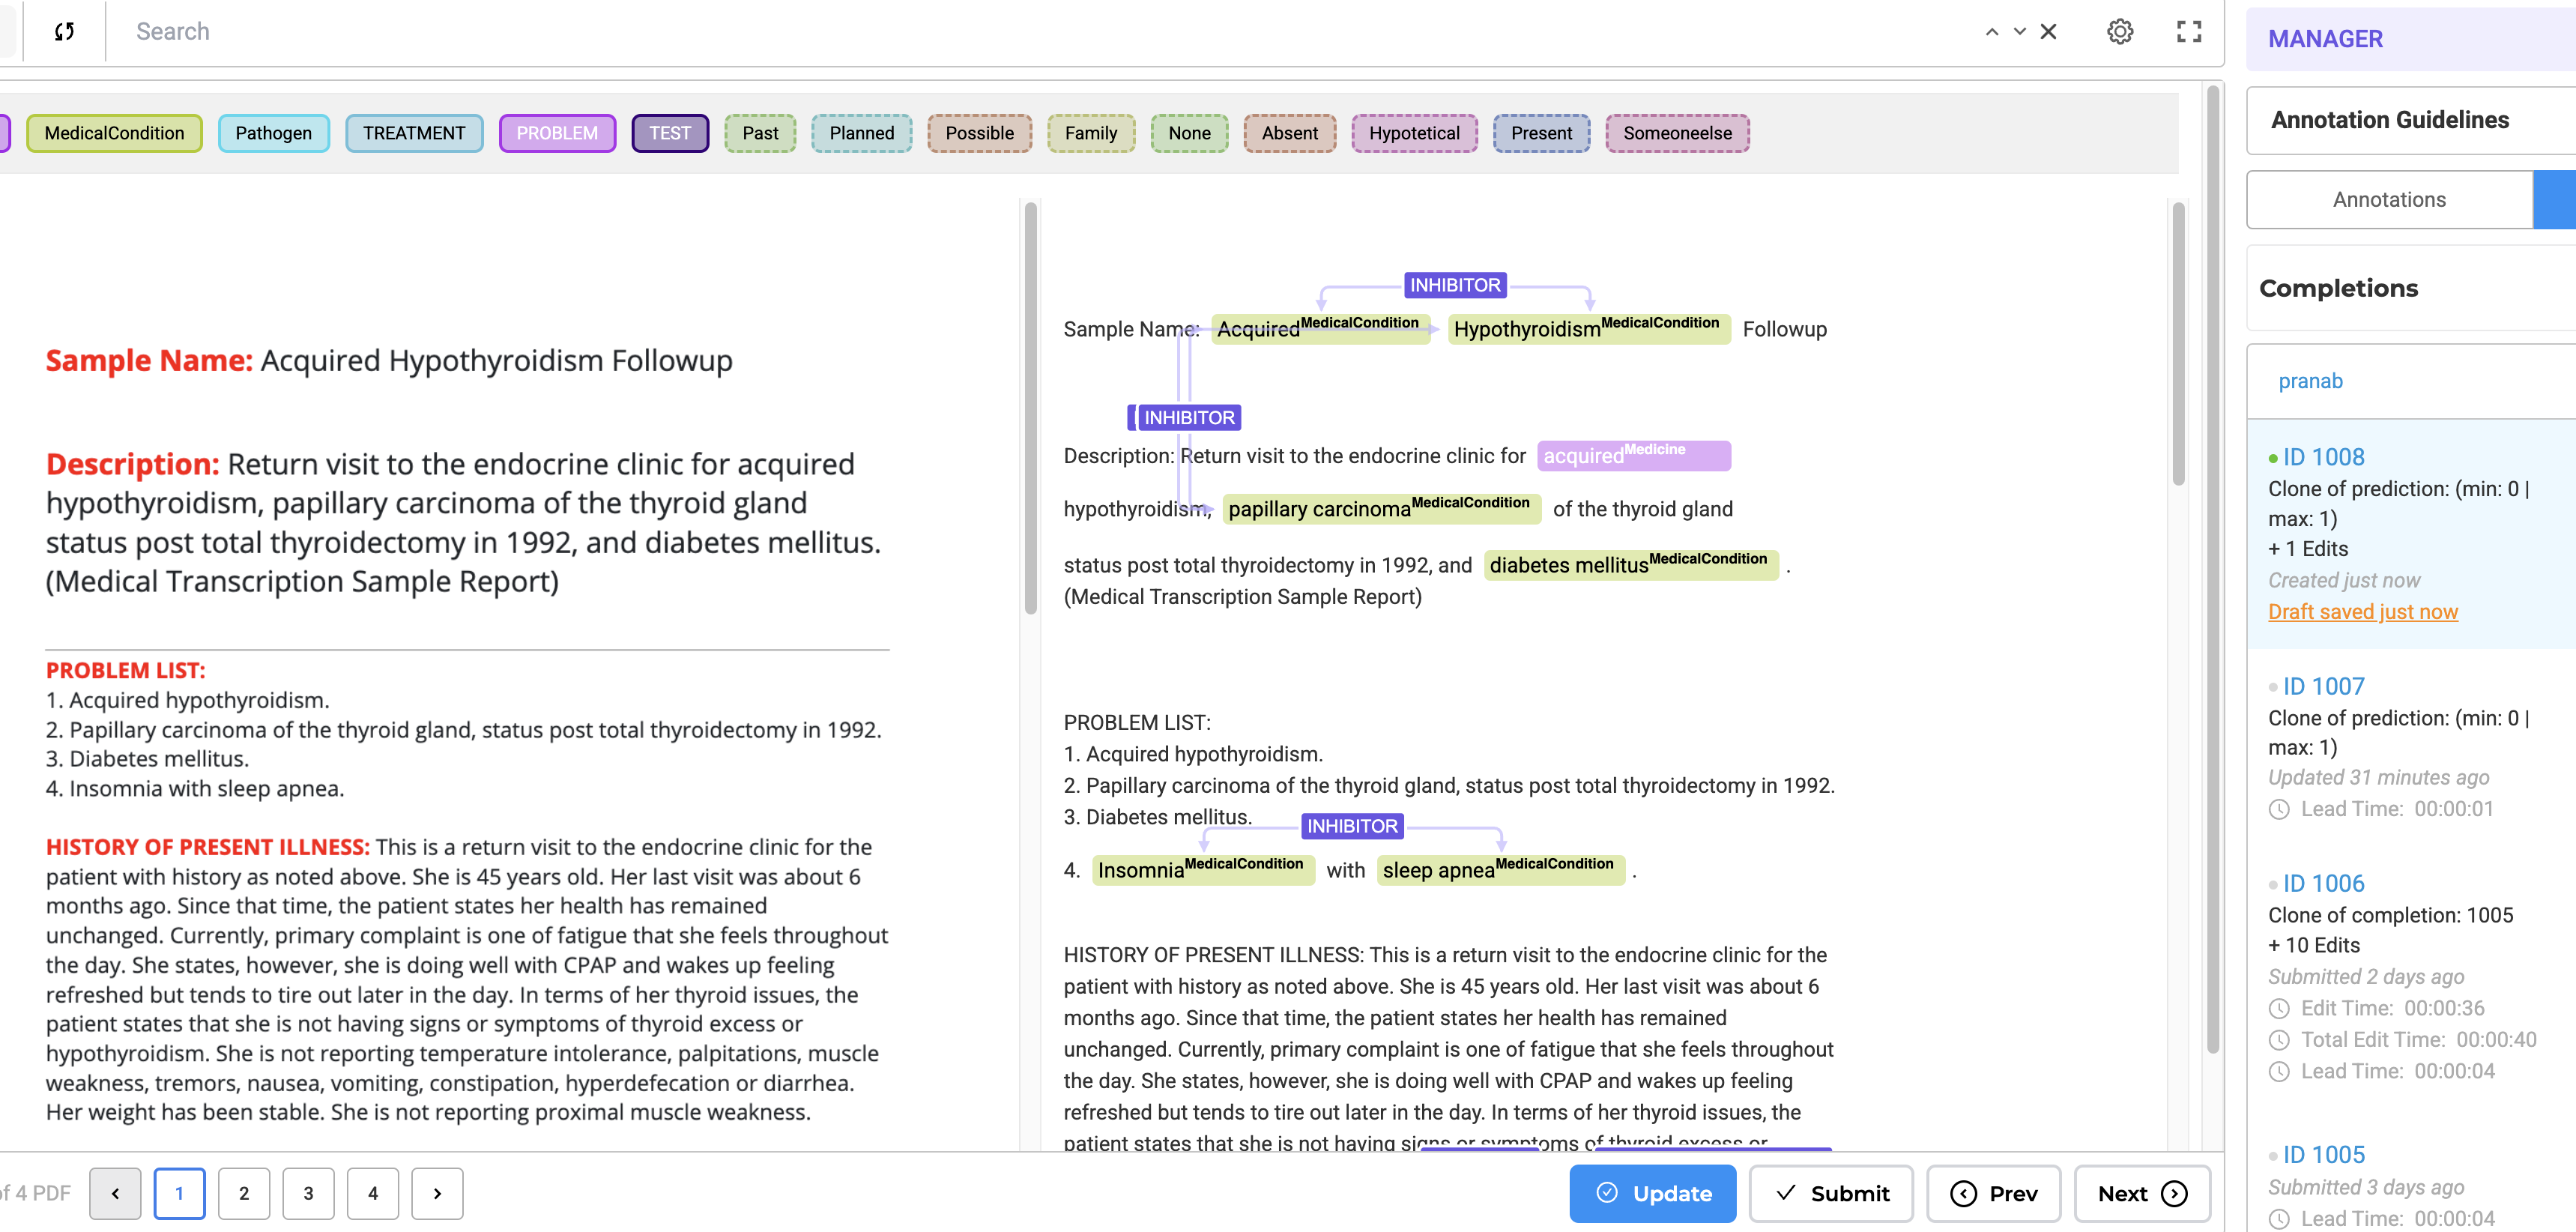
This feature improves visibility for image-based documents by displaying both the image/PDF and its OCR-extracted text side by side. Users can now annotate more efficiently while maintaining a visual reference. While Generative AI Lab has offered annotation on top of Image and PDF formats for quite some time, there was a gap in annotating large amounts of data on top of the original document, as there was not enough space to adequately address more robust annotation projects.
Image on the Left, OCR Text on the Right: By Selecting this project type, users can now view the image/PDF document on the left side of the interface and its corresponding OCR-extracted text on the right side.
Paginated Documents: All document pages are paginated, allowing users to navigate the document effortlessly.
Image and PDF documents now support all text-based annotation features—including NER, assertion, relations, resolvers, and lookup code annotation—and allow OCR text annotation.
Key Features
How to Configure the Project
- Select the Project Template:
- Navigate to the Image tab and choose the Image & Text Side-By-Side Annotation template.
- Save the configuration to proceed.
- Add Models to the Reuse Resource Page:
- Click Next to move to the Reuse Resource page.
- Add the required models, such as NER, relation, and assertion models, to the project.
- Configure Individual Labels:
- Click Next again to access the label configuration page.
- Click on individual labels to add lookup data or resolver models.
- Save and Deploy the Preannotation Server:
- Once all configurations are complete, save the project.
- Deploy the preannotation server to start using the project.
For a visual guide, refer to the GIF below that demonstrates the configuration process step-by-step:
How to Use Preannotation
After deploying the preannotation server, follow these steps to preannotate your documents:
- Import a PDF or Image:
- Go to the Task Page and navigate to the Import Page.
- Import the PDF or image you wish to annotate.
- Automatic OCR Processing:
- The imported document will automatically pass through our OCR process.
- Once OCR is complete, a task will be generated for the document.
- Preannotate the Task:
- Use the deployed preannotation server to preannotate the task.
- Alternatively, click on the task to annotate it manually.
- Automatic NER Label Projection:
- As you annotate the text side, NER labels are automatically projected onto the image side for visual reference.
- This ensures a seamless and intuitive annotation experience.
For a visual guide, refer to the GIF below that demonstrates the pre-annotation/annotation process step-by-step:
Image with Text Annotation (Performance-Optimized)
The second project template is similar to the first but is optimized for speed and larger multi-page PDFs. It maintains the side-by-side view found in the above project without the NER labels appearing on the image. This is to improve annotation speed and reduce server resources. This will work better for high-volume document processing.
Advanced Capabilities
- Model Training: Train NER, assertion, and relation models seamlessly in both project types.
- Rule-Based & Prompt-Based Annotation: Utilize rules and prompts for efficient labeling.
- Support for Resolvers & ICD-10 Coding: Ensures compatibility with all text-based annotation features.
Improvements
Optimized Visual NER loading for Large PDF Tasks
We’ve made improvements to how JSON data is loaded when working with PDF tasks. Previously, every time you opened a new page in a PDF, the system would load JSON data for all pages, which could slow down performance, especially with larger documents.
With this update, JSON data is now loaded more efficiently:
-
Initial Load: JSON data is fetched and loaded only once when the task is first opened (i.e., when the first page is accessed).
-
Dynamic Loading: When navigating to other pages, JSON data is loaded only for the page you’re viewing, rather than loading data for the entire PDF.
This update brings significant performance improvements, especially when working with larger PDFs. For example, with a 3785-page PDF, the first page now loads about 1.2 times faster, Before, moving to the second page or jumping to the 50th page would often result in an empty screen. Now, these actions are 8 times faster, taking just under 2 seconds each.
Key Benefits:
- Faster navigation between pages.
- Reduced memory usage by loading only the required data.
- Resolved issues with empty screens when navigating large PDFs.
This update ensures a smoother and more responsive experience when working with PDF tasks, especially for larger documents.
Improved Zooming in Visual NER
We’ve made significant improvements to the zooming functionality in Visual NER to enhance usability and give you better control over how documents are displayed.
-
More Efficient Zooming Out Previously, when zooming out, both the horizontal and vertical dimensions shrank, often leaving a lot of empty white space at the top. This made it frustrating to position the page properly, requiring extra scrolling. With this update, zooming out now happens only horizontally, ensuring a better fit without unnecessary space. Now, you can get a proper view of your document without extra scrolling.
-
Better Scaling for Larger Screens On larger screens, PDFs and images used to be displayed at full width (100%), making them too large and hard to view in their entirety. With this fix, documents are now automatically zoomed out so that you can see more of the page at once, making it easier to work with your data.
New Application License Requirement for On-Prem Deployments
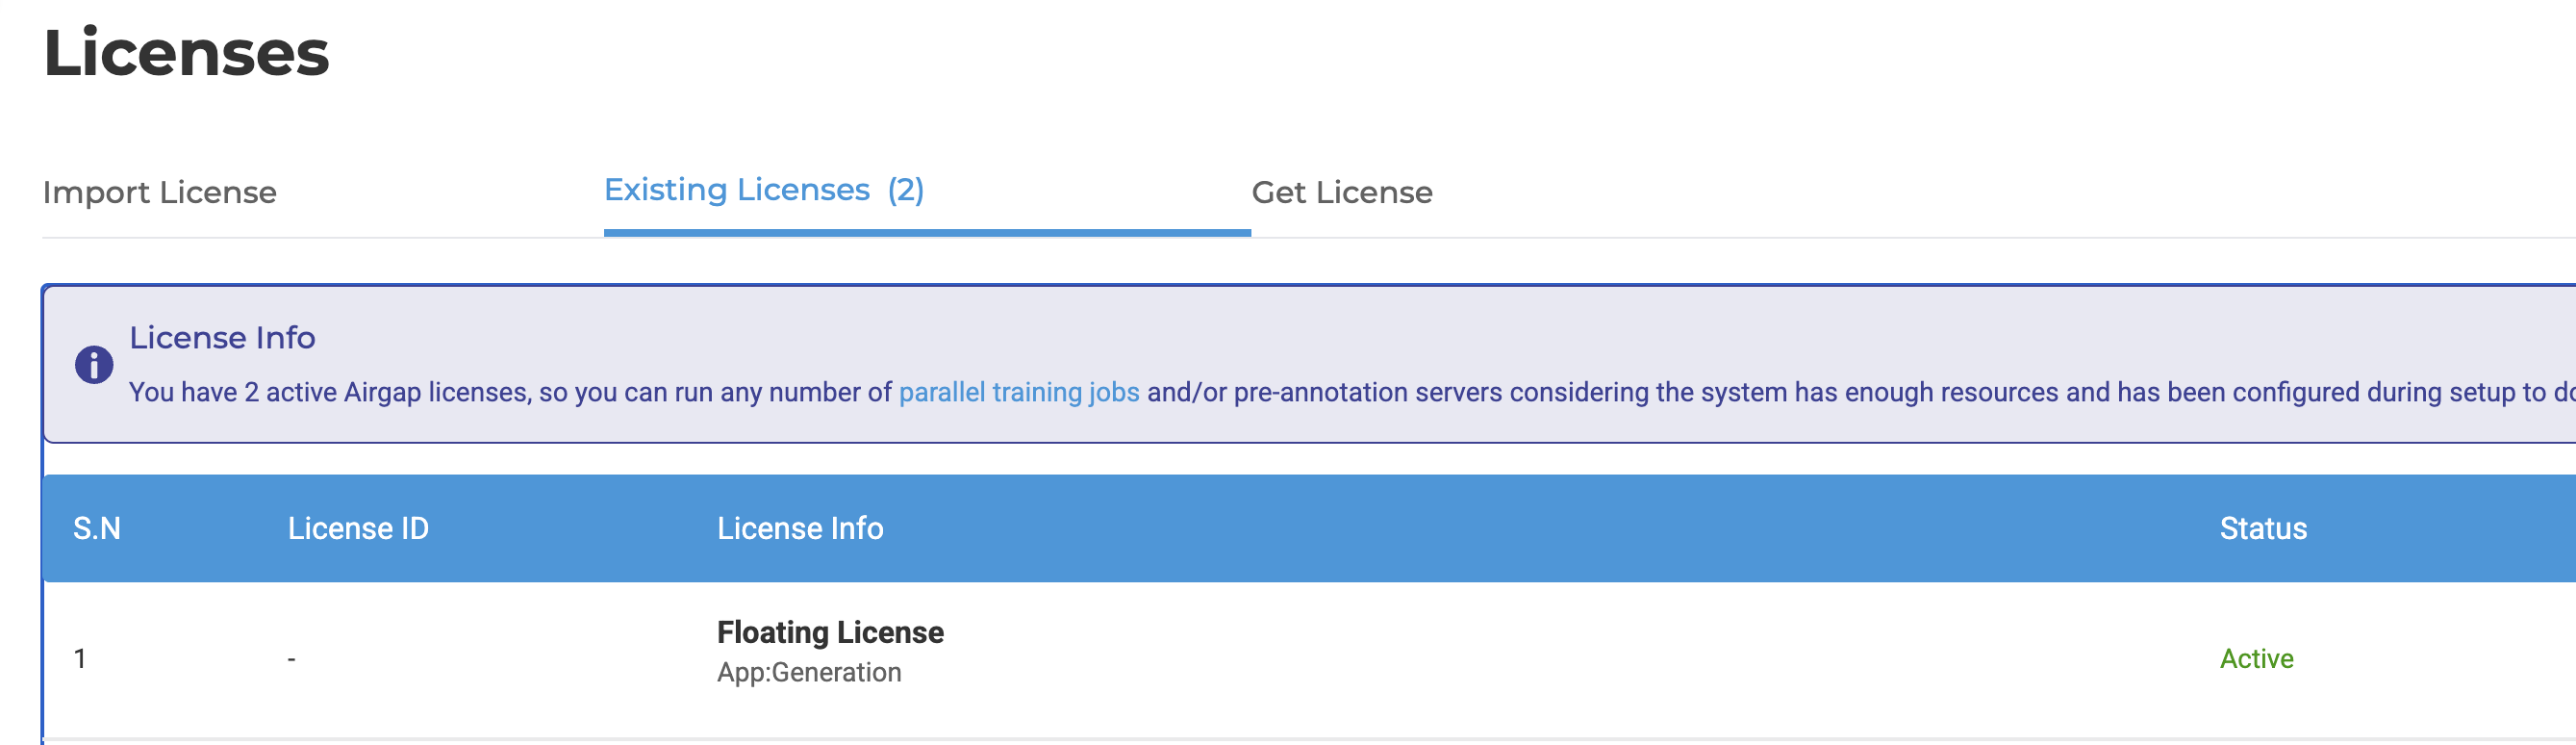
With the latest version, Generative AI Lab now requires an application license for on-premises installations. This change brings on-prem licensing in line with our cloud deployments via AWS Marketplace AMI and Azure Marketplace, where usage has been metered.
On-prem users will now need to import an application license on the same License page where other library licenses are managed. This ensures a smooth experience while maintaining flexibility across different deployment environments.
Our commitment remains to provide a powerful and efficient annotation tool while supporting ongoing innovation and improvements. We appreciate your continued support and look forward to introducing more enhancements to Generative AI Lab.
Installation in Airgapped Environments for On-Prem Deployments
With Version 6.11.0, Generative AI can now be installed in air-gapped environments, removing the need for internet access to pull images and artifacts. Previously, users required internet connectivity to access these resources, but with this update, the installation can now be performed entirely offline.
To install the Generative AI Lab in an air-gapped environment, two instances are required:
- Instance 1: With internet access and the Annotation Lab pre-installed, this instance will download the necessary artifacts and images.
- Instance 2: The air-gapped instance where the Generative AI Lab is installed.
The installation process consists of three steps:
Step 1: Compress Images and Artifacts in the Online Instance
Define the Version:
SSH into the instance with the pre-installed application and define the version
For example:
Version="6.11.0"
Gather Files on an Online System:
In the internet-enabled instance, download all the necessary images, tools, and dependencies. Bundle them into a single archive using the following commands:
   ctr -n k8s.io images export all-images.tar \
           --platform linux/amd64 \
           docker.io/library/redis:7-bullseye \
           docker.io/bitnami/postgresql:11.20.0-debian-11-r12 \
           docker.io/bitnami/kubectl:1.27.12 \
           docker.io/library/busybox:1.36.0 \
           docker.io/keycloak/keycloak:20.0.3 \
           docker.io/johnsnowlabs/annotationlab:$VERSION \
           docker.io/johnsnowlabs/annotationlab:active-learning-$VERSION \
           docker.io/johnsnowlabs/annotationlab:auth-theme-$VERSION \
           docker.io/johnsnowlabs/annotationlab:backup-$VERSION \
           docker.io/johnsnowlabs/annotationlab:dataflows-$VERSION
Fix Download Issues if Needed**:
If any images fail to export properly in the previous step, use the following commands to pull the images manually. Run the code mentioned in Step 2:
    ctr -n k8s.io images pull docker.io/library/redis:7-bullseye
    ctr -n k8s.io images pull docker.io/library/busybox:1.36.0
    ctr -n k8s.io images pull docker.io/keycloak/keycloak:20.0.3
    ctr -n k8s.io images pull docker.io/bitnami/kubectl:1.27.12
    ctr -n k8s.io images pull docker.io/bitnami/postgresql:11.20.0-debian-11-r12
    ctr -n k8s.io images pull docker.io/johnsnowlabs/annotationlab:$VERSION
    ctr -n k8s.io images pull docker.io/johnsnowlabs/annotationlab:active-learning-$VERSION
    ctr -n k8s.io images pull docker.io/johnsnowlabs/annotationlab:auth-theme-$VERSION
    ctr -n k8s.io images pull docker.io/johnsnowlabs/annotationlab:backup-$VERSION
    ctr -n k8s.io images pull docker.io/johnsnowlabs/annotationlab:dataflows-$VERSION
Step 2: Download and Install Dependencies
Download k3s Installer and Images
From the K3s releases page, search for the desired version and download the k3s and k3s-airgap-images-amd64.tar.zst files (assets). We are currently using the v1.27.4+k3s1 version.
Download and Unpack Helm Executable
Download helm. Any version should work (latest stable recommended). For example, Linux amd64 v3.17.0. After downloading, extract the archive. We will only need the helm executable from the linux-amd64 directory.
Step 3: Prepare and Proceed with Installation in the Air-Gapped Instance
Copy All the Required Files to the Air-Gapped Instance
Copy the following files that were downloaded in step 2 to the Air-Gapped instance:
k3s-airgap-images-amd64.tar.zstk3shelm
Prepare the Air-Gapped System
Place the files in their correct directories and make the binaries executable:
mkdir -p /var/lib/rancher/k3s/agent/images/
mv k3s-airgap-images-amd64.tar.zst /var/lib/rancher/k3s/agent/images/

mv k3s /usr/local/bin/
mv helm /usr/local/bin/
chmod a+x /usr/local/bin/k3s
chmod a+x /usr/local/bin/helm
Install System Components
Create an installer.sh file in the air-gapped instance and run the following installer script for K3s in offline mode:
chmod a+x install.sh
INSTALL_K3S_SKIP_DOWNLOAD=true ./install.sh
Load Images and Dependencies
Import the downloaded images into the system that were packed in Step 1, along with the tar file of the application required for installation:
all-images.tarannotationlab-$VERSION.tar.gzImport and Install Generative AI Lab
Unpack the Generative AI Lab package by importing the images using the following command:
ctr -n k8s.io images import --platform linux/amd64 all-images.tar
Once the images are unpacked, proceed to run the installer in air-gapped mode using the following commands:
tar -zxf annotationlab-$VERSION.tar.gz
cd artifacts
./annotationlab-installer.sh airgap
Airgap Environment Upgrade Steps
To upgrade the application in an air-gapped environment, most of the steps from the installation process are reused. However, we only need to follow steps 1 and 3(installing system Components can be skipped from this step), as k3s and helm will already be installed and running. Step 2 can be skipped.
The main difference during the upgrade process is the script used from the artifacts directory. Instead of the installation script, use the following command:
./annotationlab-updater.sh --airgap
De-Identification Improvements
Add demo test project for De-identification project**
With Version 6.11, we have created a Demo De-identification Project. This is designed to help users familiarize themselves with de-identification workflows without the need for manual project setup.
Now, users can click the Import button and select Import Demo Projects, which will automatically add a pre-configured de-identification project to their workspace. This feature provides a practical example, enabling users to explore how de-identification pipelines work, understand labeling structures, and experiment with different de-identification settings before working on actual datasets. Please note that the project will only be imported if a valid license is available within the application.
Simplified Export of De-identified tasks**
With Version 6.11, manually completing de-identifications before export is no longer necessary. Now, when exporting de-identified tasks, the system automatically determines what to export:
- If de-identified submitted completions are available, they are prioritized for export.
- If no submitted completions exist, the de-identified predictions generated by the model are exported instead.
Increased Consistency in the De-Identification Process Across De-identification Projects
With Version 6.11, the De-identify button now functions uniformly across all de-identification projects, whether using models or pipelines. It seamlessly pre-annotates and de-identifies predictions in a single step, ensuring a smoother and more predictable workflow.
Users can now rely on a standardized approach, reducing confusion and making the de-identification workflow more intuitive.
Bug Fixes
- Empty annotation instructions are seen when annotation instructions are removed from the customize Labels page
When instructions are removed, the empty field and its marker are also removed, ensuring a cleaner and more intuitive interface.
- Imported projects are not transferred or shared when the user is deleted
Projects are now correctly transferred when a user is removed, ensuring seamless project management. Additionally, the deleted user is automatically removed from all associated projects, maintaining a clean and organized system.
- Users aren’t able to add assertion labels by clicking on the tokens
Users can seamlessly add assertion labels by directly clicking on tokens, improving ease of use.
- Server fails to deploy successfully for Checkbox Detection and Handwriting and Signature Detection Project Type
Users can now deploy these project types/models without any issues and use them seamlessly for pre-annotation.
- Error observed in Pre-annotation server log when users try to de-identify tasks without completions or there is no pre-annotation result
Users no longer encounter errors related to missing completions.
- Error Generating Predictions in De-Identification
Generating predictions and De-identifying completions are handled as separate processes now, eliminating errors when attempting to do both at the same time.
Versions
- 8.2.1
- 8.2.0
- 8.1.3
- 8.1.2
- 8.1.1
- 8.1.0
- 8.0.1
- 8.0.0
- 7.8.2
- 7.8.1
- 7.8
- 7.7
- 7.6.0
- 7.5.1
- 7.5.0
- 7.4.0
- 7.3.1
- 7.3.0
- 7.2.2
- 7.2.1
- 7.2.0
- 7.1.0
- 7.0.1
- 7.0.0
- 6.11.3
- 6.11.2
- 6.11.1
- 6.11.0
- 6.10.1
- 6.10.0
- 6.9.1
- 6.9.0
- 6.8.1
- 6.8.0
- 6.7.2
- 6.7.0
- 6.6.0
- 6.5.1
- 6.5.0
- 6.4.1
- 6.4.0
- 6.3.2
- 6.3.0
- 6.2.1
- 6.2.0
- 6.1.2
- 6.1.1
- 6.1.0
- 6.0.2
- 6.0.0
- 5.9.3
- 5.9.2
- 5.9.1
- 5.9.0
- 5.8.1
- 5.8.0
- 5.7.1
- 5.7.0
- 5.6.2
- 5.6.1
- 5.6.0
- 5.5.3
- 5.5.2
- 5.5.1
- 5.5.0
- 5.4.1
- 5.3.2
- 5.2.3
- 5.2.2
- 5.1.1
- 5.1.0