A Project Owner or a Manager can use the completed tasks (completions) from a project to train a new Spark NLP model. The training feature can be found on the train page, accessible from the Project Menu. The training process can be triggered via a three step wizard that guides users and offers useful hints. Users can also opt for a synthesis view for initiating the training of a model. During the training, a progress bar is shown to give users basic information on the status of the training process.

Deploy a new training job
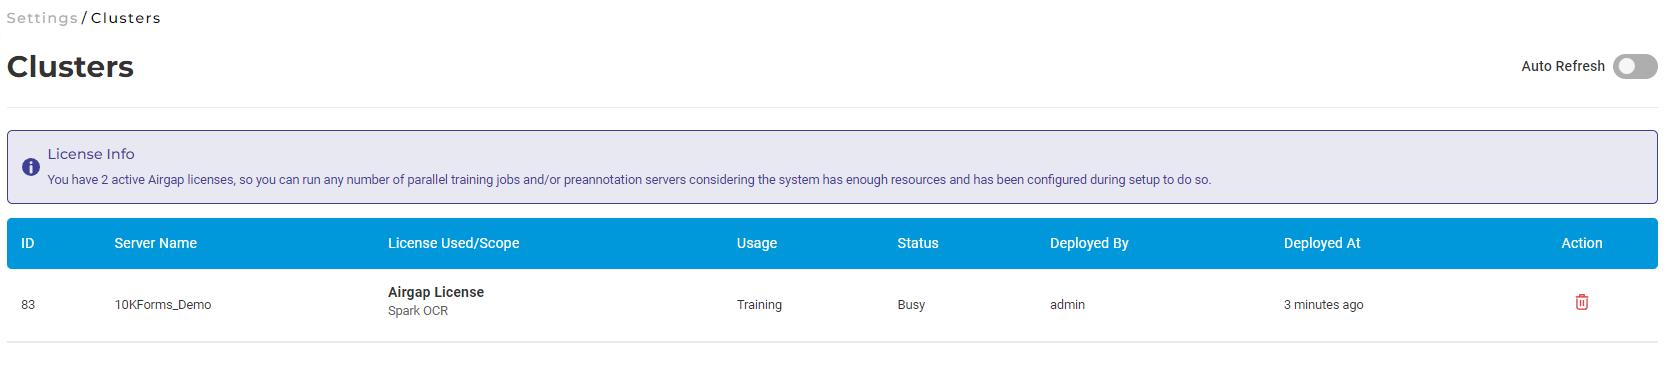
Users can perform multiple training jobs at the same time, depending on the available resources/license(s). Users can opt to create new training jobs independently from already running training/pre-annotation/OCR jobs. If resources/licenses are available when pressing the Train Model button a new training server is launched.
The running servers can be seen by visiting the Clusters page.
Named Entity Recognition
For training a good Named Entity Recognition (NER) model, a relevant number of annotations must exist for all labels included in the project configuration. The recommendation is to have minimum 40-50 examples for each entity. Once this requirement is met, for training a new model users need to navigate to the Train page for the current project and follow some very simple steps:
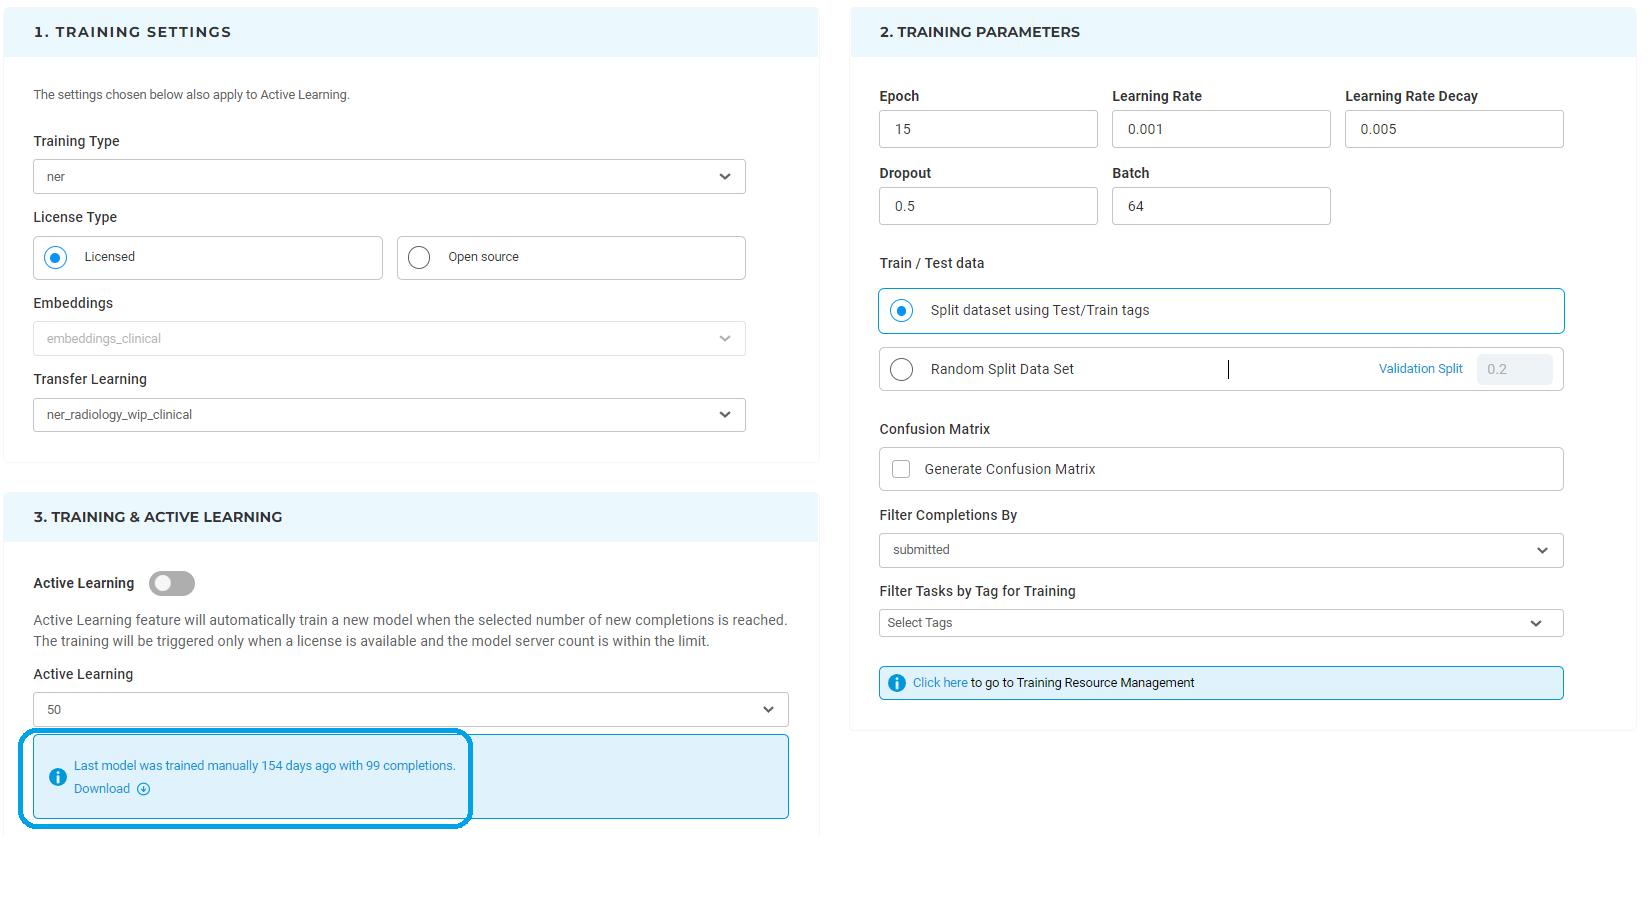
- Select the type of model to train - Open source/Healthcare/Finance/Legal - and the embeddings to use;
- Define the training parameters and the train/test data split;
- Optionally turn on the Active Learning feature;
- Click the
Train Modelbutton.
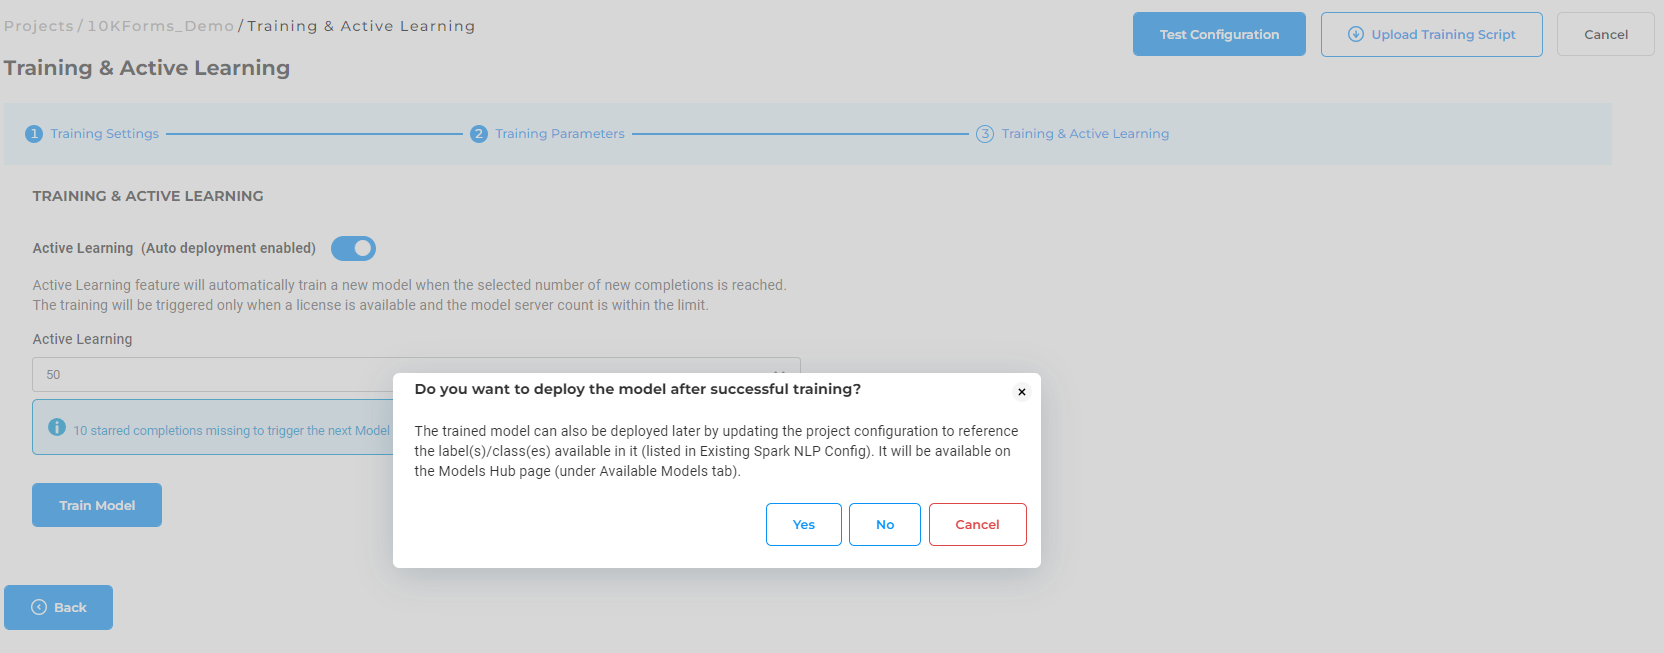
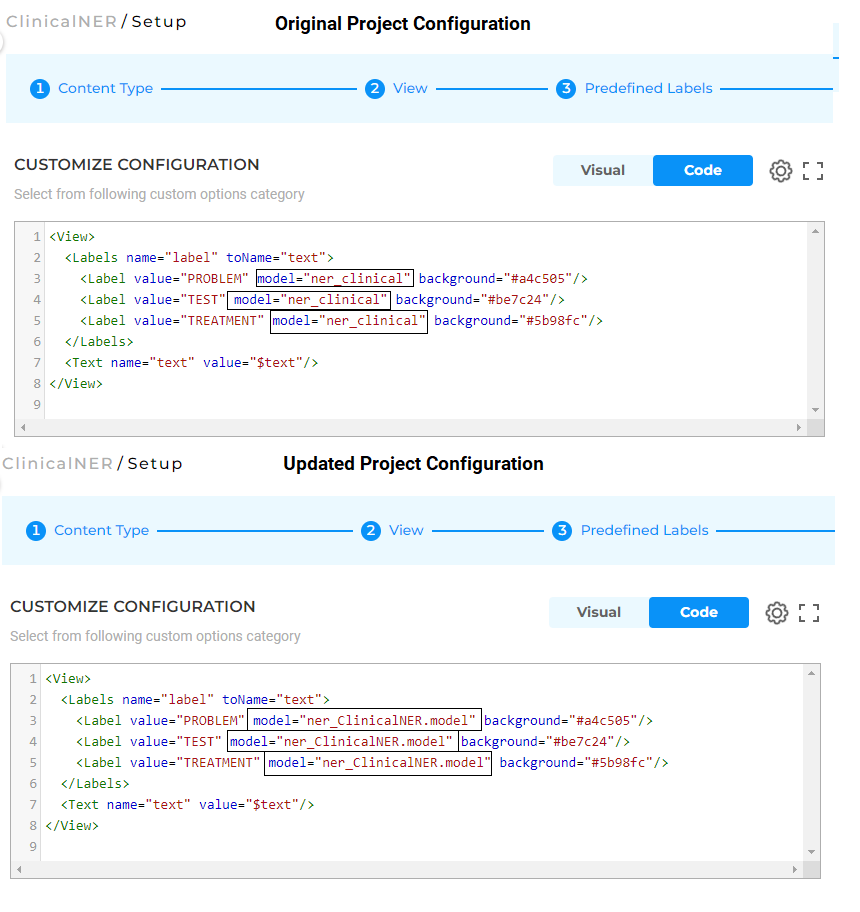
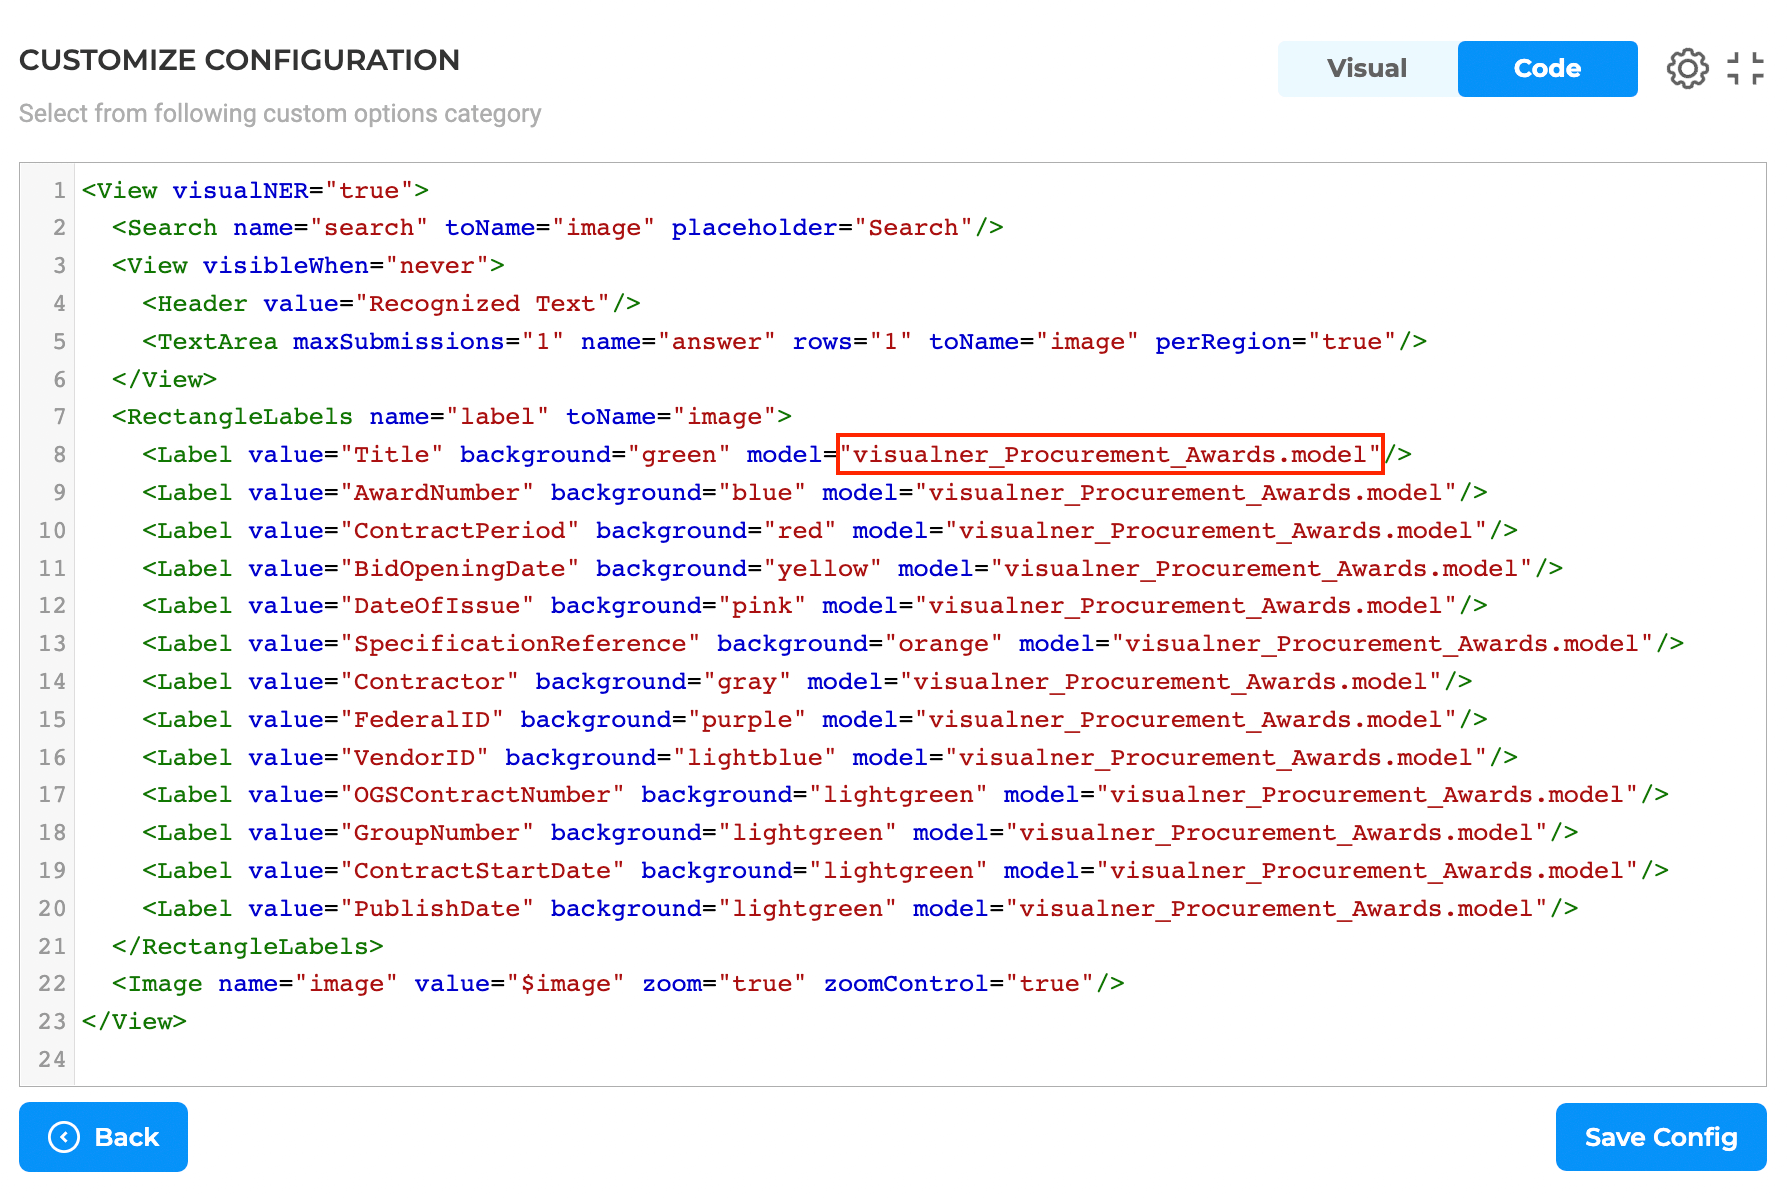
When triggering the training, users are prompted to choose either to immediately deploy models or just do training. If immediate deployment is chosen, then the Labeling config is updated according to the name of the new model. Notice how the name of the original model used for preannotations is replaced with the name of the new model in the configuration below.
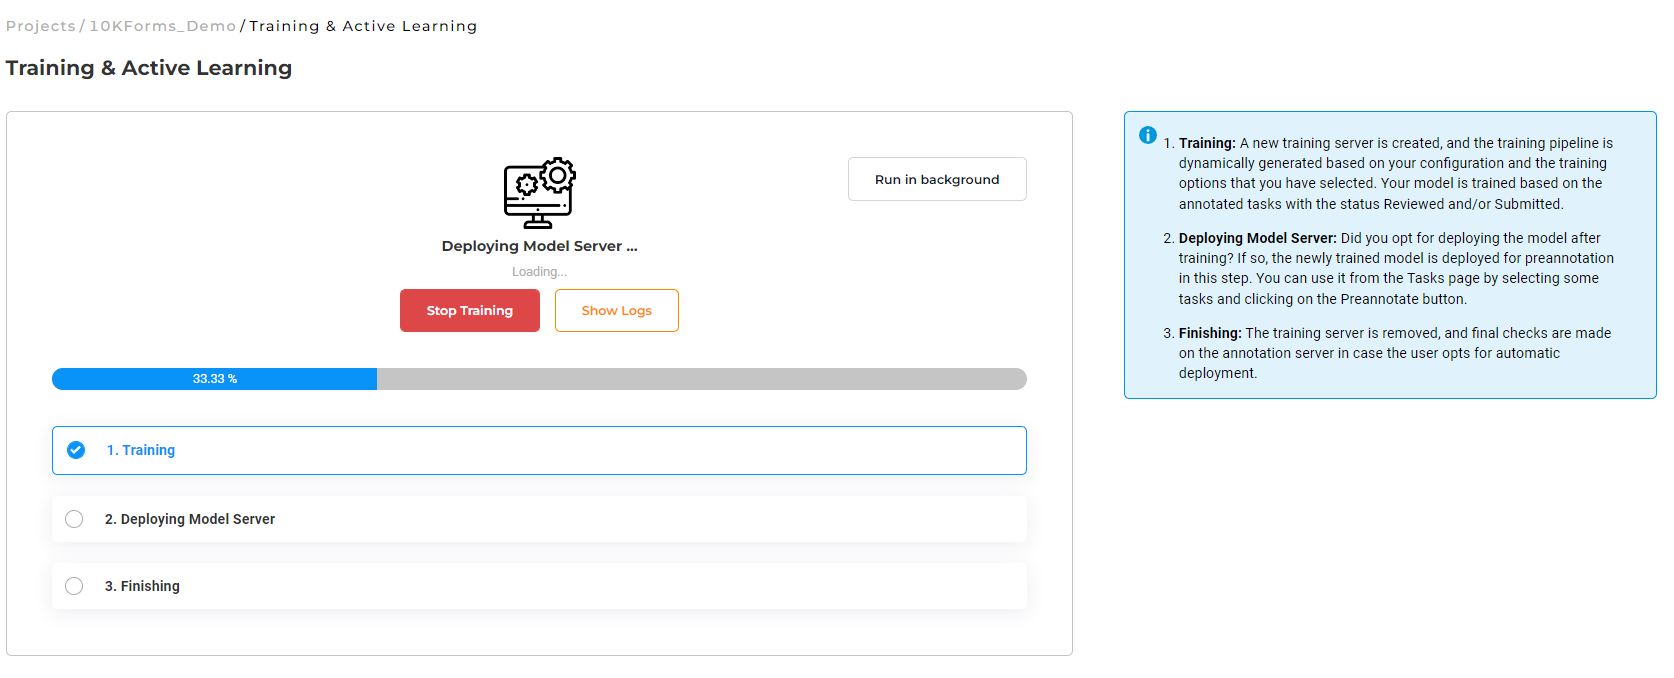
Information on the overall training progress is shown in the page. User can get indications on the success or failure of the training as well as check the live training logs (by pressing the Show Logs button).
Once the training is finished, it is possible to download the training logs by clicking on the download logs icon of the recently trained NER model which includes information like training parameters and TF graph used along with precision, recall, f1 score, etc. This information is also accessible by clicking on the benchmarking icon available on the models on the Models page.
Training History and Logs
Generative AI Lab provides a Training History feature that allows users to track all previous training activities executed for a project. By clicking the History button on the Train page, users can view a complete list of training sessions associated with the current project.
Each training record displays key details such as the training source (manual or active learning), the dataset used, the date and time of the event, and its status. For deeper analysis, users can also download training logs directly from this view to review training progress, outcomes, and any potential issues.
This feature ensures full transparency of the training process and helps teams monitor model evolution over time.

Training parameters
In Generative AI Lab, for mixed projects containing multiple types of annotations in a single project like classifications, NER, and assertion status, if multiple trainings were triggered at the same time using the same system resources and Spark NLP resources, the training component could fail because of resource limitations.
In order to improve the usability of the system, dropdown options can be used to choose which type of training to run next. The project Owner or Manager of a project can scroll down to Training Settings and choose the training type. The drop-down gives a list of possible training types for that particular project based on its actual configuration. A second drop-down lists available embeddings which can be used for training the model.
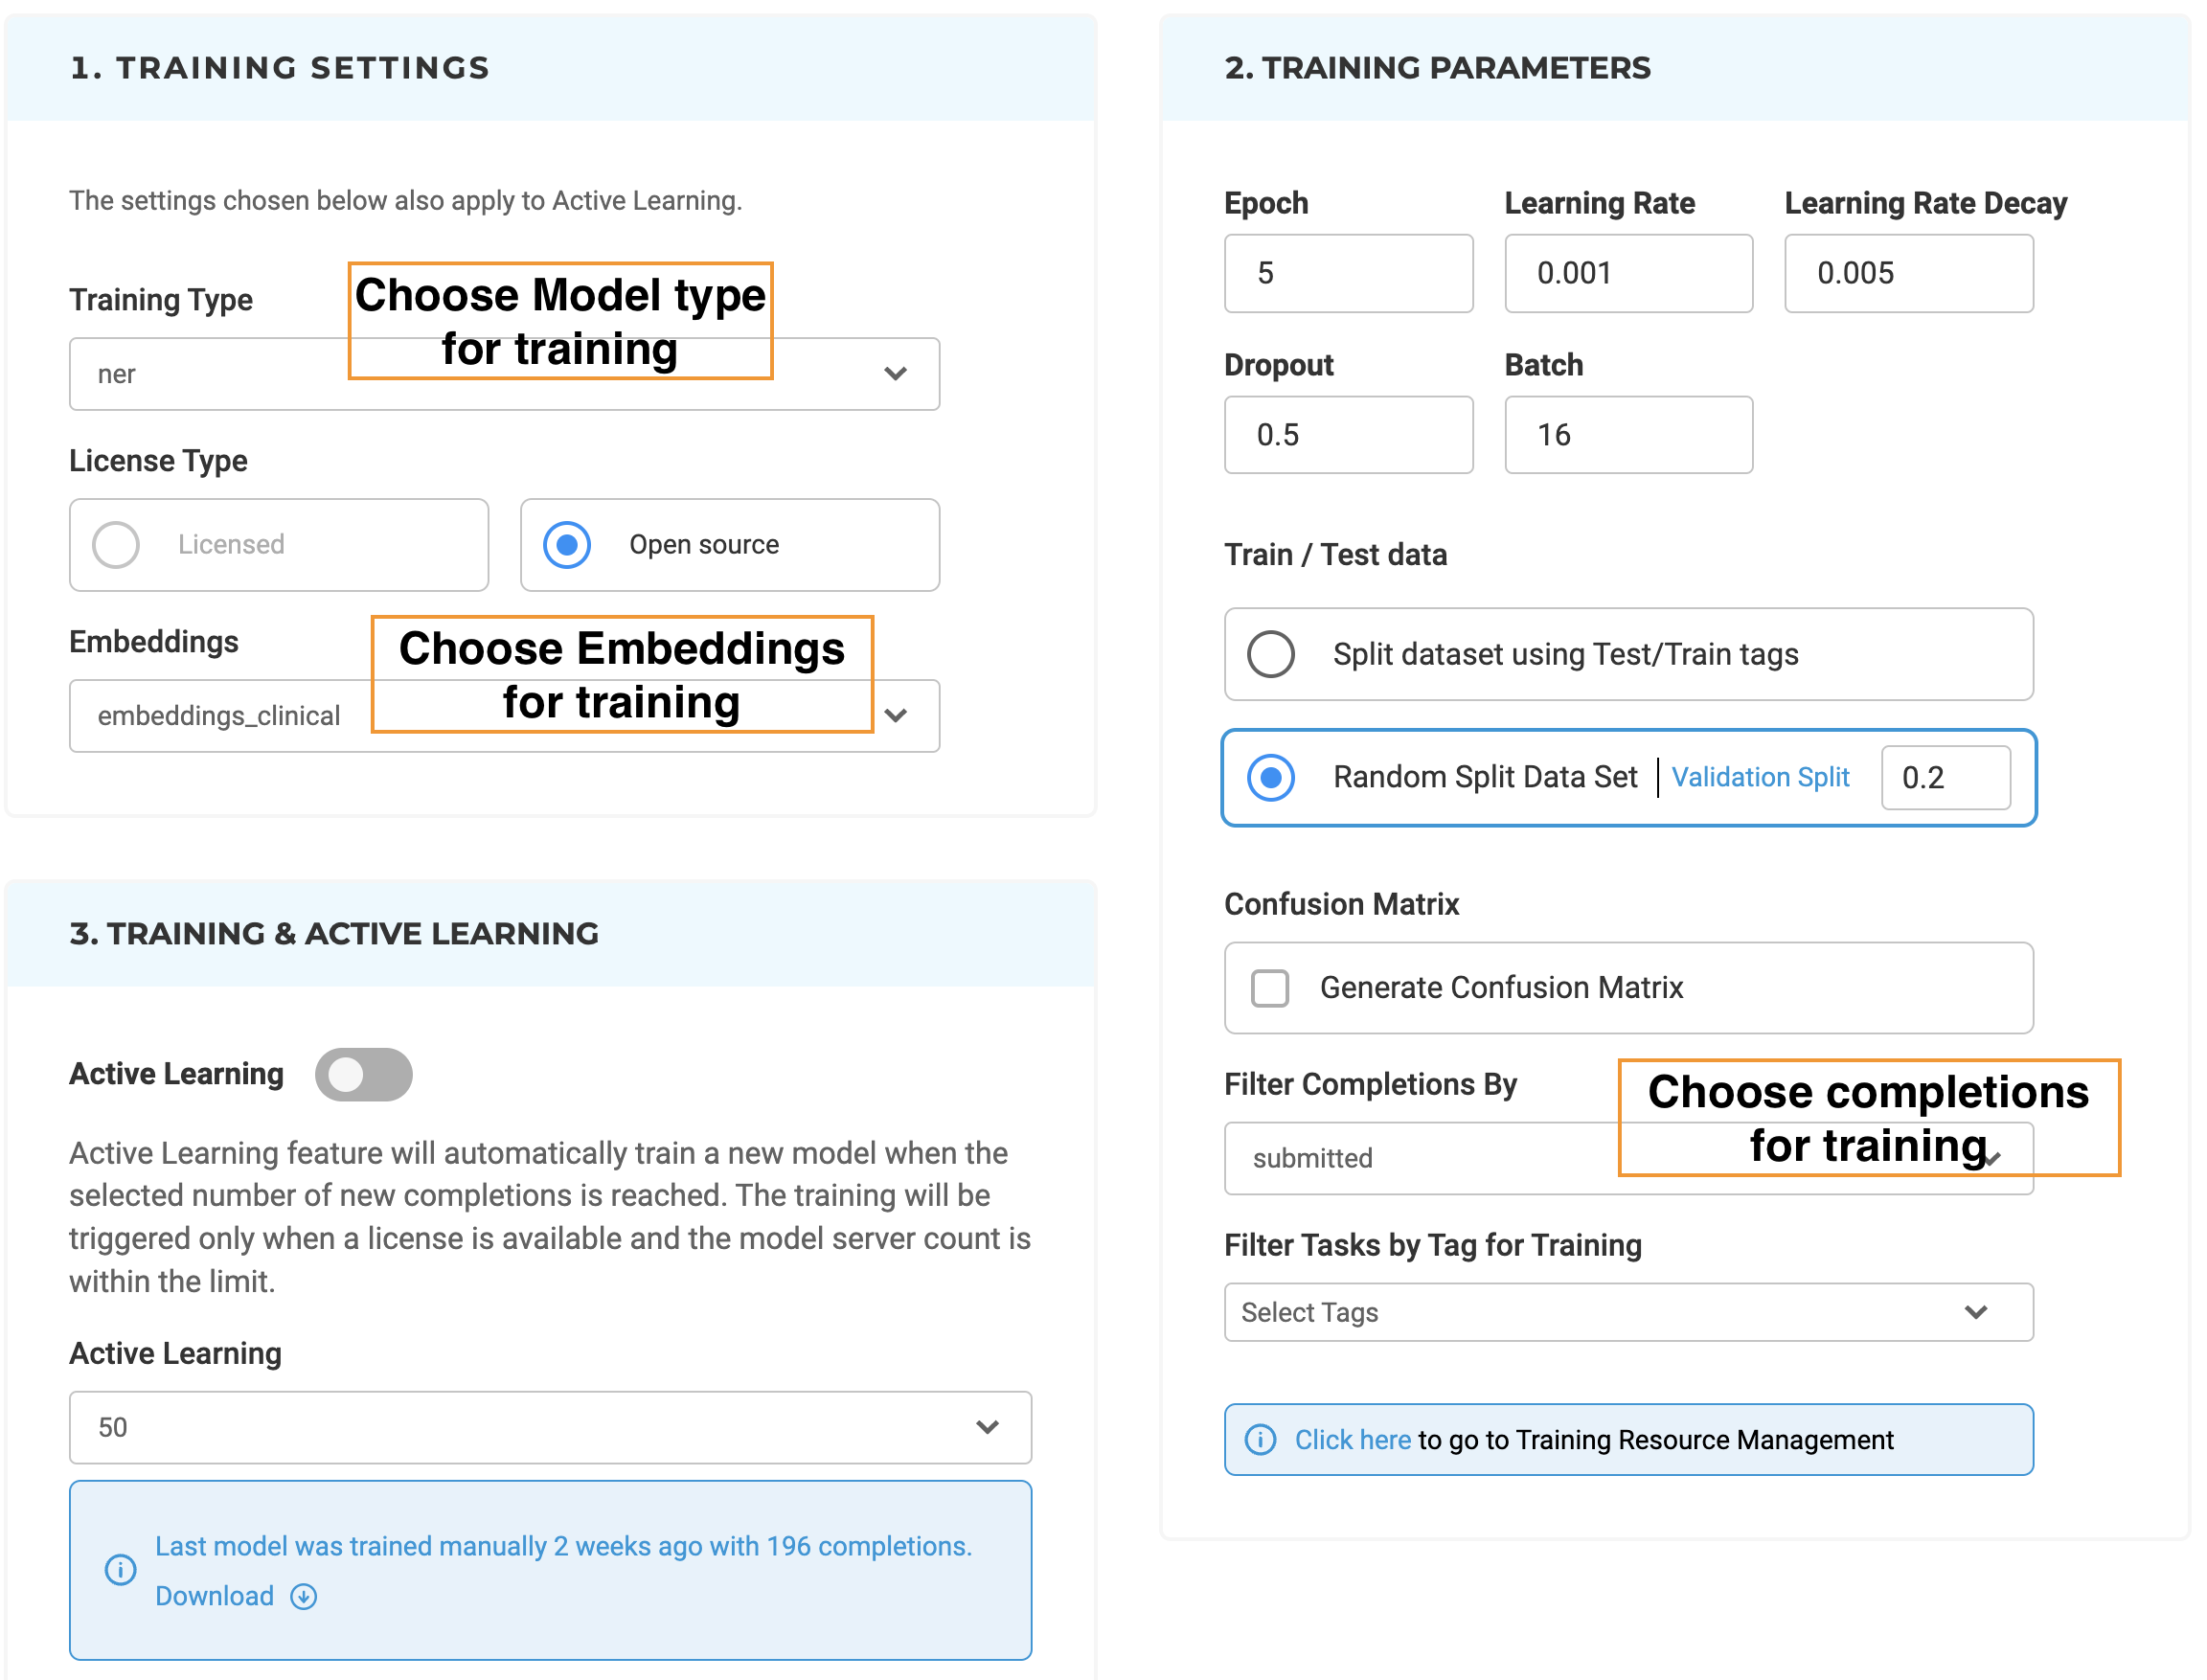
It is possible to tune the most common training parameters (Number of Epochs, Learning rate, Decay, Dropout, and Batch) by editing their values in Training Parameters.
Test/Train data for a model can be randomly selected based on the Validation Split value or can be set using Test/Train tags. The later option is very useful when conducting experiments that require testing and training data to be the same on each run.
It is also possible to train a model by using a sublist of tasks with predefined tags. This is done by specifying the targeted Tags on the Training Parameters (last option).
Generative AI Lab also includes additional filtering options for the training dataset based on the status of completions, either all submitted completions can be used for training or only the reviewed ones.
Model Versioning During Training
Generative AI Lab supports model versioning for multiple project types, including Named Entity Recognition (NER), Classification, Assertion, Relation, and Visual NER.
Within the Training Settings section of the Train page, users can enable model versioning by toggling the Enable Versioning option. When activated, each new training run creates a distinct version of the model, allowing teams to track model evolution, compare performance, and safely revert to earlier versions if needed.
By default, model versioning is turned off, giving users flexibility to decide when version tracking is required for their workflow.
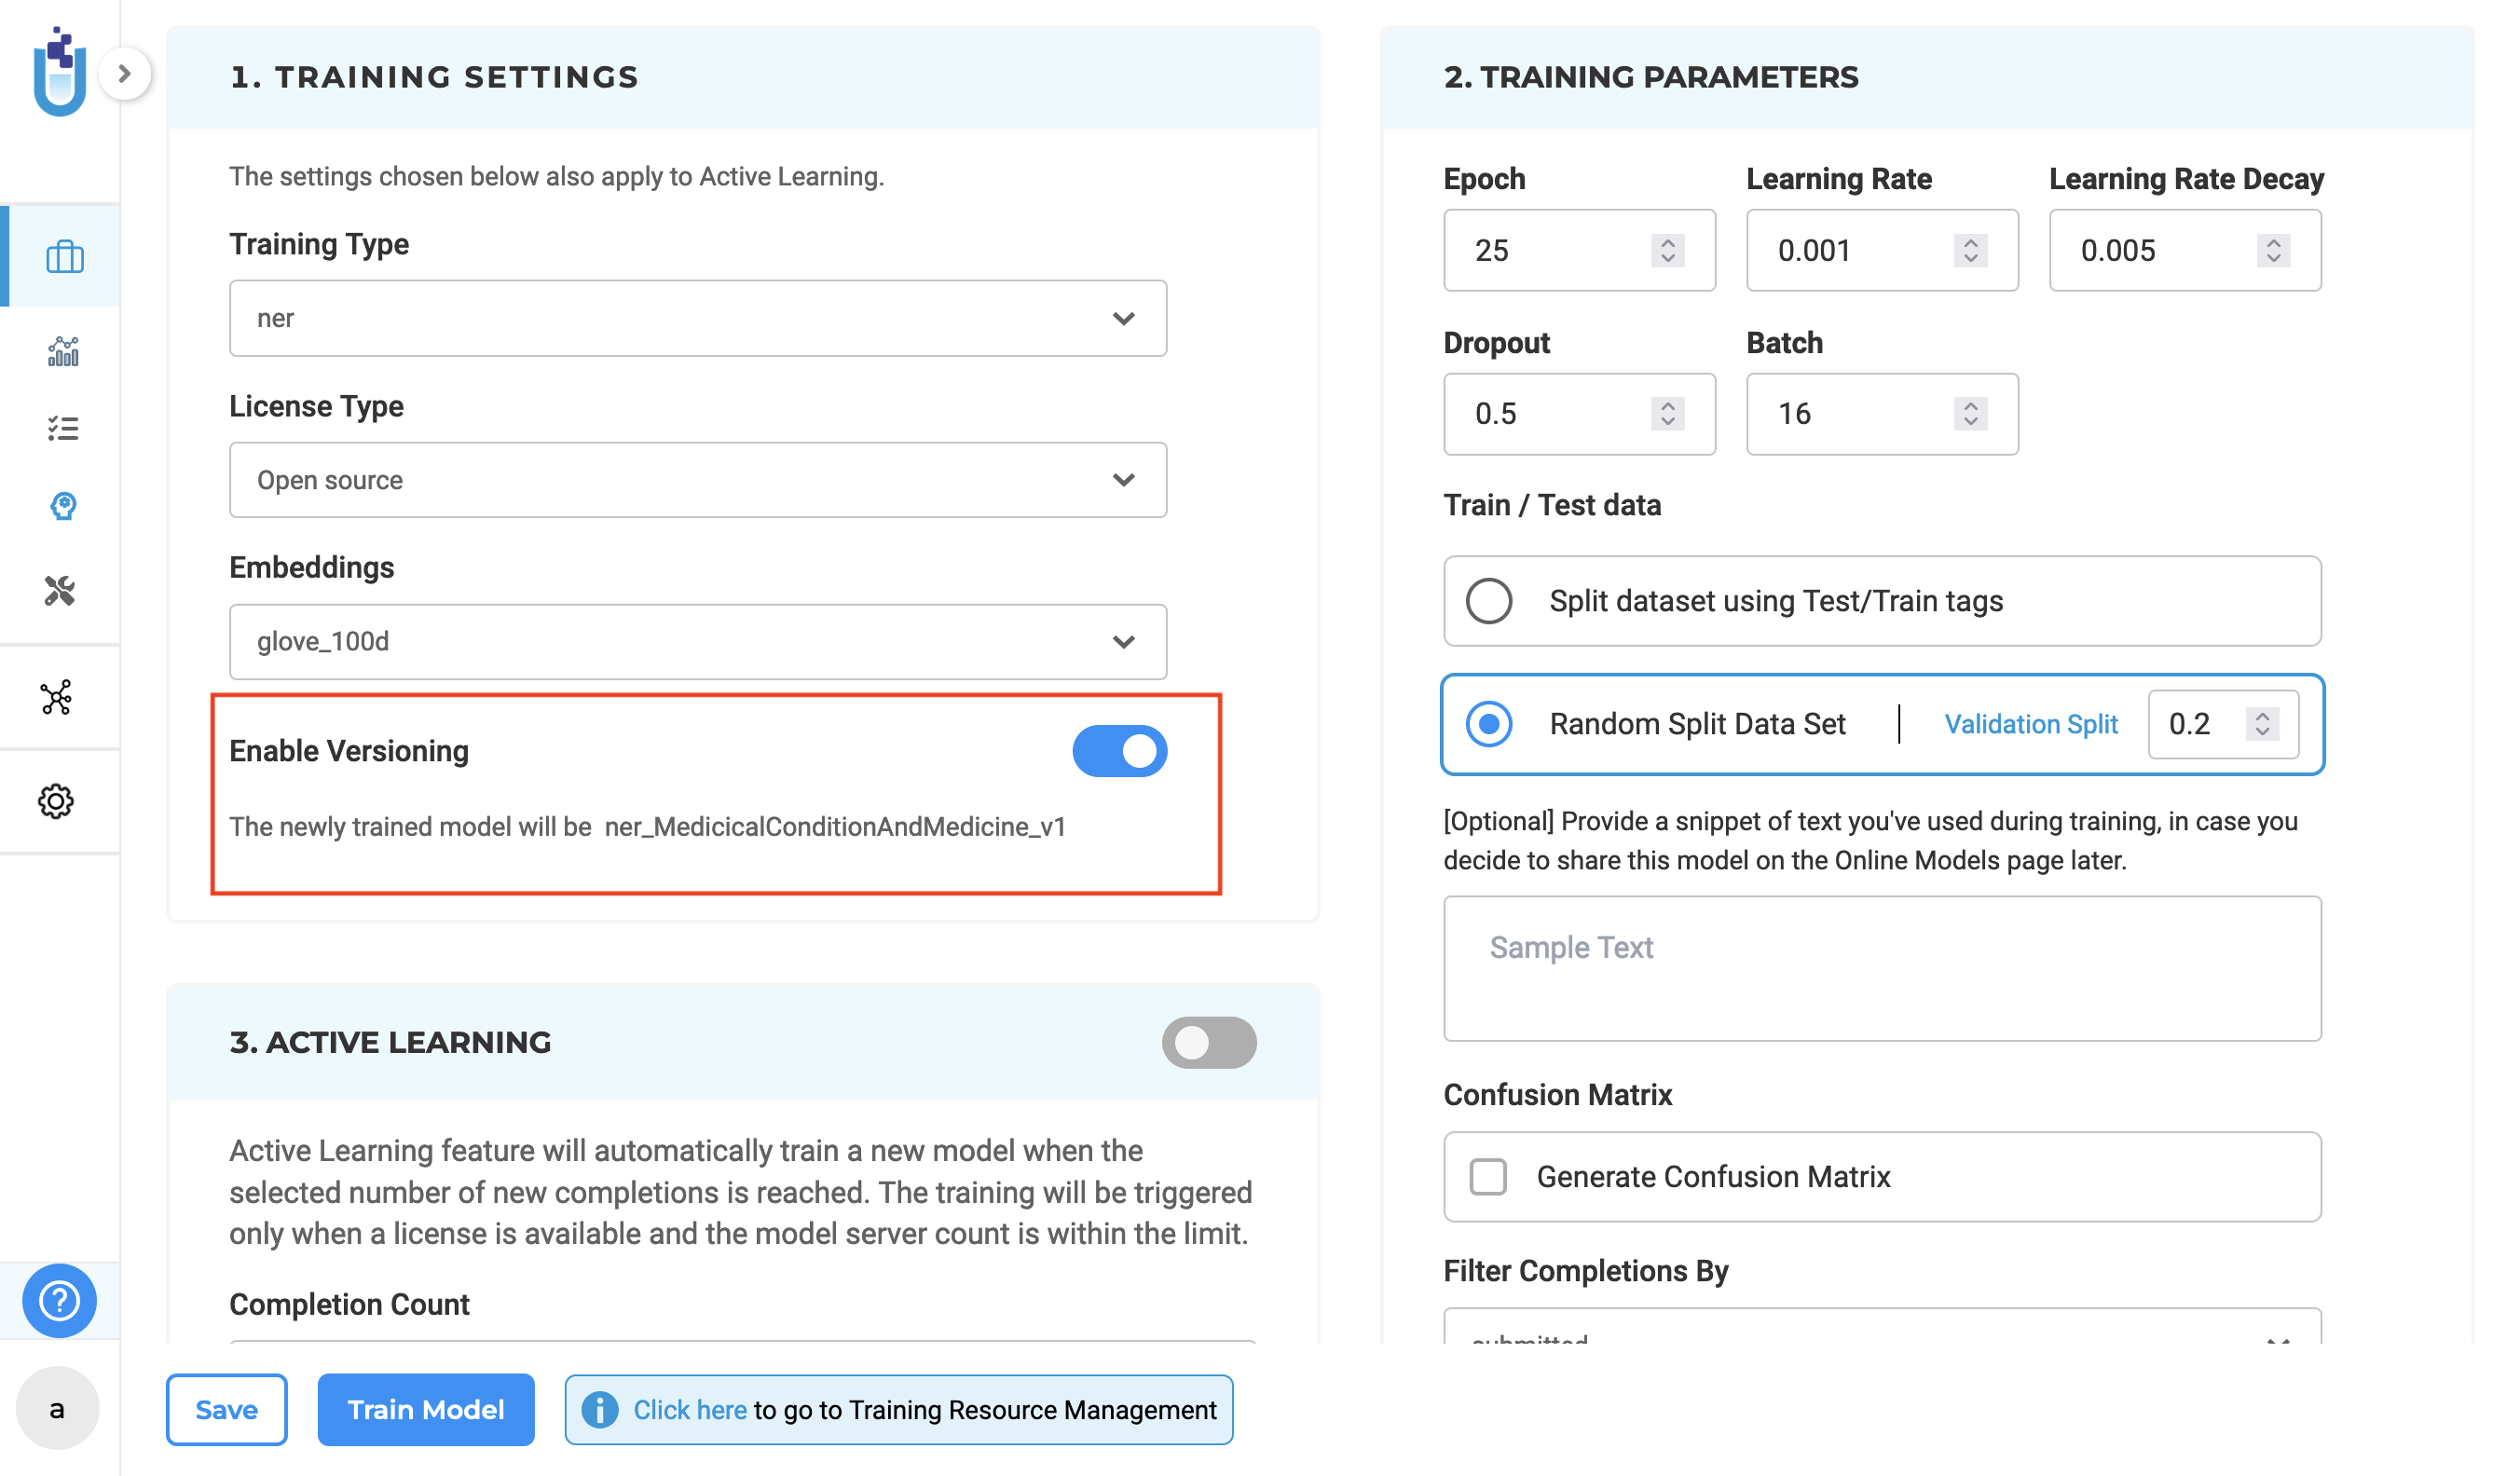
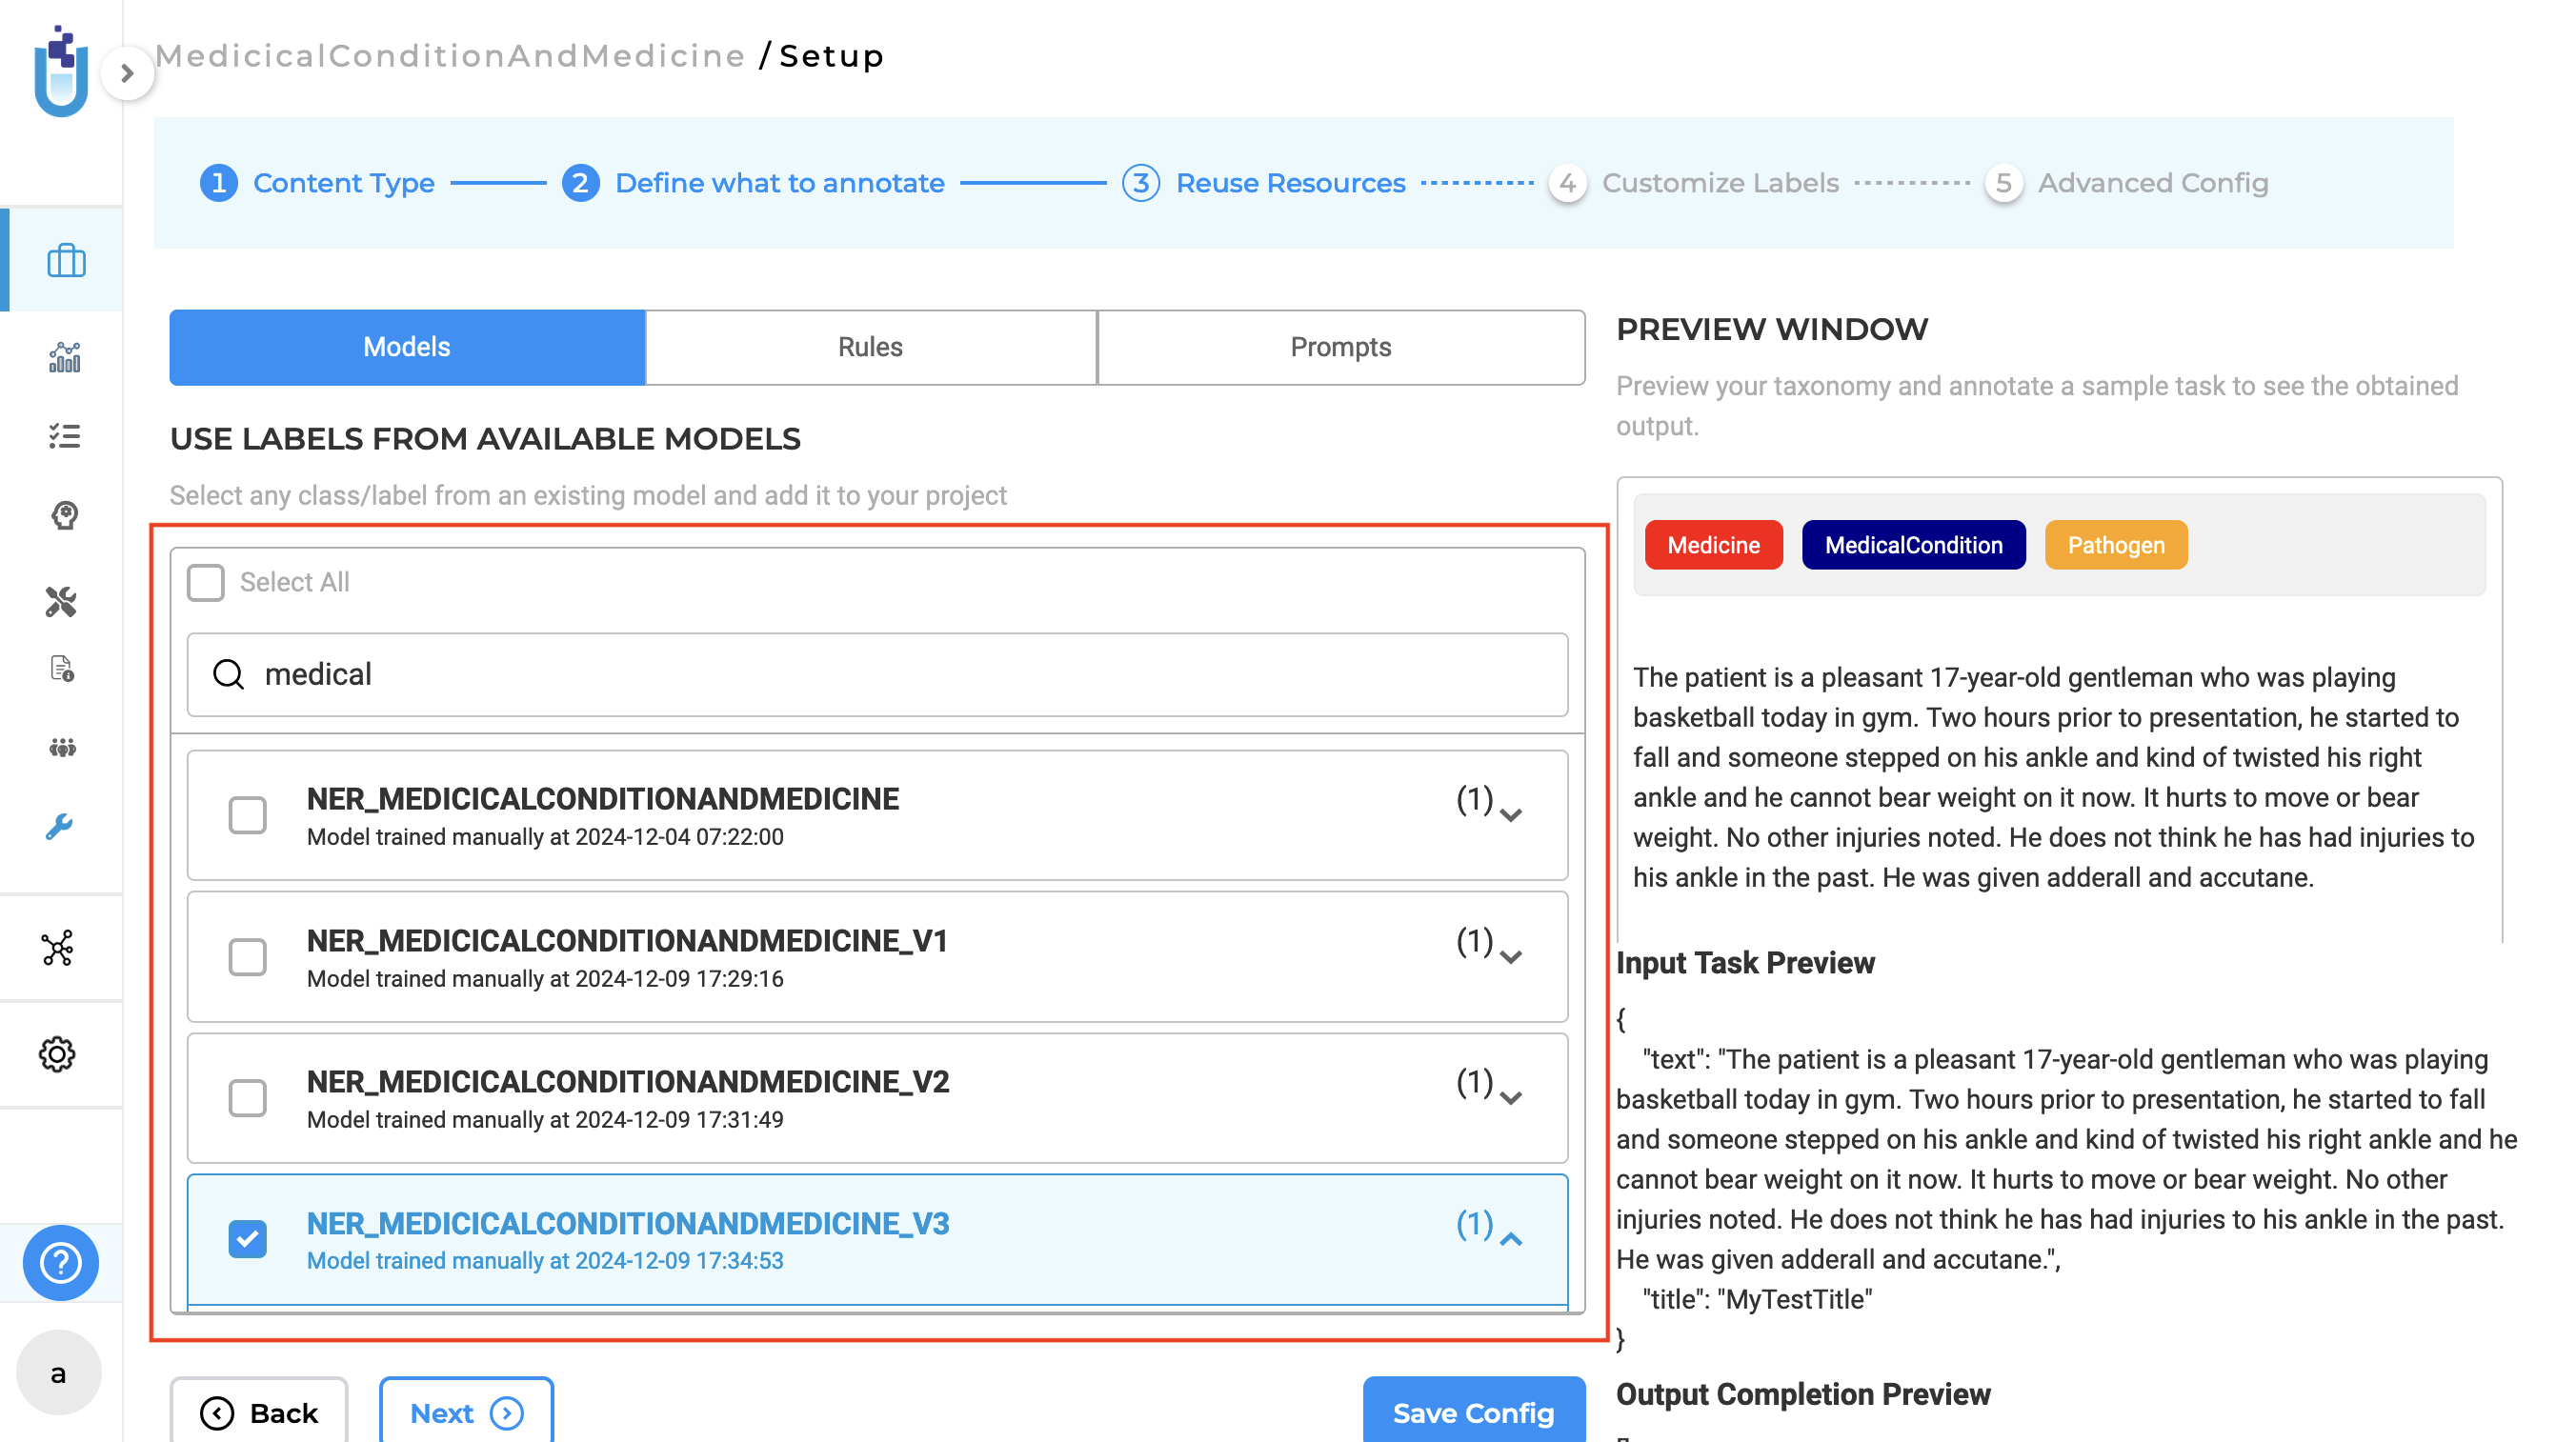
When enabled, models are saved with versioned names following the format projecttype_projectname_v1, projecttype_projectname_v2, and so on. If model deployment is enabled after training is complete, the most recently trained model is automatically applied to the project configuration. If model deployment after training is not enabled, the project configuration remains unchanged. All versions of trained models are accessible on the Reuse Resource page, allowing users to browse and select specific model versions for reuse in other projects.
Model versioning is also supported for previously created projects. If versioning is disabled, subsequent training overwrites the most recent model without creating a new version. When re-enabled, versioning resumes from the latest version rather than starting over from v1. This feature simplifies model management by enabling version tracking and reusability, offering seamless integration for new and existing projects.
Note: The Enable Versioning toggle is disabled during training.
Dataset Sampling for Efficient Model Training
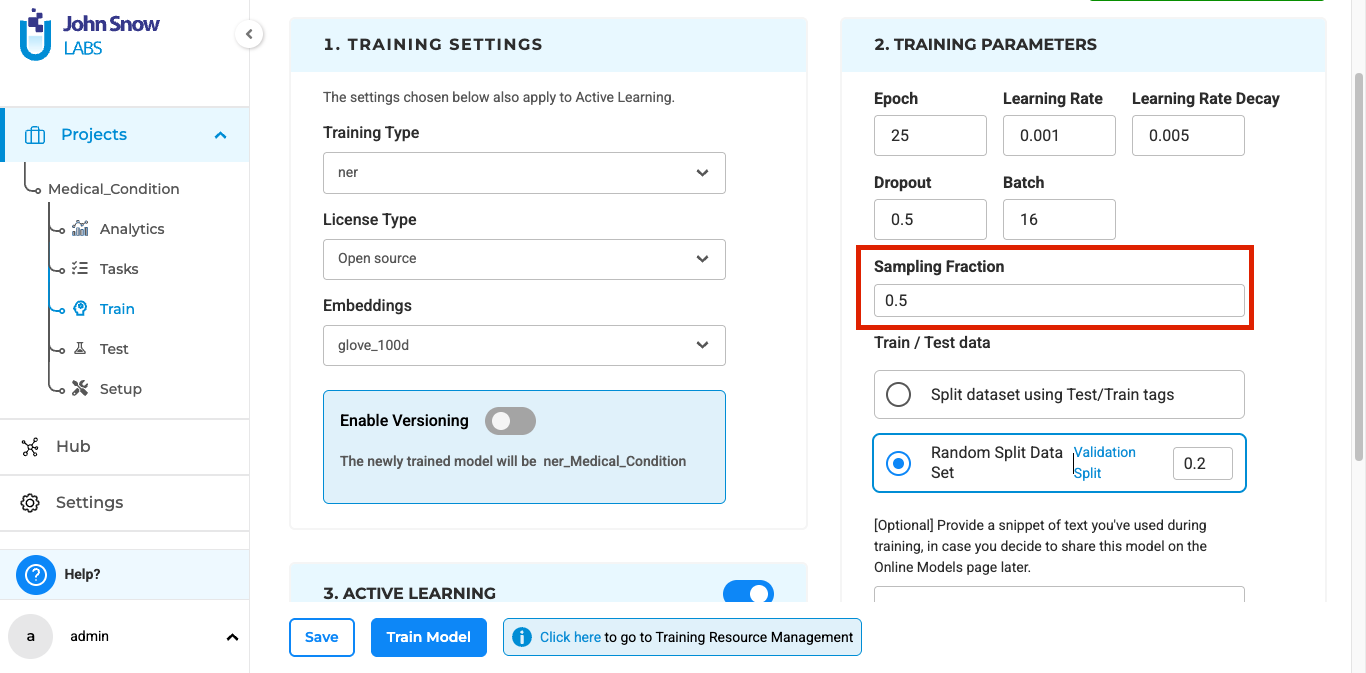
To enhance the training process for NER (Named Entity Recognition) projects this version introduces data sampling. In the past, training models on extensive datasets could lead to lengthy training periods or even failures due to the limitations of the existing infrastructure. This update introduces a new feature that allows users to specify a sampling fraction in the training configuration page, enabling controlled dataset selection. A new parameter has been added to the Training page called Sampling Fraction, where users can specify the portion of the dataset they wish to use for training. The system automatically applies this setting, using only the specified fraction of the dataset for training, thereby optimizing the training process and improving overall efficiency.
For example, if there are 500 tasks in total and the user sets the sampling fraction to 0.5, the system will randomly select 250 tasks (50% of the dataset) for training instead of using the entire dataset.
This enhancement eliminates the need for manual dataset selection, as training can now be initiated based on a randomized subset, optimizing efficiency and resource utilization.
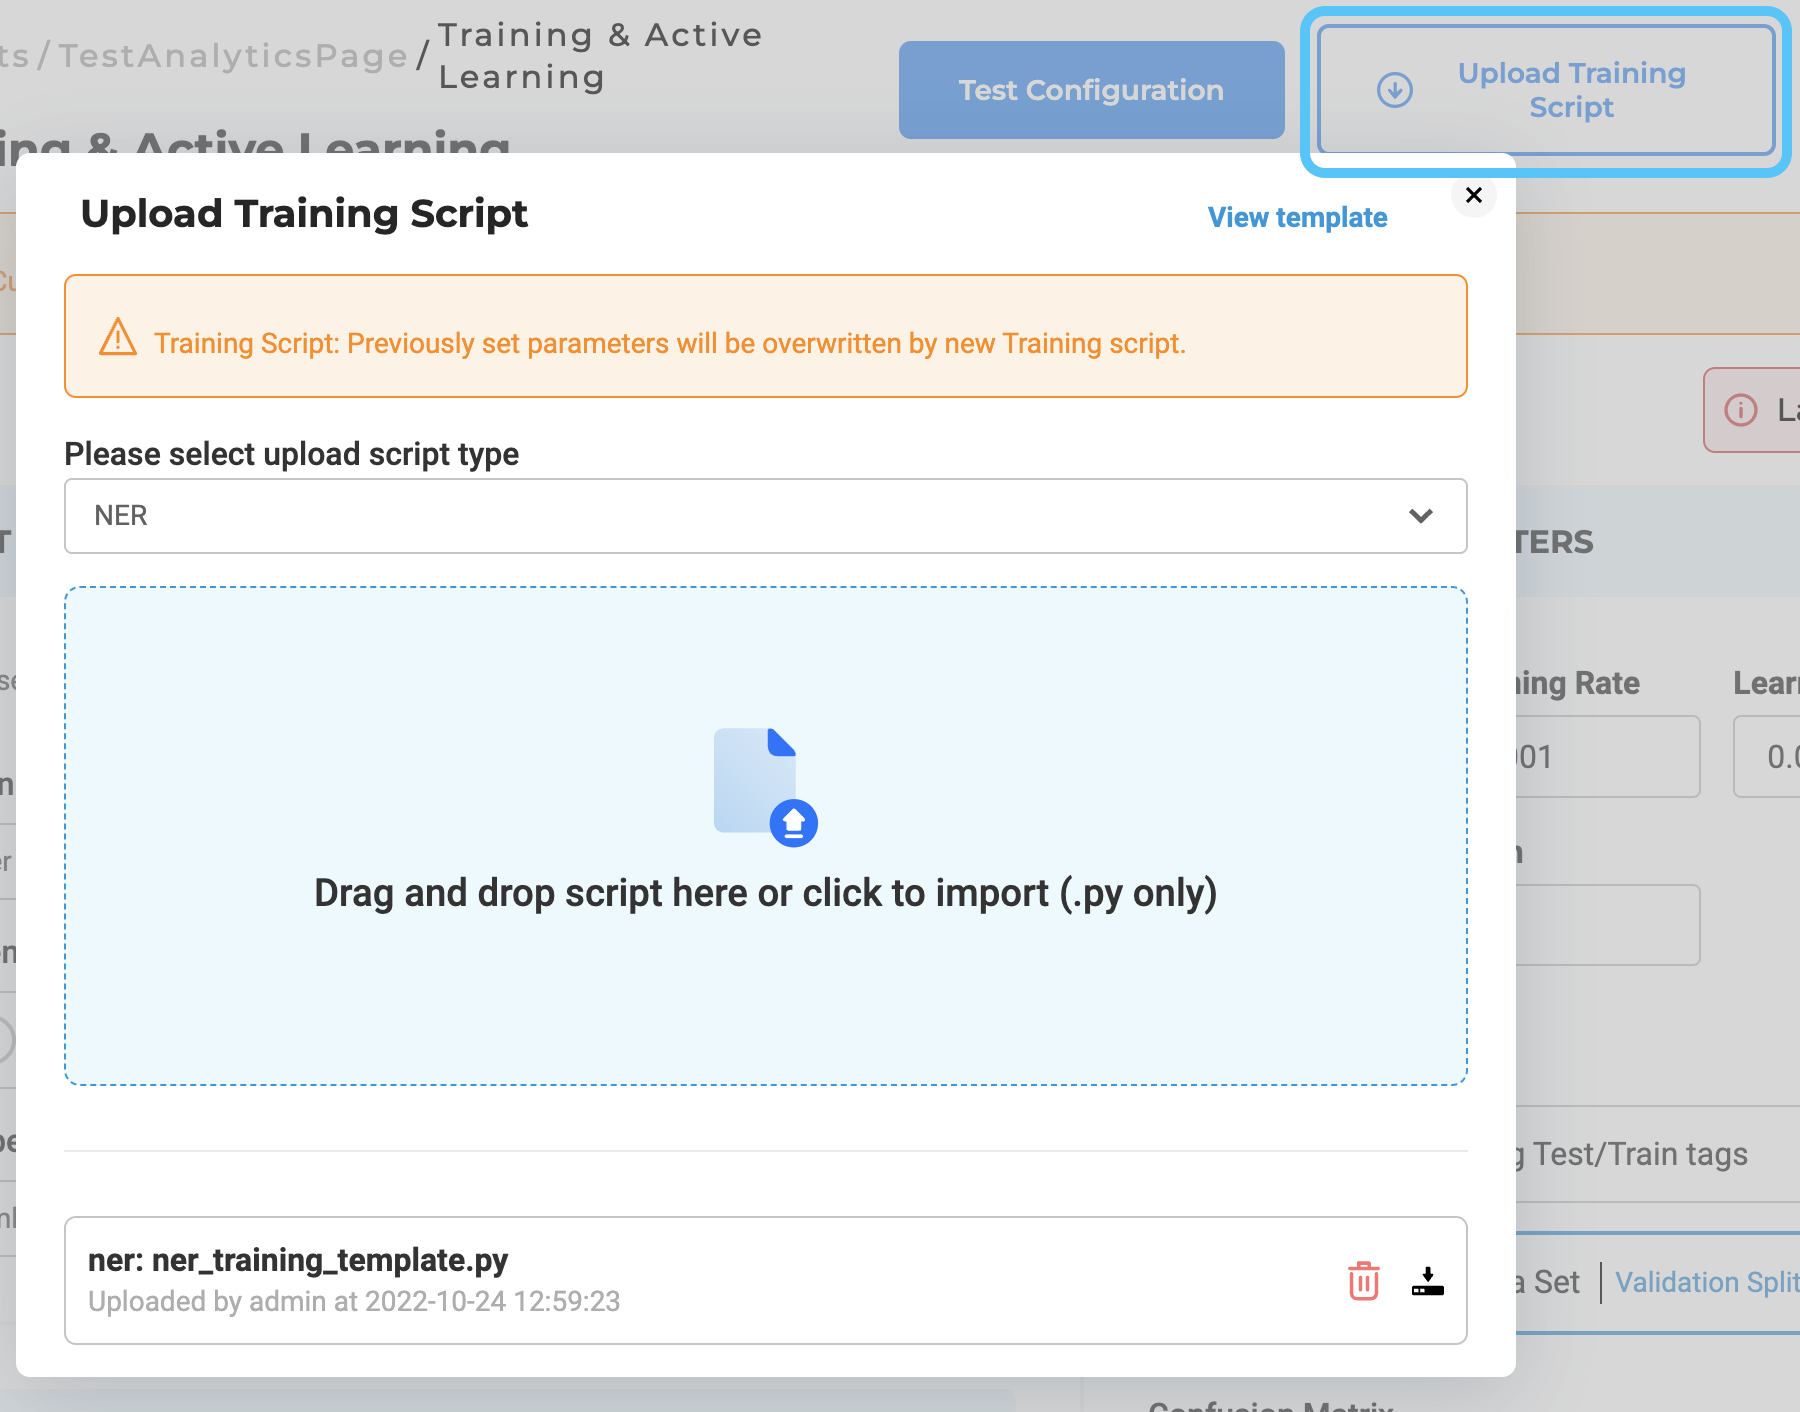
Custom Training Script
If users want to change the default Training script present within the Generative AI Lab, they can upload their own training pipeline. In the Train Page, project owners can upload the training scripts. At the moment we are supporting custom training script just for NER projects.
Selection of Completions
During the annotation project lifetime, normally not all tasks/completions are ready to be used as a training dataset. This is why the training process selects completions based on their status:
- Filter tasks by tags (if defined in Training Parameters widget, otherwise all tasks are considered)
- For completed tasks, completions to be taken into account are also selected based on the following criteria:
- If a task has a completion accepted by a reviewer this is selected for training and all others are ignored;
- Completions rejected by a Reviewer are not used for training;
- If no reviewer is assigned to a task that has multiple submitted completions the completion to use for training purpose is the one created by the user with the highest priority.
Assertion Status
NER configurations for the healthcare domain are often mixed with Assertion Status labels. In this case, Generative AI Lab offers support for training both types of models in one go. After the training is complete, the models will be listed in the Pretrained Labels section of the Project Configuration. Information such as the source of the model and time of training will be displayed as well.
Once the model(s) has been trained, the project configuration will be automatically updated to reference the new model for prediction. Notice below, for the Assertion Status Label tag the addition of model attribute to indicate which model will be used for task pre-annotation for this label.
    <Label value="Absent" assertion="true" model="assertion_jsl_annotation_manual.model"/>
    <Label value="Past" assertion="true" model="assertion_jsl_annotation_manual.model"/>
It is not possible to mark a label as an Assertion Status label and use a NER model to predict it. A validation error is shown in the Interface Preview in case an invalid Assertion model is used.

The Generative AI Lab only allows the use of one single Assertion Status model in the same project.

Classification
Generative AI Lab supports two types of classification training: Single Choice Classification and Multi-Choice Classification. For doing so, it uses three important attributes of the Choices tag to drive the Classification Models training and pre-annotation. Those are name, choice and train.
Attribute name
The attribute name allows the naming of the different choices present in the project configuration, and thus the training of separate models based on the same project annotations. For example, in the sample configuration illustrated below, the name=”age” attribute, tells the system to only consider age-related classification information when training an Age Classifier. The value specified by the name attribute is also used to name the resulting Classification model (classification_age_annotation_manual).
Attribute choice
The choice attribute specifies the type of model that will be trained: multiple or single. For example, in the Labeling Config below, Age and Gender are Single Choice Classification categories while the Smoking Status is Multi-Choice Classification. Depending upon the value of this attribute, the respective model will be trained as a Single Choice Classifier or Multi-Choice Classifier.
<View>
  <View style="overflow: auto;">
    <Text name="text" value="$text"/>
  </View>
  <Header value="Smoking Status"/>
  <Choices name="smokingstatus" toName="text" choice="multiple" showInLine="true">
    <Choice value="Smoker"/>
    <Choice value="Past Smoker"/>
    <Choice value="Nonsmoker"/>
  </Choices>
  <Header value="Age"/>
  <Choices name="age" toName="text" choice="single" showInLine="true">
    <Choice value="Child (less than 18y)" hotkey="c"/>
    <Choice value="Adult (19-50y)" hotkey="a"/>
    <Choice value="Aged (50+y)" hotkey="o"/>
  </Choices>
  <Header value="Gender"/>
  <Choices name="gender" toName="text" choice="single" showInLine="true">
    <Choice value="Female" hotkey="f"/>
    <Choice value="Male" hotkey="m"/>
  </Choices>
</View>
Attribute train
Generative AI Lab restricts the training of two or more Classification Models at the same time. If there are multiple Classification categories in a project (like the one above), only the category whose name comes first in alphabetical order will be trained by default. In the above example, based on the value of the name attribute, we conclude that the Age classifier model is trained. The model to be trained can also be specified by setting the train=”true” attribute for the targeted Choices tag (like the one defined in Gender category below).
<View>
  <View style="overflow: auto;">
    <Text name="text" value="$text"/>
  </View>
  <Header value="Smoking Status"/>
  <Choices name="smokingstatus" toName="text" choice="multiple" showInLine="true">
    ...
  </Choices>
  <Header value="Age"/>
  <Choices name="age" toName="text" choice="single" showInLine="true">
    ...
  </Choices>
  <Header value="Gender"/>
  <Choices name="gender" train="true" toName="text" choice="single" showInLine="true">
   ...
  </Choices>
</View>
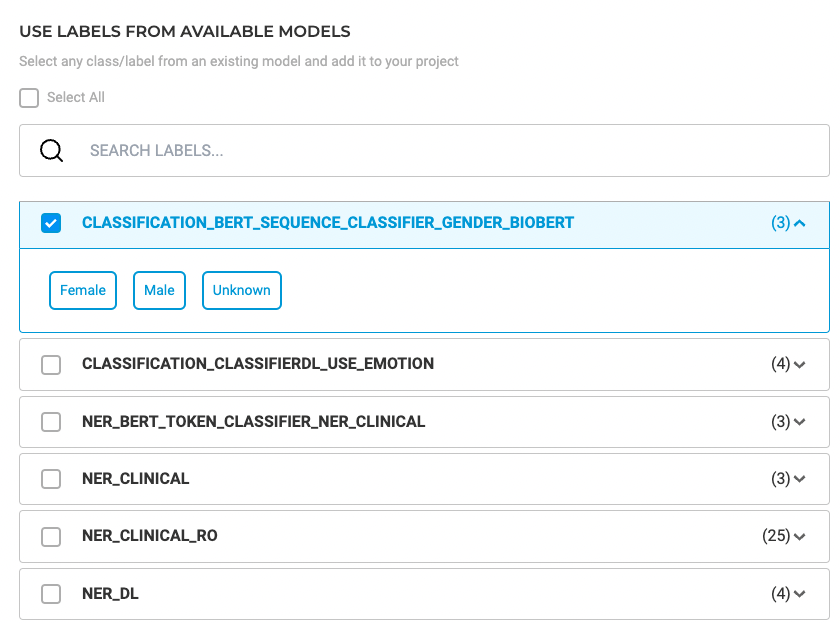
The trained classification models are available to reuse in any project and can be added on step 3 of the Project Configuration wizard.
The classification models trained using Generative AI Lab also have attached benchmarking information. The training logs include the confusion matrix, helpful in understanding the performance of the model and in checking if the model is underfitting or overfitting. The confusion matrix is also available on the models tiles on the Models page, and is accessible by clicking on the benchmarking icon.

Visual NER Training
Generative AI Lab offers the ability to train Visual NER models, apply active learning for automatic model training, and preannotate image-based tasks with existing models in order to accelerate annotation work.
Model Training
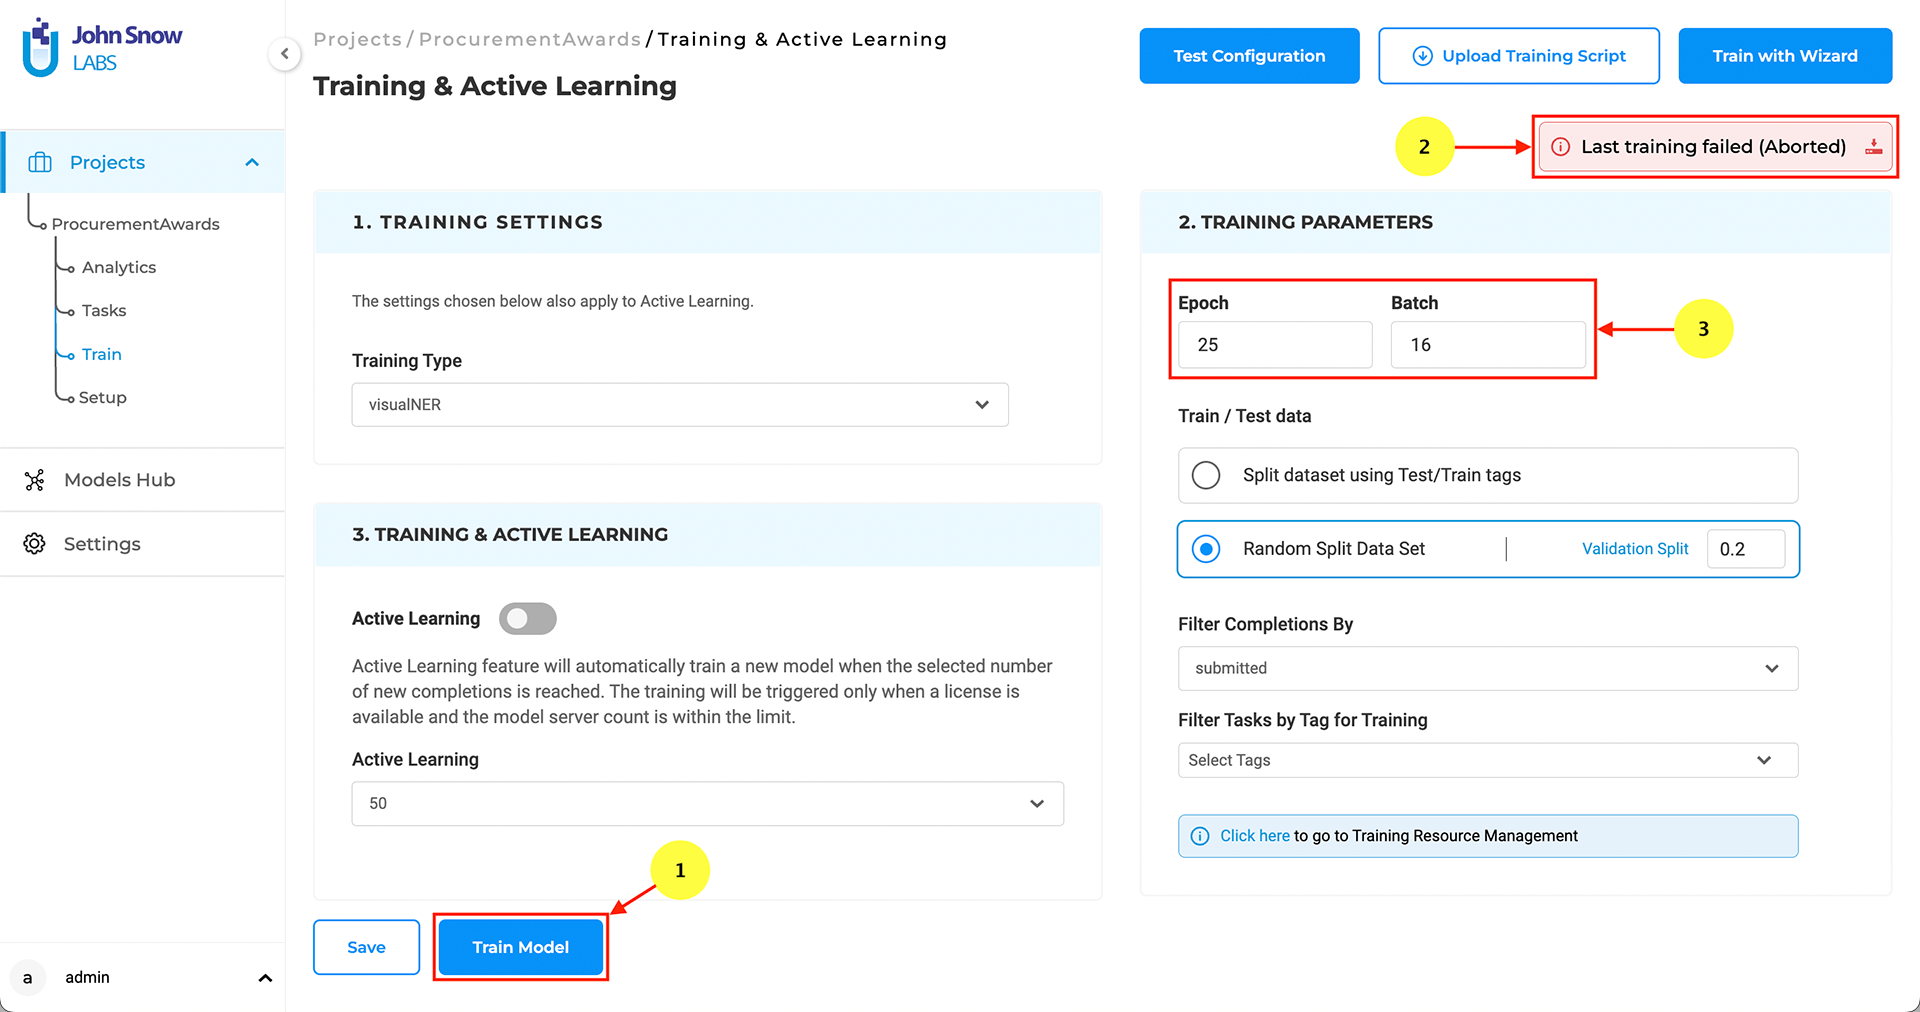
The training feature for Visual NER projects can be activated from the Setup page via the “Train Now” button (See 1). From the Training Settings sections, users can tune the training parameters (e.g. Epoch, Batch) and choose the tasks to use for training the Visual NER model (See 3).
Information on the training progress is shown in the top right corner of the Model Training tab (See 2). Users can check detailed information regarding the success or failure of the last training.
Training Failure can occur because of:
- Insufficient number of completions
- Poor quality of completions
- Insufficient CPU and Memory
- Wrong training parameters
When triggering the training, users can choose to immediately deploy the model or just train it without deploying. If immediate deployment is chosen, then the labeling config is updated with references to the new model so that it will be used for preannotations.
License Requirements
Visual NER annotation, training and preannotation features are dependent on the presence of a Visual NLP license. Licenses with scope ocr: inference and ocr: training are required for preannotation and training respectively.

Training Server Specification
The minimal required training configuration is 64 GB RAM, 16 Core CPU for Visual NER Training.
Visual NER Training with GPU
GPU Resource Availability If the Generative AI Lab is equipped with a GPU, the following message will be displayed on the infrastructure page:
“GPU Resource Available”.
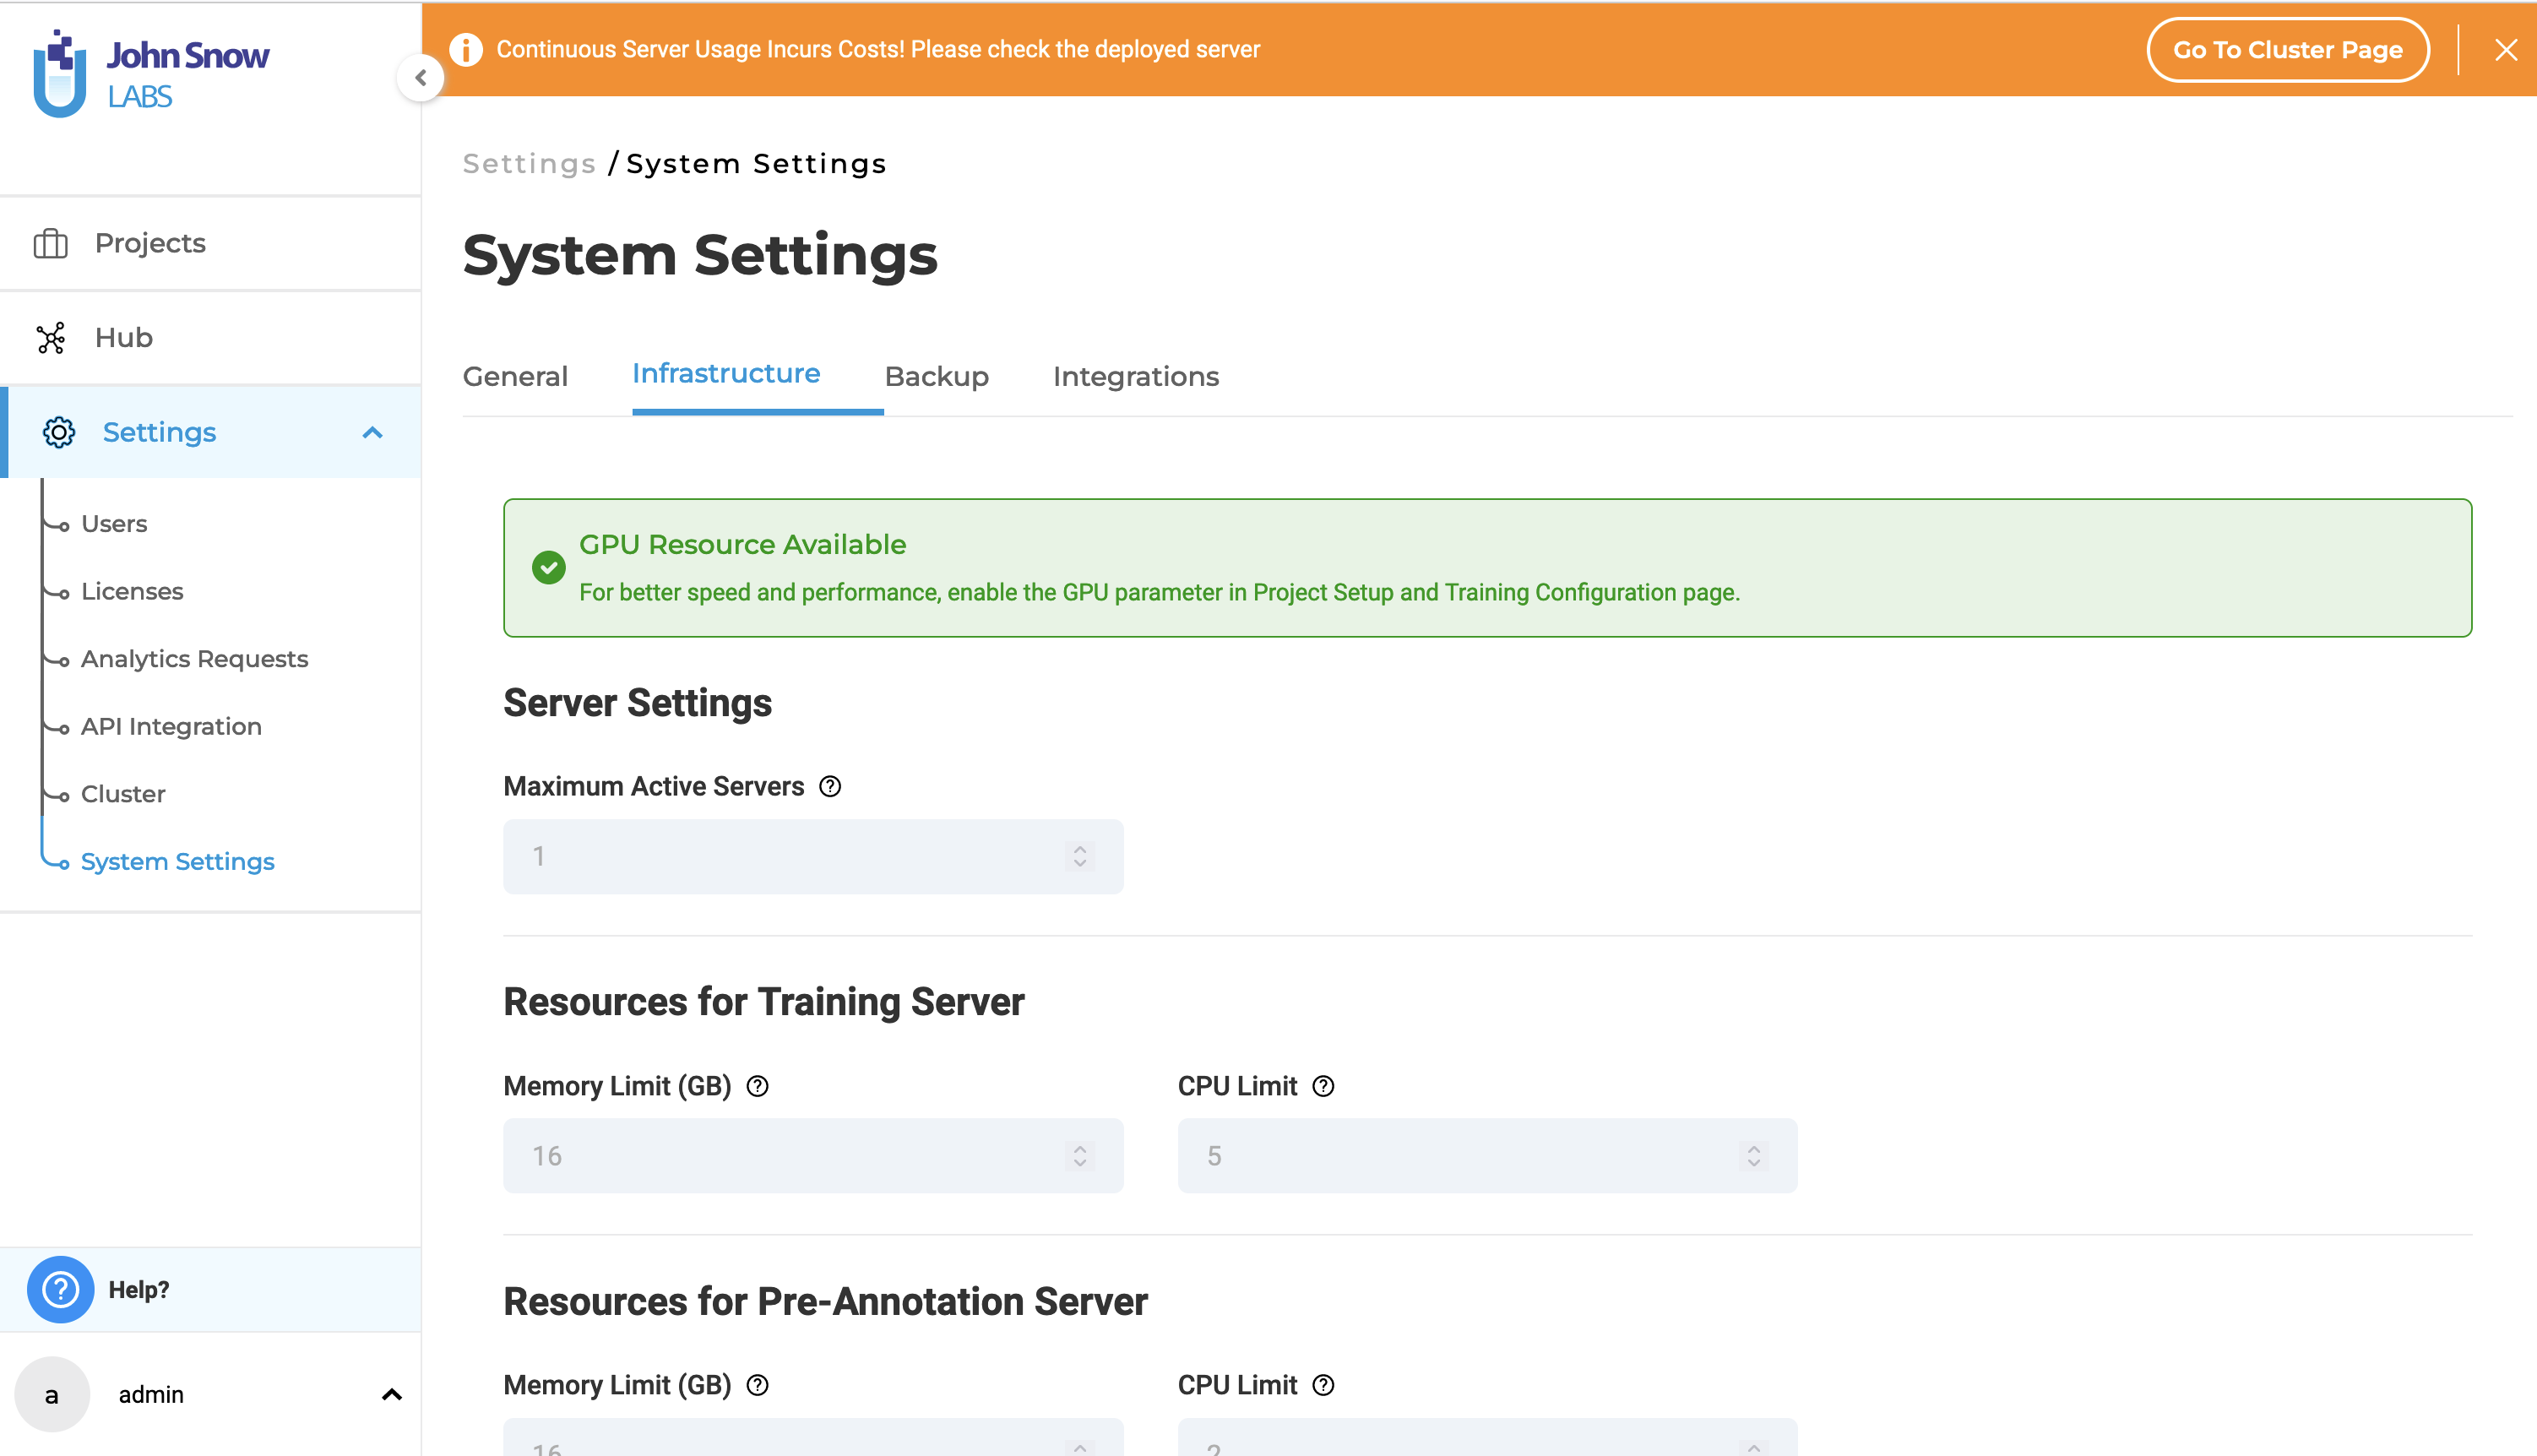
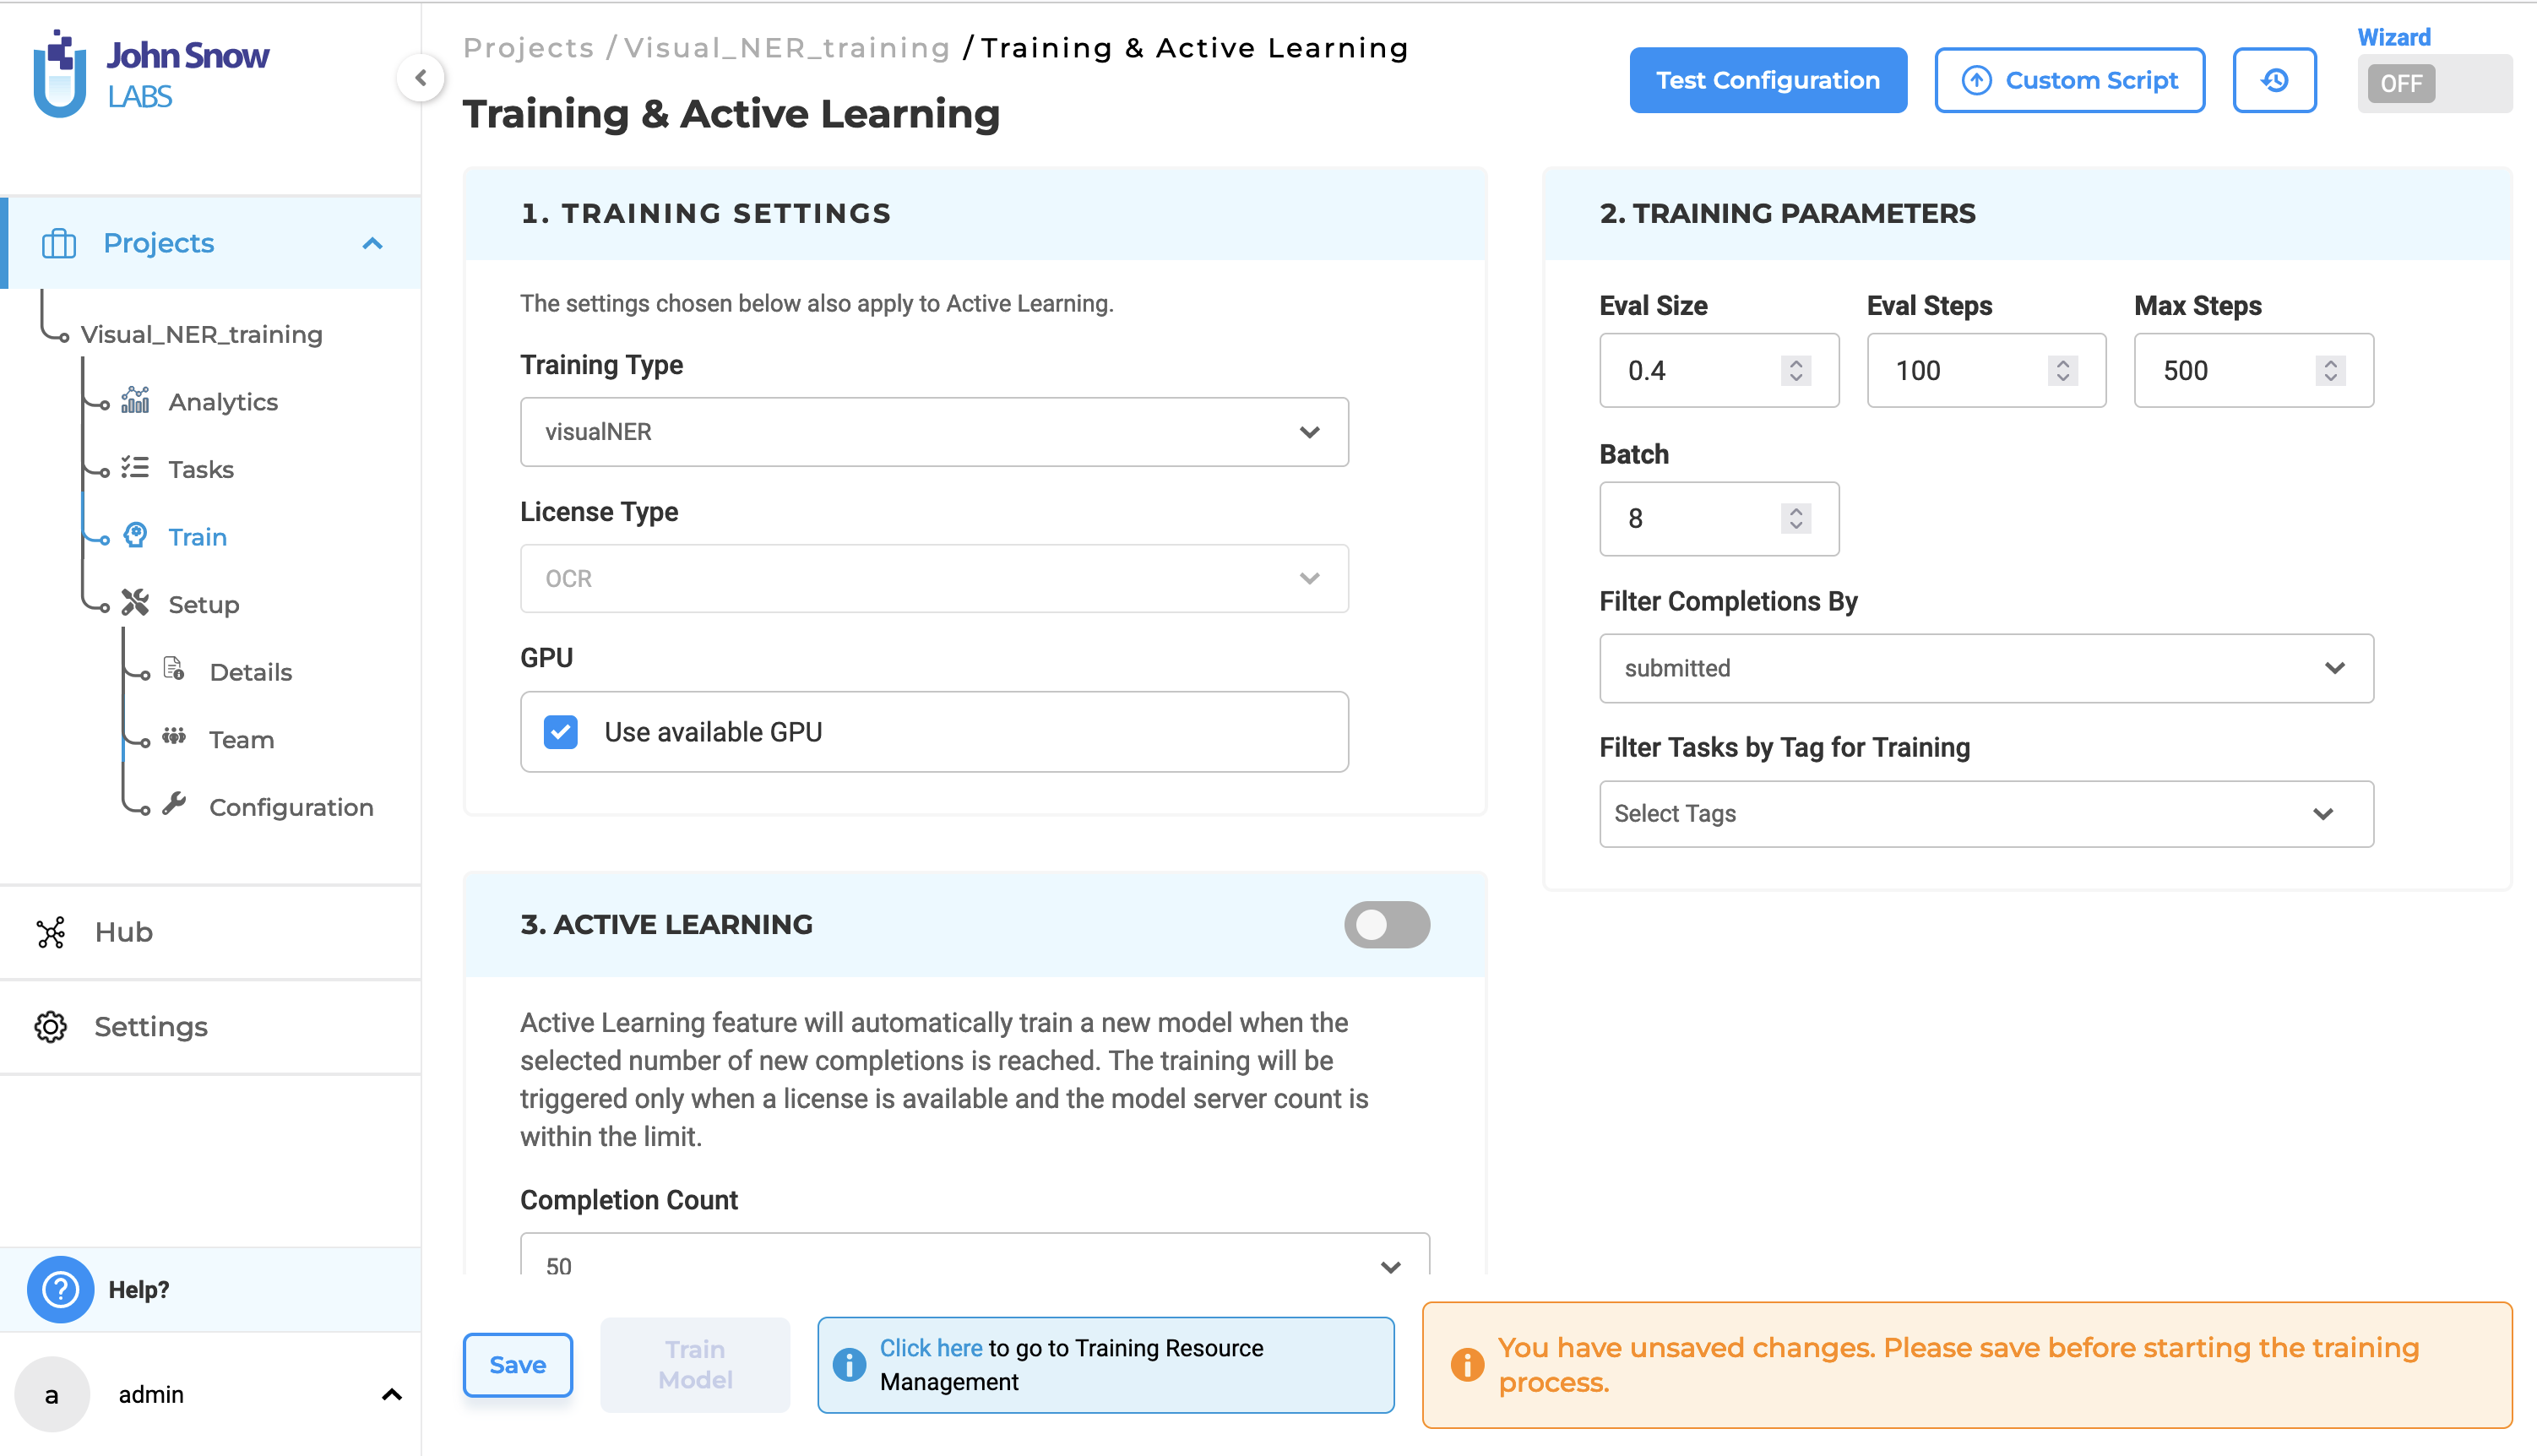
The Training & Active Learning page now includes a new option “Use available GPU” for Visual NER projects. Selecting this option enables Visual NER model training using GPU.
Boost performance with the use of GPU- side by side CPU - GPU Benchmark for Visual Named Entity Recognition (NER) Project
In this section we dive into a side-by-side comparison between CPUs and GPUs for a specific task: recognizing names in images (Visual NER). Two powerful machines were used for comparison, one with CPU only (central processing unit), and the second one equipped with GPU (graphics processing unit). The goal of the test was to measure and compare the time required for training an AI model based on the different hardware architectures of the servers.
Understanding CPU vs GPU for NLP Tasks:
One of the important differences between CPU and GPU architecture is in how they deliver performance for AI training and inference with GPU delivering leading performance in this context. CPUs, with their adeptness in sequential tasks and single-threaded performance, stand in contrast to GPUs, which thrive in highly parallelized environments, excelling at simultaneous large-scale computations crucial for NLP tasks, especially those entailing intensive matrix operations as encountered in deep learning models.
Hardware Configuration:
CPU Machine (m4.4xlarge):
    CPU: Intel Xeon E5-2676 v3 (Haswell) processors (16 cores)
    Memory: 64 GiB
    Storage: EBS only
    Network Performance: Moderate ##### GPU Machine (g4dn.2xlarge):
    GPU: NVIDIA T4 Tensor Core GPU
    vCPUs: 8
    GPU Memory: 16 GiB
    Memory: 32 GiB
    Storage: EBS only
    Network Performance: High
Versions:
The benchmarking was carried out using the following Spark NLP versions:
Spark version: 3.4.0
SparkNLP version: 5.3.0
SparkOCR version: 5.3.0
Benchmark Setup:
Our benchmarking focuses on a Visual Named Entity Recognition (NER) project. Visual data (images) was processed to identify named entities like people, locations, and brands within them. Visual NER training employs advanced NLP techniques and deep learning architectures, demanding significant computational resources for efficient execution. To assess the performance training of our Visual NER model GPU-enabled instance, the benchmark experiments were conducted using a batch size of 8, with 1 core CPU allocated for the GPU training. In addition to the GPU’s dedicated 16GB memory, 24 GB of system memory was allocated for the training pod.
For Visual NER model training without GPU, we conducted benchmark experiments using a batch size of 8, with 14 cores CPU allocation and 58 GB of memory for training.
The time taken for model training for both cases was measured, and the results were compared.
Dataset:
The benchmark utilizes a dataset containing 714 tasks. Each task is an image with corresponding labels for the named entities present.
Training params:
Eval Size: 0.4 (percentage of data used for evaluation)
Learning rate: 0.001 (controls how quickly the model learns)
Batch size: 8 (number of images processed together during training)
Benchmark Results:
The training pod specifications were:
For instance, without GPU: 14 CPU cores and 58GB RAM
For instance, with both GPU and CPU: 1 CPU core, 24GB RAM, and 1 GPU
| Batch Size | Only CPU Training Time | With GPU Training Time | Speedup (With GPU vs Only CPU) |
|---|---|---|---|
| 8 | 225 mins | 26 mins | 8.6x |
The benchmarking experiment was aimed to offer insights into the performance differences between CPU and GPU architectures for Visual NER projects. The results showed 225 minutes of execution time for CPU training alone, whereas GPU training only took 26 minutes, resulting in an 8.6x speedup. Even with just a 1-core CPU and 24GB of RAM, training with a GPU significantly surpasses the performance of a 14-core CPU with 58GB of RAM. Just using 1 GPU, we could decrease the number of CPU cores from 14 cores to 1 core and reduce the memory allocation by 30 percent for the training. The results underscore the superior performance of GPUs in parallel computations, which considerably accelerates training processes for NLP tasks.
Mixed Projects
If a project is set up to include Classification, Named Entity Recognition and Assertion Status labels and the three kinds of annotations are present in the training data, it is possible to train three models: one for Named Entity Recognition, one for Assertion Status, and one for Classification at the same time. The training logs from all three trainings can be downloaded at once by clicking the download button present in the Training section of the Setup Page. The newly trained models will be added to the Spark NLP pipeline config.
Support for European Languagues
Users can download English, German, Spanish, Portuguese, Italian, Danish and Romanian pretrained models from the NLP Models Hub and use them for pre-annotation. Generative AI Lab also offers support for training/tuning models in the above languages.