Protect Sensitive Data While Preserving Value
Working with documents that contain Personally Identifiable Information (PII) or Protected Health Information (PHI) requires careful handling. Generative AI Lab provides multiple De-Identification project types that help detect and transform sensitive data so it can be safely reviewed, shared, and reused for analysis or model training.
Depending on the project type, de-identification can be applied either to text representations or directly to visual documents such as PDFs and images.
Why De-Identification Matters
- Stay compliant: Support privacy requirements such as HIPAA and GDPR
- Share data safely: Collaborate without exposing sensitive information
- Enable AI development: Train models on realistic data without privacy risks
- Reduce exposure: Limit the spread of PII and PHI across systems
De-Identification Project Types
Generative AI Lab supports two distinct de-identification project types. Both can ingest PDFs, but they differ in how de-identification is applied and what is produced as output.
Text De-Identification (TEXT tab)
Text De-Identification applies transformations to text content.
Projects of this type:
- Are created under the TEXT tab
- Can ingest plain text inputs
- Can ingest PDFs that are processed through OCR to extract text
- Apply de-identification to the extracted text representation
- Produce text-based outputs
This project type is appropriate when working primarily with text and when preserving the original document layout is not required.
Visual NER De-Identification (PDF / Image tabs)
Visual NER De-Identification applies masking directly to the visual document.
Projects of this type:
- Are created under the PDF or Image tabs
- Operate on PDFs or images as visual documents
- Detect sensitive entities using OCR, NER models, and rule-based patterns
- Apply masking directly on document pages
- Allow reviewers to preview masked documents
- Export de-identified PDFs or images, with the option to exclude original raw files
This project type is intended for document-centric workflows where the visual format must be preserved.
How It Works (Text De-Identification)
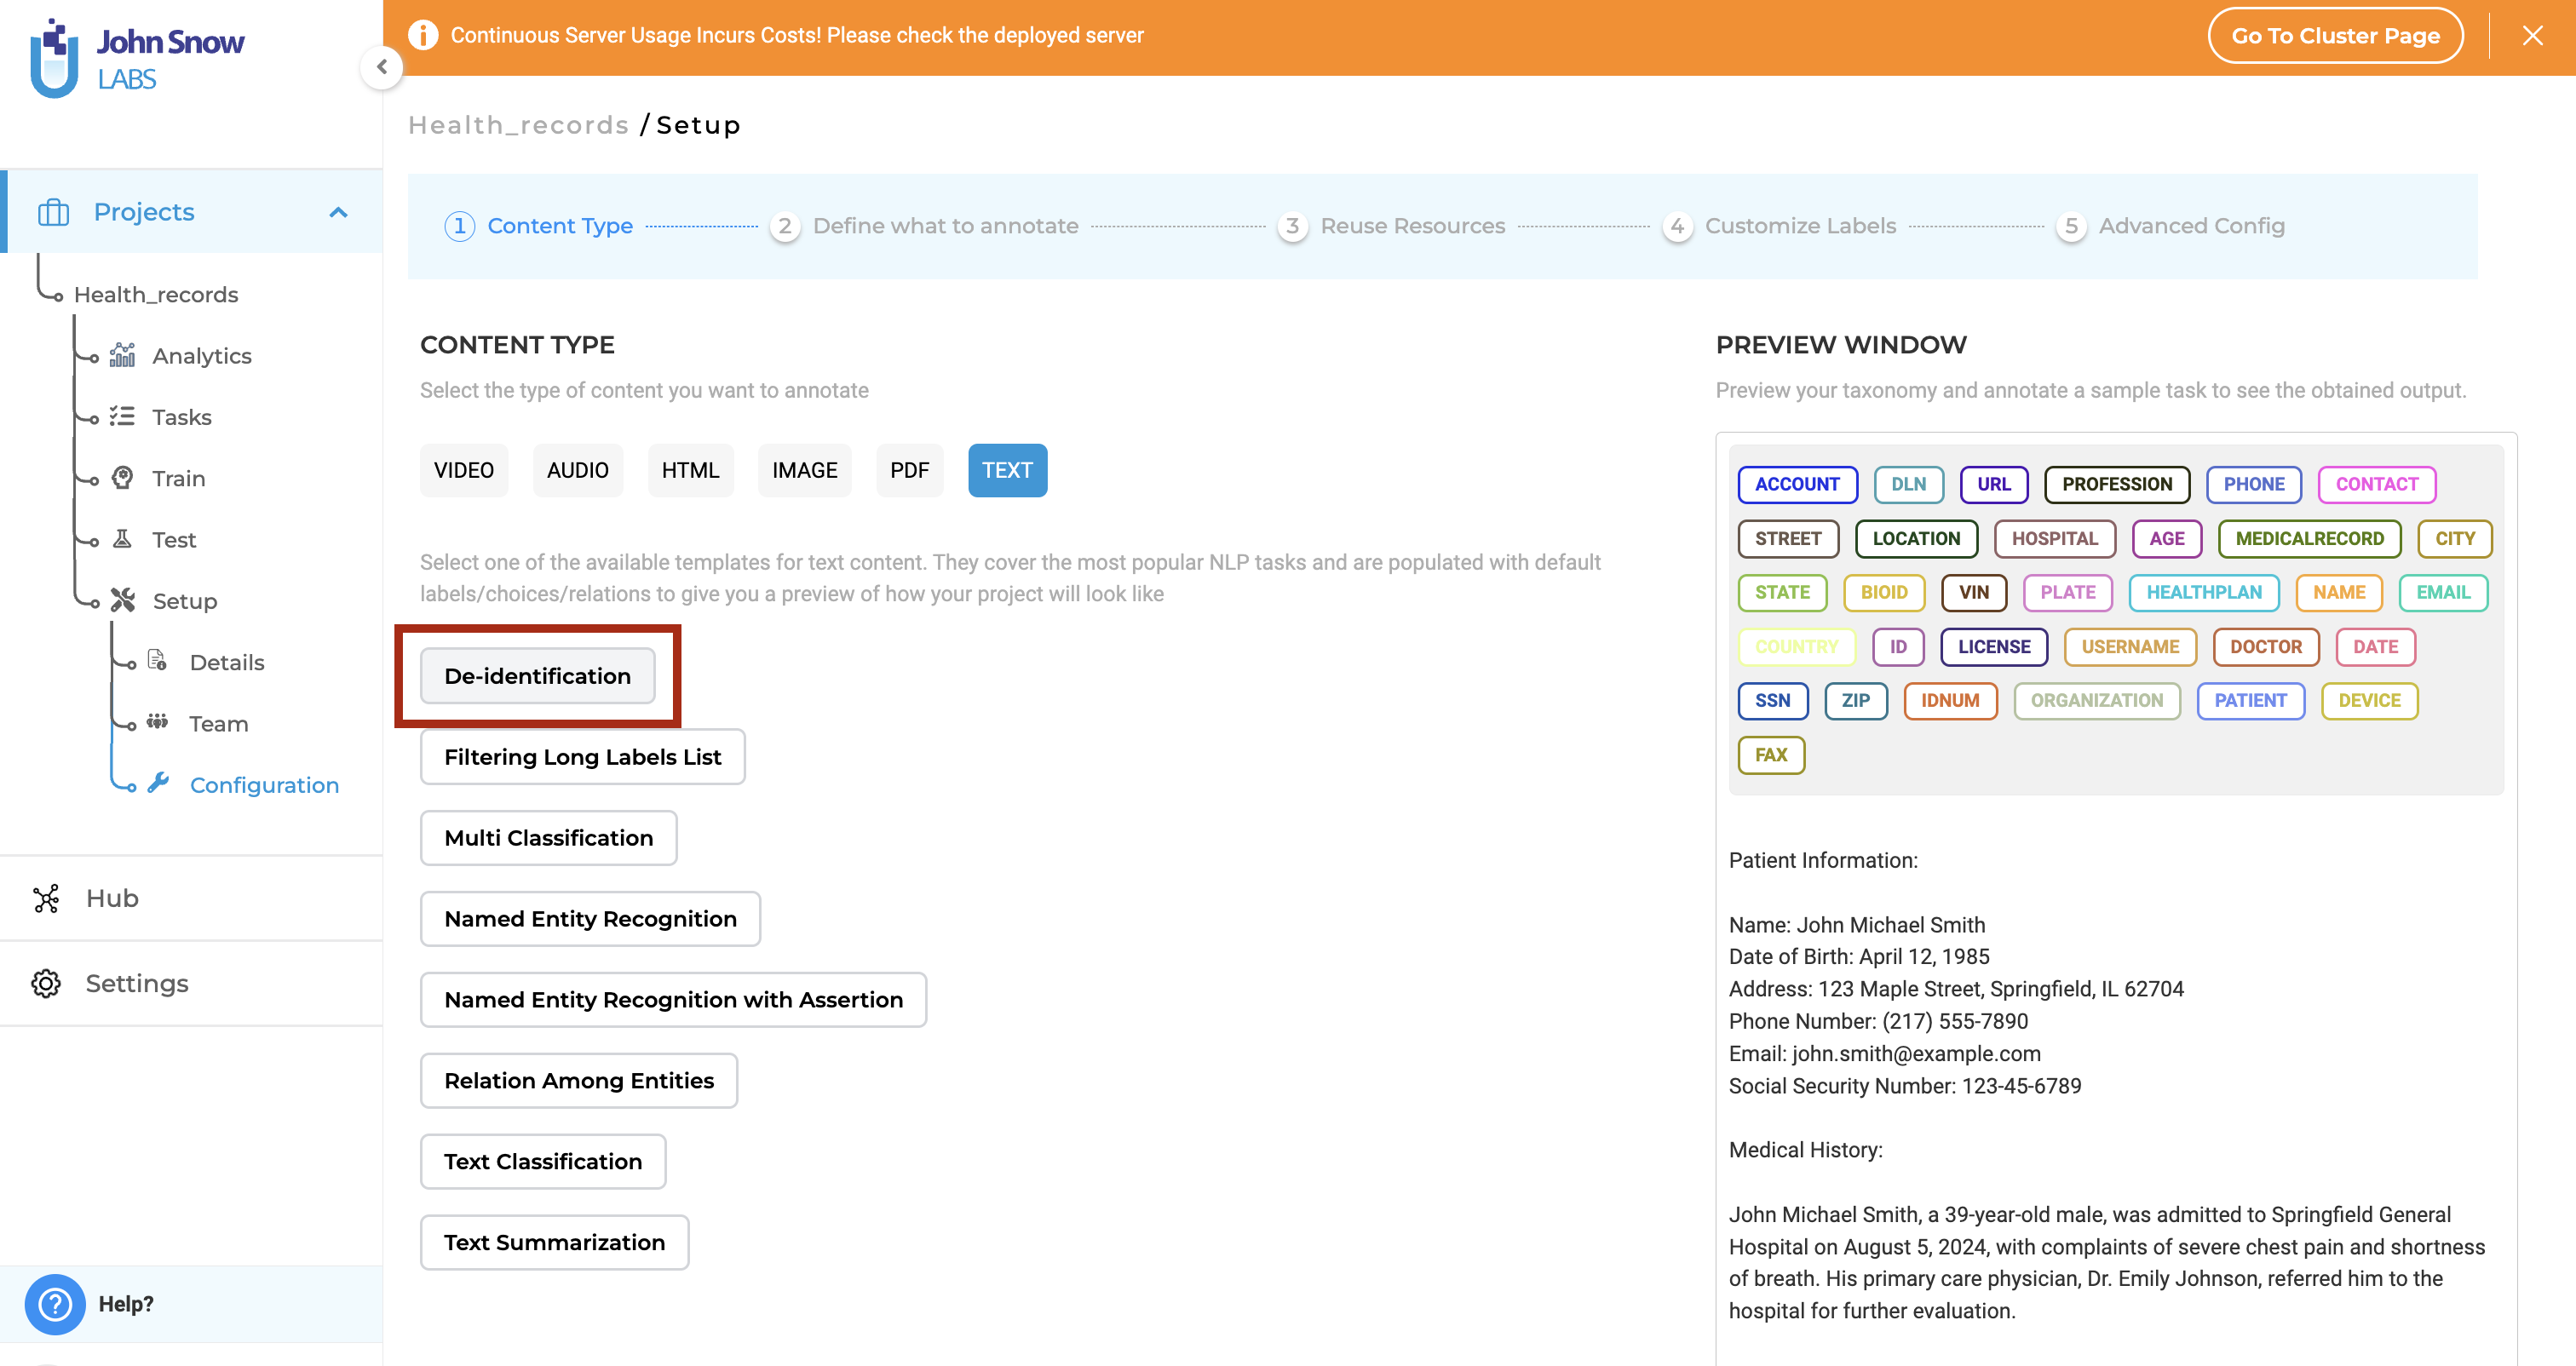
1. Create a Text De-Identification Project
Create a new project and select the De-identification template under the TEXT tab.
This configures the project for text-based de-identification, including:
- Standard labels for common sensitive entities (names, dates, IDs)
- De-identification configuration options
- Export behavior based on reviewed completions
Quick Start: Import the Demo De-Identification Project from the Import menu to explore the workflow using sample data.
2. Choose Your De-Identification Strategy
Each entity type can use a different transformation strategy.
| Strategy | Description | Example |
|---|---|---|
| Mask with Entity Labels | Replace text with label names | <Patient> is a <Age> y.o. |
| Mask with Characters | Replace characters with * |
**** ****** is a ** y.o. |
| Fixed Length Mask | Replace with fixed-length mask | **** **** is a **** y.o. |
| Obfuscation | Replace with realistic synthetic values | Mark Doe is a 48 y.o. |
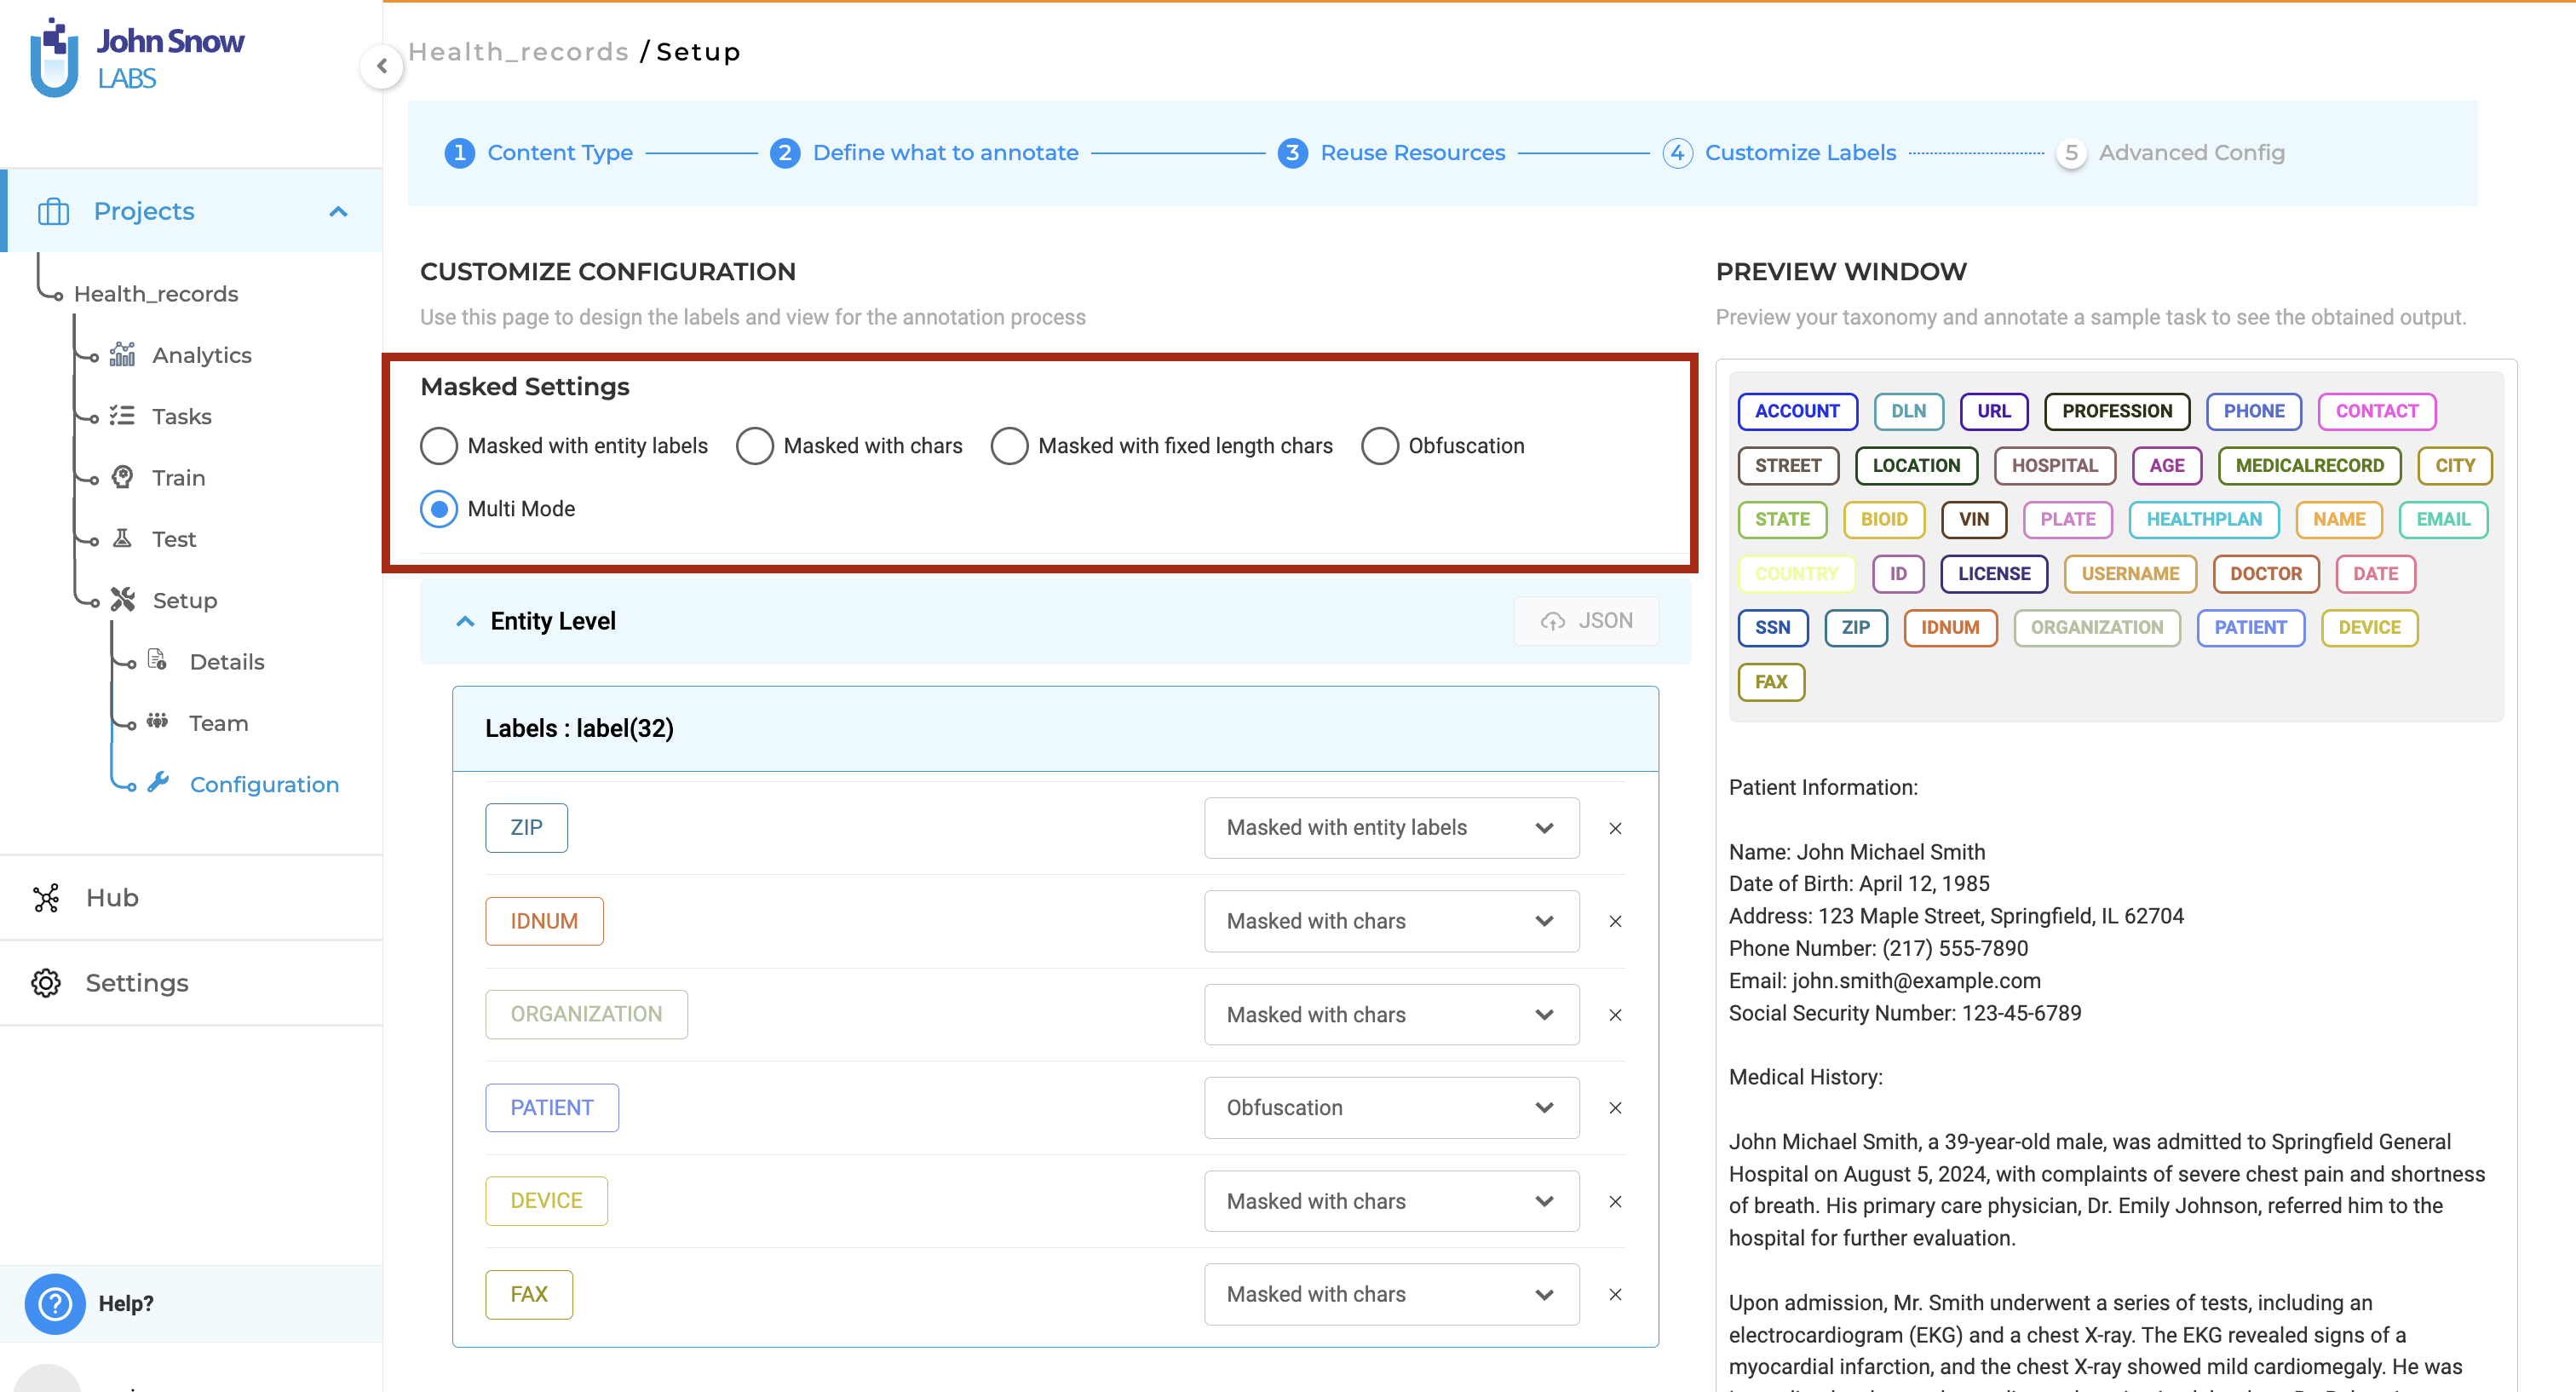
You can upload custom obfuscation rules in JSON format to reuse configurations across projects.
3. Review and Export Text Outputs
- Import documents (tasks are tagged as
NonDeidentified) - Run De-identify to generate predictions
- Review and correct labels
- Submit (star) reviewed completions
- Export de-identified text outputs
Visual NER De-Identification for PDFs and Images
Visual NER De-Identification is used when sensitive information must be masked within the document itself, rather than only in extracted text.
How Visual NER De-Identification Works
- PDFs or images are processed using OCR and visual entity detection
- Sensitive entities are detected using NER models and rule-based patterns
- Masking is applied directly to document pages
- Reviewers can preview masked PDFs or images
- Exports can be configured to include only de-identified documents
Screenshot needed: Visual NER project creation for PDF or image de-identification.
Review with Visual Preview
Reviewers validate masking by viewing the de-identified document before export. This allows verification of masked content while preserving document readability.
Screenshot needed: Visual NER review screen showing masked entities on a PDF page.
Export De-Identified PDFs or Images
Visual NER De-Identification supports exporting masked PDFs or images. Original raw files can be excluded from the export depending on configuration.
Screenshot needed: Export dialog showing the option to export only de-identified documents.
When to Use Each Project Type
| Requirement | Recommended Project Type |
|---|---|
| De-identify text content (including OCR-extracted text from PDFs) | Text De-Identification |
| Produce text-based outputs | Text De-Identification |
| Mask sensitive information on PDF pages or images | Visual NER De-Identification |
| Review masking visually before export | Visual NER De-Identification |
| Export de-identified PDFs or images | Visual NER De-Identification |
Best Practices (Text De-Identification)
- Review predictions before export to ensure accuracy
- Apply different strategies per entity type where appropriate
- Use demo projects to understand workflows before processing real data
- Combine models and rules to improve coverage
Important Notes
License Required: A valid John Snow Labs license is required.
Project Type Is Fixed: The de-identification project type must be selected during project creation. Existing projects cannot be converted to a different de-identification type.
Human Review: Export behavior depends on reviewed completions and project configuration.
Need Help?
- Import the Demo De-Identification Project from the Import menu
- Upload JSON obfuscation rules from the Customize Labels page
- Manage pipelines from the Pipelines page
- Contact support@johnsnowlabs.com