⚠️ Note: The instructions below are for Scala 2.12 compatible versions of Spark NLP and Healthcare NLP. If you need to deploy on Scala 2.13 with Java 17 and Spark 3.5.x, please contact Support@johnsnowlabs.com to request the required JAR files.
Installation with johnsnowlabs
On Oct 4th, 2022 we released johnsnowlabs library, which eases the installation and session starting processes in an
almost transparent way for the user.
Finance NLP and Legal NLP are built on the top of a new John Snow Labs library, called johnsnowlabs. If you are a former user of Spark NLP or Spark NLP for Healthcare, you will find this new way of deploying your Spark NLP clusters much more user-friendly! Clinical NLP (former Spark NLP for Healthcare) still can be run without johnsnowlabs library, although we highly recommend to install it with this new method.
For advanced installation options, please check johnsnowlabs webpage.
1. Installing johnsnowlabs
The first step you need to carry out is installing johnsnowlabs library. This is as easy as doing:
!pip install johnsnowlabs
2. Installing Enterprise NLP (Finance, Legal, Healthcare)
Import johnsnowlabs and use our one-liner nlp.install() to install all the dependencies, downloading the jars (yes, Spark NLP runs on top of the Java Virtual Machine!), preparing the cluster environment variables, licenses, etc!
from johnsnowlabs import *

nlp.install(force_browser=True)
The force_browser=True command gets rid of you uploading a license. It will open a popup to connect to our license server at my.johnsnowlabs.com retrieve the license for you, and install everything your license allows you to use!
If you are a user of Financial NLP, you will get that installed. If you are a Legal user, then Legal NLP will be installed, or Clinical! Everything will be taken care on your behalf!
Optional: Uploading the license manually
We still have the way of downloading manually the license, in case the connection with my.johnsnowlabs.com is not an option for you.
Just put your license json in the same folder of the notebook, and run:
nlp.install()
In colab, you can use this fancy widget to upload a file to your environment:
from google.colab import files

print('Please Upload your John Snow Labs License using the button below')
license_keys = files.upload()
And then do:
nlp.install()
3. Starting an Enterprise NLP cluster
Another one-liner can be used to start your Enterprise Spark NLP cluster:
spark = nlp.start()
It will take into account the previous steps and your license and return a Spark Session.
4. Ready to go!
And you are done! Simple, isn’t it? Find hundreds of notebooks using johnsnowlabs library here:
Finance, Legal, Clinical NLP on Databricks
- List of tested runtimes.
- Recommended instance type
Standard_F8s_v2 (16 GB Memory, 8 Cores)or higher. - The installation takes around 15 minutes.
Connection via Databricks Partner connect
Databricks has an integration of Spark NLP libraries via Partner Connect. If you are eligible, you can connect your Databricks workspace to John Snow Labs. The Partner Connect wizard will redirect you to John Snow Labs portal. After you fill-in/validate your information a 30-day trial license will be automatically generated for you. A new Databricks cluster will also be created, and all necessary resources to run the library on your account will be installed on your new cluster. Furthermore, a set of ready to use notebooks will be copied to your workspace, so you can start experimenting on your data right away. The trial license file will also be deployed to your environment and made available to your cluster.
The trial period is 30 days. You can use the trial period only once. After the trial period, we will contact you with a licensing offer.
- Start exploring preloaded notebooks
Workspace -> Shared -> John Snow Labs
Automatic deployment of John Snow Labs NLP libraries from www.johnsnowlabs.com/databricks
Alternatively, you can automatically deploy John Snow Labs libraries on Databricks by filling in the form available here. This will allow you to start a 30-day free trial with no limit on the amount of processed data. You just need to provide a Databricks Access Token that is used by our deployment script to connect to your Databricks instance and install John Snow Labs NLP libraries on a cluster of your choice.
- Start exploring preloaded notebooks
Workspace -> Shared -> John Snow Labs
Automatic deployment via my.JohnSnowLabs.com
Login to your account on my.JohnSnowLabs.com, navigate to ‘My Subscriptions’ page, and identify your license for Databricks. Click on the three dots as illustrated in the image below, then select the Install On Cluster option.

On the install form, provide an access token for this account and then select the cluster where you want to install the libraries. Once it is done, you will get an email with information on the status of your deployment and on how to get started with the libraries.

Automatic deployment or upgrade from the Databricks workspace
If you have already deployed the libraries in the past, you have a script Workspace -> Shared -> John Snow Labs -> Install JohnSnowLabs NLP. If you attach it to any cluster and run it, it will reinstall the libraries on the respective cluster.
- This is also the recommended way to upgrade to the latest versions of the libraries.
Manual deployment of Enterprise Spark NLP
Automatic deployment is the preferred option.
- Create a cluster with one of the supported runtimes if you don’t have one already.
-
On a new cluster or existing one you need to add the following to the
Advanced Options -> Sparktab, inSpark.Configbox:spark.kryoserializer.buffer.max 1000M spark.serializer org.apache.spark.serializer.KryoSerializer- Please add the following to the
Advanced Options -> Sparktab, inEnvironment Variablesbox:
 AWS_ACCESS_KEY_ID=xxx
 AWS_SECRET_ACCESS_KEY=yyy
 SPARK_NLP_LICENSE=zzz
Note: Enterprise Spark NLP also support reading the license from the Databricks DFS, on the fixed location,
dbfs:/FileStore/johnsnowlabs/license.key. The precedence for that location is the highest, so make sure that file is not containing any outdated license key.- (OPTIONAL) If the environment variables used to setup the AWS Access/Secret keys are conflicting with the credential provider chain in Databricks, you may not be able to access to other s3 buckets. To access both JSL repos with JSL AWS keys as well as your own s3 bucket with your own AWS keys), you need to use the following script, copy that to dbfs folder, then go to the Databricks console (init scripts menu) to add the init script for your cluster as follows:
%scala val script = """ #!/bin/bash echo "******** Inject Spark NLP AWS Profile Credentials ******** " mkdir ~/.aws/ cat << EOF > ~/.aws/credentials [spark_nlp] aws_access_key_id=<YOUR_AWS_ACCESS_KEY> aws_secret_access_key=<YOUR_AWS_SECRET_KEY> EOF echo "******** End Inject Spark NLP AWS Profile Credentials ******** " """ - Please add the following to the
- In
Librariestab inside your cluster you need to follow these steps:- Lookup the version of Healhcare NLP vs. Spark NLP you will install.
- Install Spark NLP (Public): New -> PyPI ->
spark-nlp==${x.y.z_public_version}-> Install - Install: New -> Maven -> Coordinates ->
com.johnsnowlabs.nlp:spark-nlp_2.12:${x.y.z_public_version}-> Install - Please add following jars:
- Install: New -> Python Whl -> upload
https://pypi.johnsnowlabs.com/${secret.code}/spark-nlp-jsl/spark_nlp_jsl-${x.y.z_healthcare_version}-py3-none-any.whl - Install: New -> Jar -> upload
https://pypi.johnsnowlabs.com/${secret.code}/spark-nlp-jsl-${x.y.z_healthcare_version}.jar
- Install: New -> Python Whl -> upload
- (For Legal and Finance NLP) Install: New -> PyPI ->
johnsnowlabs-for-databricks==${x.y.z_healthcare_version}-> Install
- Now you can attach your notebook to the cluster and use Spark NLP!
Windows Support
In order to fully take advantage of Spark NLP on Windows (8 or 10), you need to setup/install Apache Spark, Apache Hadoop, Java and a Pyton environment correctly by following the following instructions: https://github.com/JohnSnowLabs/spark-nlp/discussions/1022
How to correctly install Spark NLP on Windows
Follow the below steps to set up Spark NLP with Spark 3.1.2:
- Download Adopt OpenJDK 1.8
- Make sure it is 64-bit
- Make sure you install it in the root of your main drive
C:\java. - During installation after changing the path, select setting Path
- Download the pre-compiled Hadoop binaries
winutils.exe,hadoop.dlland put it in a folder calledC:\hadoop\binfrom https://github.com/cdarlint/winutils/tree/master/hadoop-3.2.0/bin- Note: The version above is for Spark 3.1.2, which was built for Hadoop 3.2.0. You might have to change the hadoop version in the link, depending on which Spark version you are using.
-
Download Apache Spark 3.1.2 and extract it to
C:\spark. -
Set/add environment variables for
HADOOP_HOMEtoC:\hadoopandSPARK_HOMEtoC:\spark. -
Add
%HADOOP_HOME%\binand%SPARK_HOME%\binto thePATHenvironment variable. -
Install Microsoft Visual C++ 2010 Redistributed Package (x64).
- Create folders
C:\tmpandC:\tmp\hive- If you encounter issues with permissions to these folders, you might need
to change the permissions by running the following commands:
%HADOOP_HOME%\bin\winutils.exe chmod 777 /tmp/hive
%HADOOP_HOME%\bin\winutils.exe chmod 777 /tmp/
- If you encounter issues with permissions to these folders, you might need
to change the permissions by running the following commands:
Requisites for PySpark
We recommend using conda to manage your python environment on Windows.
- Download Miniconda for python 3.8
- See Quick Install on how to set up a conda environment with Spark NLP.
- The following environment variables need to be set:
PYSPARK_python=python- Optionally, if you want to use the Jupyter Notebook runtime of Spark:
- first install it in the environment with
conda install notebook - then set
PYSPARK_DRIVER_python=jupyter,PYSPARK_DRIVER_python_OPTS=notebook
- first install it in the environment with
- The environment variables can either be directly set in windows, or if only
the conda env will be used, with
conda env config vars set PYSPARK_python=python. After setting the variable with conda, you need to deactivate and re-activate the environment.
Now you can use the downloaded binary by navigating to %SPARK_HOME%\bin and
running
Either create a conda env for python 3.6, install pyspark==3.1.2 spark-nlp numpy and use Jupyter/python console, or in the same conda env you can go to spark bin for pyspark –packages com.johnsnowlabs.nlp:spark-nlp_2.12:3.4.4.


Windows Server
-
Download and Install JAVA 8
i) Download and Install JAVA 8 from https://adoptium.net/temurin/releases/?version=8
ii) Once installed , We can check if java is installed by opening cmd and type
java -versioncommand -
Install Microsoft Visual C++ 2010
i) Install Microsoft Visual C++ 2010 from Microsoft Visual C++ 2010 Service Pack 1 Redistributable Package MFC Security Update
-
Download the pre-compiled Hadoop binaries
winutils.exe,hadoop.dlli) Download the pre-compiled Hadoop binaries winutils.exe, hadoop.dll from winutils/hadoop-3.2.0/bin at master · cdarlint/winutils
ii) Copy files into a folder called
C:\hadoop\bin -
Configure Hadoop ENV variables
Windows Explorer→This PC-> Right Click selectproperties-> Click onAdvancedsystem settings -> Click onEnvironment VariablesUnder system variables
- Add HADOOP_HOME as below
Under system variables -> Click on
newVARIABLE Name:
HADOOP_HOMEVARIABLE Value:
C:\hadoop- Select the
Path(from variable) -> Click onedit→ Click onNew→ add%HADOOP_HOME%\bin
-
Dowload and Install Conda and set Conda ENV variables
i) Download Miniconda for python 3.8 from https://repo.anaconda.com/miniconda/Miniconda3-py38_4.11.0-Windows-x86_64.exe
ii) Install miniconda exe file.
iii)
Under system variables->Select the Path (from variable)->Click on edit->(ADD the miniconda install location)/bin(Same steps as above) -
Configure conda env
i) Open cmd and execute the following commands
conda --version
java -version
conda create -n sparknlp python=3.8 -y
conda activate sparknlp
pip install spark-nlp==5.1.2 pyspark==3.2.1
pip install jupyter
conda env config vars set PYSPARK_PYTHON=python
conda activate sparknlp
conda env config vars set PYSPARK_DRIVER_PYTHON=jupyter
conda activate sparknlp
conda env config vars set PYSPARK_DRIVER_python_OPTS=notebook
conda activate sparknlp
jupyter notebook
Apple Silicon Support
Installation for Apple Silicon (M1, M2, M3): Starting from version 4.0.0, Spark NLP has experimental support for apple silicon.
Make sure the following prerequisites are set:
- Installing SDKMAN, you can also follow the official documentation at https://sdkman.io/install
$ curl -s "https://get.sdkman.io" | bashsource "$HOME/.sdkman/bin/sdkman-init.sh"sdk list java
list available java libraries:
- Installing Java
sdk install java 8.0.402-amznwhereis javajava -version
- Installing MiniConda, you can also follow the official documentation at https://docs.anaconda.com/free/miniconda/#quick-command-line-install
mkdir -p ~/miniconda3curl https://repo.anaconda.com/miniconda/Miniconda3-py39_23.11.0-2-MacOSX-arm64.sh -o ~/miniconda3/miniconda.shPS: you can change python version to 3.10 or 3.11bash ~/miniconda3/miniconda.sh -b -u -p ~/miniconda3~/miniconda3/bin/conda init bash~/miniconda3/bin/conda init zshsource miniconda3/bin/activate
-
Installing
jupyter environmentsor you can install it viaVSCode# use base environment conda --version java -version conda activate pip install pyspark==3.4.0 pip install jupyter conda env config vars set PYSPARK_PYTHON=python conda activate conda env config vars set PYSPARK_DRIVER_PYTHON=jupyter conda activate conda env config vars set PYSPARK_DRIVER_python_OPTS=notebook conda activate jupyter notebook# or create new sparknlp environment conda --version java -version conda create -n sparknlp python=3.9 -y conda activate sparknlp pip install pyspark==3.4.0 pip install jupyter conda env config vars set PYSPARK_PYTHON=python conda activate sparknlp conda env config vars set PYSPARK_DRIVER_PYTHON=jupyter conda activate sparknlp conda env config vars set PYSPARK_DRIVER_python_OPTS=notebook conda activate sparknlp jupyter notebook -
Installing Spark NLP Healthcare
please see the Spark NLP Healthcare Installation Notebook
Non-johnsnowlabs Healthcare NLP on Ubuntu
These instructions use non-johnsnowlabs installation syntax. For simplified installation with
johnsnowlabslibrary, check first section.
For installing John Snow Labs NLP libraries on an Ubuntu machine/VM please run the following command:
wget https://setup.johnsnowlabs.com/nlp/install.sh -O - | sudo bash -s -- -a PATH_TO_LICENSE_JSON_FILE -i -r
This script will install Spark NLP, Enterprise Spark NLP, Spark OCR, NLU and Spark NLP Display on the specified virtual environment. It will also create a special folder, ./JohnSnowLabs, dedicated to all resources necessary for using the libraries. Under ./JohnSnowLabs/example_notebooks you will find some ready to use example notebooks that you can use to test the libraries on your data.
For a complete step-by-step guide on how to install NLP Libraries check the video below:
The install script offers several options:
-hshow brief help-iinstall mode: create a virtual environment and install the library-rrun mode: start jupyter after installation of the library-vpath to virtual environment (default: ./sparknlp_env)-jpath to license json file for Enterprise Spark NLP-opath to license json file for Spark OCR-apath to a single license json file for both Spark OCR and Spark NLP-sspecify pyspark version-pspecify port of jupyter notebook
Use the -i flag for installing the libraries in a new virtual environment.
You can provide the desired path for virtual env using -v flag, otherwise a default location of ./sparknlp_env will be selected.
The PATH_TO_LICENSE_JSON_FILE parameter must be replaced with the path where the license file is available on the local machine. According to the libraries you want to use different flags are available: -j, -o or -a. The license files can be easily downloaded from My Subscription section in your my.JohnSnowLabs.com account.
To start using Jupyter Notebook after the installation of the libraries use the -r flag.
The install script downloads a couple of example notebooks that you can use to start experimenting with the libraries. Those will be availabe under ./JohnSnowLabs/example_notebooks folder.
Non-johnsnowlabs Healthcare NLP via Docker
These instructions use non-johnsnowlabs installation syntax. For simplified installation with
johnsnowlabslibrary, check first section.
A docker image that contains all the required libraries for installing and running Enterprise Spark NLP libraries is also available. However, it does not contain the library itself, as it is licensed, and requires installation credentials.
Make sure you have a valid license for Enterprise Spark NLP libraries (in case you do not have one, you can ask for a trial here), and follow the instructions below:
Docker Image for running Spark NLP for Healthcare inside Jupyter Notebook
The Image contains all the required libraries for installing and running Spark NLP for Healthcare. However, it does not contain the library itself, as it is licensed, and requires installation credentials.
- Please download the necessary files from the here or just get them with commandline as the following:
curl -o Dockerfile https://raw.githubusercontent.com/JohnSnowLabs/spark-nlp-workshop/master/jupyter/docker_enterprise/docker_image_nlp_hc/sparknlp_for_healthcare_jupyter/Dockerfile
curl -o entrypoint.sh https://raw.githubusercontent.com/JohnSnowLabs/spark-nlp-workshop/master/jupyter/docker_enterprise/docker_image_nlp_hc/sparknlp_for_healthcare_jupyter/entrypoint.sh
curl -o requirements.txt https://raw.githubusercontent.com/JohnSnowLabs/spark-nlp-workshop/master/jupyter/docker_enterprise/docker_image_nlp_hc/sparknlp_for_healthcare_jupyter/requirements.txt
- Download your license key in json format from my.JohnSnowLabs.com and put the same folder
- Make sure you have valid license for Spark NLP for Healthcare, and run the following command:
docker run -v /home/jsl_keys.json:/notebooks/sparknlp_keys.json -p 8888:8888 -d johnsnowlabs/sparknlp:sparknlp_for_healthcare_jupyter
- Please replace values inside
tags. For instance, replace/home/jsl_keys.jsonwith the correct license json absolute path. - Make sure docker is installed on your system.
- Run
docker psto validate the container is running. - If your container is not running, look at docker logs to identify issue.
- If the default port
8888is already occupied by another process, please change the mapping. Only change values inside thetags.
Alternative Docker Image Instractions
- Run the following commands to download the
docker-compose.ymland thesparknlp_keys.txtfiles on your local machine:curl -o docker-compose.yaml https://raw.githubusercontent.com/JohnSnowLabs/spark-nlp-workshop/master/jupyter/docker_enterprise/docker_image_nlp_hc/sparknlp_for_healthcare_image/docker-compose.yaml curl -o sparknlp_keys.txt https://raw.githubusercontent.com/JohnSnowLabs/spark-nlp-workshop/master/jupyter/docker_image_nlp_hc/sparknlp_keys.txt - Download your license key in json format from my.JohnSnowLabs.com
- Update License keys in
sparknlp_keys.txtfile. - Run the following command to run the container in detached mode:
docker-compose up -d
- By default, the jupyter notebook runs on port
8888- you can access it by typinglocalhost:8888in your browser - Create a new jupyter notebook and start coding
Troubleshooting
- Make sure docker is installed on your system.
- If you face any error while importing the lib inside jupyter, make sure all the credentials are correct in the key files and restart the service again.
- If the default port
8888is already occupied by another process, please change the mapping. - You can change/adjust volume and port mapping in the
docker-compose.yamlfile. - You don’t have a license key? Ask for a trial license here.
Non-johnsnowlabs Healthcare NLP on python
These instructions use non-johnsnowlabs installation syntax. For simplified installation with
johnsnowlabslibrary, check first section.
You can install the Healthcare NLP by using:
pip install -q spark-nlp-jsl==${version} --extra-index-url https://pypi.johnsnowlabs.com/${secret.code} --upgrade
{version} is the version part of the {secret.code} ({secret.code}.split('-')[0]) (i.e. 2.6.0)
The {secret.code} is a secret code that is only available to users with valid/trial license.
You can ask for a free trial for Enterprise Spark NLP libraries here. Then, you can obtain the secret code by visiting your account on my.JohnSnowLabs.com. Read more on how to get a license here.
Setup AWS-CLI Credentials for licensed pretrained models
You need to first set up your AWS credentials to be able to access the private repository for John Snow Labs Pretrained Models. You can do this setup via Amazon AWS Command Line Interface (AWSCLI).
Instructions about how to install AWSCLI are available at:
Make sure you configure your credentials with AWS configure following the instructions at:
Please substitute the ACCESS_KEY and SECRET_KEY with the credentials available on your license json file. This is available on your account from my.JohnSnowLabs.com. Read this for more information.
Start Spark NLP Session from python
The following will initialize the spark session in case you have run the Jupyter Notebook directly. If you have started the notebook using pyspark this cell is just ignored.
Initializing the spark session takes some seconds (usually less than 1 minute) as the jar from the server needs to be loaded.
The {secret.code} is a secret code that is only available to users with valid/trial license.
You can ask for a free trial for Enterprise Spark NLP here. Then, you can obtain the secret code by visiting your account on my.JohnSnowLabs.com. Read more on how to get a license here.
You can either use our convenience function to start your Spark Session that will use standard configuration arguments:
import sparknlp_jsl
spark = sparknlp_jsl.start(SECRET)
Or use the SparkSession module for more flexibility:
from pyspark.sql import SparkSession

def start(SECRET):
    builder = SparkSession.builder \
        .appName("Spark NLP Licensed") \
        .master("local[*]") \
        .config("spark.driver.memory", "16G") \
        .config("spark.serializer", "org.apache.spark.serializer.KryoSerializer") \
        .config("spark.kryoserializer.buffer.max", "2000M") \
        .config("spark.jars.packages", "com.johnsnowlabs.nlp:spark-nlp_2.12:"+PUBLIC_VERSION) \
        .config("spark.jars", "https://pypi.johnsnowlabs.com/"+SECRET+"/spark-nlp-jsl-"+JSL_VERSION+".jar")

    return builder.getOrCreate()

spark = start(SECRET)
If you want to download the source files (jar and whl files) locally, you can follow the instructions here.
Cheatsheet
# Install Spark NLP from PyPI
pip install spark-nlp==${public_version}

#install Spark NLP Healthcare

pip install spark-nlp-jsl==${version} --extra-index-url https://pypi.johnsnowlabs.com/${secret.code} --upgrade

# Load Spark NLP with Spark Shell
spark-shell --packages com.johnsnowlabs.nlp:spark-nlp_2.12:${public_version} --jars spark-nlp-jsl-${version}.jar

# Load Spark NLP with PySpark
pyspark --packages com.johnsnowlabs.nlp:spark-nlp_2.12:${public_version} --jars spark-nlp-jsl-${version}.jar

# Load Spark NLP with Spark Submit
spark-submit --packages com.johnsnowlabs.nlp:spark-nlp_2.12:${public_version} --jars spark-nlp-jsl-${version}.jar
Non-johnsnowlabs Healthcare NLP for Scala
These instructions use non-johnsnowlabs installation syntax, since
johnsnowlabsis a Python library.
Use Spark NLP in Spark shell
1.Download the fat jar for Enterprise Spark NLP
aws s3 cp --region us-east-2 s3://pypi.johnsnowlabs.com/$jsl_secret/spark-nlp-jsl-$jsl_version.jar spark-nlp-jsl-$jsl_version.jar
2.Set up the Environment Variables box:
    AWS_ACCESS_KEY_ID=xxx
    AWS_SECRET_ACCESS_KEY=yyy
    SPARK_NLP_LICENSE=zzz
3.The preferred way to use the library when running Spark programs is using the --packagesand --jar option as specified in the spark-packages section.
spark-shell --packages com.johnsnowlabs.nlp:spark-nlp_2.12:${public-version} --jars /spark-nlp-jsl-${version}.jar
Non-johnsnowlabs Healthcare NLP in Sbt project
These instructions use non-johnsnowlabs installation syntax. For simplified installation with
johnsnowlabslibrary, check first section.
1.Download the fat jar for Enterprise Spark NLP.
aws s3 cp --region us-east-2 s3://pypi.johnsnowlabs.com/$jsl_secret/spark-nlp-jsl-$jsl_version.jar spark-nlp-jsl-$jsl_version.jar
2.Set up the Environment Variables box:
    AWS_ACCESS_KEY_ID=xxx
    AWS_SECRET_ACCESS_KEY=yyy
    SPARK_NLP_LICENSE=zzz
3.Add the spark-nlp jar in your build.sbt project
libraryDependencies += "com.johnsnowlabs.nlp" %% "spark-nlp" % "{public-version}"
4.You need to create the /lib folder and paste the spark-nlp-jsl-${version}.jar file.
5.Add the fat spark-nlp-healthcare in your classpath. You can do it by adding this line in your build.sbt
unmanagedJars in Compile += file("lib/sparknlp-jsl.jar")
Non-johnsnowlabs Healthcare NLP on Colab
This is the way to run Clinical NLP in Google Colab if you don’t use johnsnowlabs library.
Run the following code in Google Colab notebook and start using Spark NLP right away.
The first thing that you need is to create the json file with the credentials and the configuration in your local system.
{
  "PUBLIC_VERSION": "{public-version}",
  "JSL_VERSION": "{version}",
  "SECRET": "{version}-{secret.code}",
  "SPARK_NLP_LICENSE": "xxxxx",
  "AWS_ACCESS_KEY_ID": "yyyy",
  "AWS_SECRET_ACCESS_KEY": "zzzz"
}
If you have a valid floating license, the license json file can be downloaded from your account on my.JohnSnowLabs.com on My Subscriptions section. To get a trial license please visit
Then you need to write that piece of code to load the credentials that you created before.
import json
import os

from google.colab import files

license_keys = files.upload()

with open(list(license_keys.keys())[0]) as f:
  license_keys = json.load(f)

# Defining license key-value pairs as local variables
locals().update(license_keys)

# Adding license key-value pairs to environment variables
os.environ.update(license_keys)
# This is only to setup PySpark and Spark NLP on Colab
!wget https://raw.githubusercontent.com/JohnSnowLabs/spark-nlp-workshop/master/jsl_colab_setup.sh
# -p is for pyspark (by default 3.1.1)
!bash jsl_colab_setup.sh
Spark NLP quick start on Google Colab is a live demo on Google Colab that performs named entity recognitions for HealthCare.
Non-johnsnowlabs Healthcare NLP on GCP Dataproc
These instructions use non-johnsnowlabs installation syntax. For simplified installation with
johnsnowlabslibrary, check first section.
- You can follow the steps here for installation via IU
- Create a cluster if you don’t have one already as follows.
At gcloud shell:
gcloud services enable dataproc.googleapis.com \
  compute.googleapis.com \
  storage-component.googleapis.com \
  bigquery.googleapis.com \
  bigquerystorage.googleapis.com
REGION=<region>
BUCKET_NAME=<bucket_name>
gsutil mb -c standard -l ${REGION} gs://${BUCKET_NAME}
REGION=<region>
ZONE=<zone>
CLUSTER_NAME=<cluster_name>
BUCKET_NAME=<bucket_name>
You can set image-version, master-machine-type, worker-machine-type, master-boot-disk-size, worker-boot-disk-size, num-workers as your needs. If you use the previous image-version from 2.0, you should also add ANACONDA to optional-components. And, you should enable gateway. As noticed below, you should explicitly write JSL_SECRET and JSL_VERSION at metadata param inside the quotes. This will start the pip installation using the wheel file of Licensed SparkNLP!
gcloud dataproc clusters create ${CLUSTER_NAME} \
  --region=${REGION} \
  --network=${NETWORK} \
  --zone=${ZONE} \
  --image-version=2.0 \
  --master-machine-type=n1-standard-4 \
  --worker-machine-type=n1-standard-2 \
  --master-boot-disk-size=128GB \
  --worker-boot-disk-size=128GB \
  --num-workers=2 \
  --bucket=${BUCKET_NAME} \
  --optional-components=JUPYTER \
  --enable-component-gateway \
  --metadata 'PIP_PACKAGES=google-cloud-bigquery google-cloud-storage spark-nlp-display
  https://s3.eu-west-1.amazonaws.com/pypi.johnsnowlabs.com/JSL_SECRET/spark-nlp-jsl/spark_nlp_jsl-JSL_VERSION-py3-none-any.whl' \
  --initialization-actions gs://goog-dataproc-initialization-actions-${REGION}/python/pip-install.sh
-
On an existing one, you need to install spark-nlp and spark-nlp-display packages from PyPI.
-
Now, you can attach your notebook to the cluster and use Spark NLP via following the instructions. The key part of this usage is how to start SparkNLP sessions using Apache Hadoop YARN cluster manager.
3.1. Read license file from the notebook using GCS.
3.2. Set the right path of the Java Home Path.
3.3. Use the start function to start the SparkNLP JSL version such as follows:
def start(secret):
    builder = SparkSession.builder \
        .appName("Spark NLP Licensed") \
        .config("spark.serializer", "org.apache.spark.serializer.KryoSerializer") \
        .config("spark.kryoserializer.buffer.max", "2000M") \
        .config("spark.jars.packages", "com.johnsnowlabs.nlp:spark-nlp_2.12:"+PUBLIC_VERSION) \
        .config("spark.jars", "https://pypi.johnsnowlabs.com/"+SECRET+"/spark-nlp-jsl-"+JSL_VERSION+".jar")

    return builder.getOrCreate()

spark = start(SECRET)
As you see, we did not set .master('local[*]') explicitly to let YARN manage the cluster.
Or you can set .master('yarn').
Non-johnsnowlabs Healthcare NLP on AWS SageMaker
These instructions use non-johnsnowlabs installation syntax. For simplified installation with
johnsnowlabslibrary, check first section.
- Access AWS Sagemaker in AWS.
- Go to Notebook -> Notebook Instances.
- Create a new Notebook Instance, follow this Instructions Steps
- Minimum requirement 16G RAM and 50G Volume. This is the configuration we have used, although most of the interesting models will require a ml.t3.xlarge instance or more. Reserve at least 50GB of memory
- Once created, open JupyterLab and use Conda python 3 kernel.
- Upload
license keyand setEnvironment Variables.
import json
import os

with open('spark_nlp_for_healthcare.json', 'r') as f:
    for k, v in json.load(f).items():
        %set_env $k=$v

%set_env PYSPARK=3.2.2
%set_env SPARK_HOME=/home/ec2-user/SageMaker/spark-3.2.2-bin-hadoop2.7
- Download and install libraries
!wget https://raw.githubusercontent.com/JohnSnowLabs/spark-nlp-workshop/master/jsl_sagemaker_setup.sh
!bash jsl_sagemaker_setup.sh
- Import libraries and start session
import sparknlp
import sparknlp_jsl
from pyspark.sql import SparkSession

spark = sparknlp_jsl.start(license_keys['SECRET'])
Non-johnsnowlabs Healthcare NLP with Poetry
These instructions use non-johnsnowlabs installation syntax. For simplified installation with
johnsnowlabslibrary, check first section.
This is a sample project.toml file which you can use with poetry install to setup spark NLP + the Healthcare python library spark-nlp-jsl
You need to point it to either the tar.gz or .whl file which are hosted at
https://pypi.johnsnowlabs.com/<SECRET>/spark-nlp-jsl/
NOTE You must update the url whenever you are upgrading your spark-nlp-jsl version
[tool.poetry]
name = "poertry_demo"
version = "0.1.0"
description = ""
authors = ["person <person@gmail.com>"]

[tool.poetry.dependencies]
python = "^3.7"

[tool.poetry.dev-dependencies]
spark-nlp = "5.1.2"
spark-nlp-jsl = { url = "https://pypi.johnsnowlabs.com/SECRET/spark-nlp-jsl/spark_nlp_jsl-tar.gz_OR_.whl" }

[build-system]
requires = ["poetry-core>=1.0.0"]
build-backend = "poetry.core.masonry.api"
Non-johnsnowlabs Healthcare NLP on AWS EMR
These instructions use non-johnsnowlabs installation syntax. For simplified installation with
johnsnowlabslibrary, check first section.
In this page we explain how to setup Spark-NLP + Spark-NLP Healthcare in AWS EMR, using the AWS console.
Steps
-
Go to AWS services, and select EMR
-
Press Create Cluster and start:
- Name your cluster
- select EMR version
- select required applications

- Specify EC2 instances for the cluster, as primary/master node and cores/workers
- Specify the storage/ EBS volume

- Choose Cluster scaling and provisioning
- Choose Networking / VPC

- Choose Security Groups/Firewall for primary/master node and cores/workers/slaves

- If you have add steps , that will be executed after cluster is provisioned
- Specify the S3 location for logs
- Under Tags section, please add a
KEY: VALUEpair withfor-use-with-amazon-emr-managed-policiestrue
Important
- Specify the Bootstrap Action
Put this sample shell script in a S3 location and specify it in the form: You will have spark-nlp and spark-nlp-jsl and spark-ocr installed by bootstrap action, this file is executed during the cluster provisioning. Version of Libraries and other credentials provided by Johnsnowlabs will be in this file.

Important
- Specify the Configuration for spark: Here is a sample configuration, you can copy/paste into Software settings tab or load from S3. You can change spark configuration according to your needs.
[
  {
    "Classification": "spark-env",
    "Configurations": [
      {
        "Classification": "export",
        "Properties": {
          "JSL_EMR": "1",
          "PYSPARK_PYTHON": "/usr/bin/python3",
          "SPARK_NLP_LICENSE": "XYXYXYXYXY"
        }
      }
    ],
    "Properties": {}
  },
  {
    "Classification": "yarn-env",
    "Configurations": [
      {
        "Classification": "export",
        "Properties": {
          "JSL_EMR": "1",
          "SPARK_NLP_LICENSE": "XYXYXYXYXY"
        }
      }
    ],
    "Properties": {}
  },
  {
    "Classification": "spark-defaults",
    "Properties": {
      "spark.driver.maxResultSize": "0",
      "spark.driver.memory": "64G",
      "spark.dynamicAllocation.enabled": "true",
      "spark.executor.memory": "64G",
      "spark.executorEnv.SPARK_NLP_LICENSE": "XYXYXYXYXY",
      "spark.jsl.settings.aws.credentials.access_key_id": "XYXYXYXYXY",
      "spark.jsl.settings.aws.credentials.secret_access_key": "XYXYXYXYXY",
      "spark.jsl.settings.aws.region": "us-east-1",
      "spark.jsl.settings.pretrained.credentials.access_key_id": "XYXYXYXYXY",
      "spark.jsl.settings.pretrained.credentials.secret_access_key": "XYXYXYXYXY",
      "spark.kryoserializer.buffer.max": "2000M",
      "spark.rpc.message.maxSize": "1024",
      "spark.serializer": "org.apache.spark.serializer.KryoSerializer",
      "spark.yarn.appMasterEnv.SPARK_NLP_LICENSE": "XYXYXYXYXY",
      "spark.yarn.preserve.staging.files": "true",
      "spark.yarn.stagingDir": "hdfs:///tmp"
    }
  }
]
- There’s not much additional setup you need to perform. So just start a notebook server, connect it to the cluster you just created(be patient, it takes a while), and test with the jsl_test_notebook_for_emr.ipynb test notebook.
Non-johnsnowlabs Healthcare NLP on Amazon Linux 2
These instructions use non-johnsnowlabs installation syntax. For simplified installation with
johnsnowlabslibrary, check first section.
# Update Package List & Install  Required Packages
sudo yum update
sudo yum install -y amazon-linux-extras
sudo yum -y install python3-pip

# Create python virtual environment and activate it:
python3 -m venv .sparknlp-env
source .sparknlp-env/bin/activate
Check JAVA version:
- For Sparknlp versions above 3.x, please use JAVA-11
- For Sparknlp versions below 3.x and SparkOCR, please use JAVA-8
Checking Java versions installed on your machine:
sudo alternatives --config java
You can pick the index number (I am using java-8 as default - index 2):

If you dont have java-11 or java-8 in you system, you can easily install via:
sudo yum install java-1.8.0-openjdk
Now, we can start installing the required libraries:
pip install jupyter
We can start jupyter notebook via:
jupyter notebook
### Now we are in the jupyter notebook cell:
import json
import os

with open('sparknlp_for_healthcare.json) as f:
    license_keys = json.load(f)

# Defining license key-value pairs as local variables
locals().update(license_keys)

# Adding license key-value pairs to environment variables
os.environ.update(license_keys)

# Installing pyspark and spark-nlp
! pip install --upgrade -q pyspark==3.1.2 spark-nlp==$PUBLIC_VERSION

# Installing Spark NLP Healthcare
! pip install --upgrade -q spark-nlp-jsl==$JSL_VERSION  --extra-index-url https://pypi.johnsnowlabs.com/$SECRET
Deploying Spark NLP Healthcare on Kubernetes
This guide will walk you through the deployment of a Spark NLP Healthcare application on a Kubernetes cluster using kind.
Prerequisites
Installing Necessary Tools:
- Docker:
- Install from Docker Desktop(https://www.docker.com/products/docker-desktop/).
- Ensure Kubernetes is enabled in Docker Desktop settings.
- kubectl:
- Install using the instructions from Kubernetes official documentation(https://kubernetes.io/docs/tasks/tools/).
- kind:
- Install using the instructions from Kubernetes official documentation(https://kubernetes.io/docs/tasks/tools/).
- Docker Hub Account:
- If you don’t have one, create your account at Docker Hub(https://hub.docker.com/signup).
- Install JohnSnow Labs licence key file to the project directory(https://my.johnsnowlabs.com/subscriptions).
Project Structure:
.
├── Dockerfile
├── main.py
├── README.md
├── requirements.txt
├── spark-nlp-healthcare-deployment.yaml
└── spark_nlp_for_healthcare_spark_ocr_8204.json (licence key filename)
Application Details
The main application script, main.py, is as follows:
from johnsnowlabs import nlp, medical
import pandas as pd
from pyspark.sql import DataFrame
import pyspark.sql.functions as F
import pyspark.sql.types as T
import pyspark.sql as SQL
from pyspark import keyword_only
from pyspark.ml import PipelineModel
import os
class NLPProcessor:
def __init__(self):
"""Initialize and set up NLP tools."""
# Install all licensed Python Wheels and pre-download Jars the Spark Session JVM
nlp.install()
# Automatically load license data and start a session with all jars user has access to
self.spark = nlp.start()
# Set up the NLP pipeline
self.model = self.setup_pipeline()
def setup_pipeline(self):
"""Set up the NLP pipeline using John Snow Labs library."""
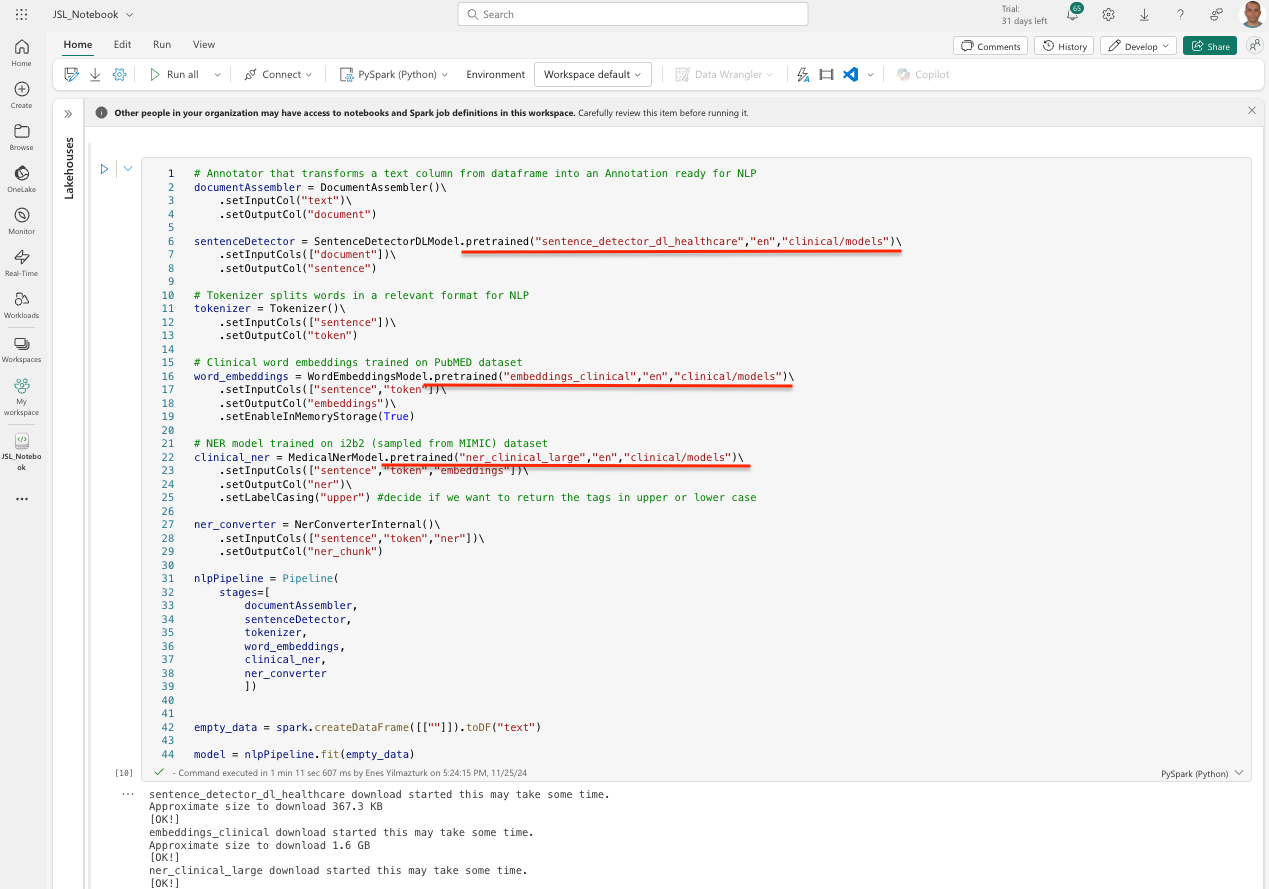
# Annotator that transforms a text column from dataframe into an Annotation ready for NLP
documentAssembler = nlp.DocumentAssembler()\
.setInputCol("text")\
.setOutputCol("document")
# Sentence detector specific to healthcare data
sentenceDetector = nlp.SentenceDetectorDLModel.pretrained("sentence_detector_dl_healthcare", "en", "clinical/models")\
.setInputCols(["document"])\
.setOutputCol("sentence")
# Tokenizer splits words in a relevant format for NLP
tokenizer = nlp.Tokenizer()\
.setInputCols(["sentence"])\
.setOutputCol("token")
# Clinical word embeddings trained on PubMED dataset
word_embeddings = nlp.WordEmbeddingsModel.pretrained("embeddings_clinical", "en", "clinical/models")\
.setInputCols(["sentence", "token"])\
.setOutputCol("embeddings")
# NER model trained on i2b2 (sampled from MIMIC) dataset
jsl_ner = medical.NerModel.pretrained("ner_jsl", "en", "clinical/models")\
.setInputCols(["sentence", "token", "embeddings"])\
.setOutputCol("jsl_ner")
# Converter to transform NER results
jsl_ner_converter = nlp.NerConverter()\
.setInputCols(["sentence", "token", "jsl_ner"])\
.setOutputCol("jsl_ner_chunk")
# Combine all the stages of the pipeline
nlpPipeline = nlp.Pipeline(stages=[
documentAssembler,
sentenceDetector,
tokenizer,
word_embeddings,
jsl_ner,
jsl_ner_converter
])
# Fit an empty dataframe to initialize the pipeline
return nlpPipeline.fit(self.spark.createDataFrame([[""]]).toDF("text"))
def annotate_text(self, text):
"""Annotate the provided text using the NLP pipeline."""
light_model = nlp.LightPipeline(self.model)
return light_model.annotate(text)
def main():
"""Main function to run the NLP annotation."""
processor = NLPProcessor()
sample_text = '''A 28-year-old female with a history of gestational diabetes mellitus diagnosed eight years prior to presentation and subsequent type two diabetes mellitus ( T2DM )'''
result = processor.annotate_text(sample_text)
print(result)
if __name__ == "__main__":
main()
Step-by-step Guide
1. Containerizing the Spark NLP Healthcare Application
Dockerfile:
# Use Ubuntu 20.04 as the base image
FROM ubuntu:20.04

# Update and install necessary packages
RUN apt-get update && DEBIAN_FRONTEND=noninteractive apt-get install -y openjdk-8-jdk python3-pip curl

# Set JAVA_HOME
ENV JAVA_HOME /usr/lib/jvm/java-8-openjdk-amd64/

# Copy the base requirements and main application into the image
COPY requirements.txt /app/requirements.txt
COPY <licence_filename> /app/<licence_filename>
WORKDIR /app

# Install Python packages
RUN pip3 install -r requirements.txt

# Copy the main application
COPY main.py /app/main.py

CMD ["python3", "main.py"]
Note: Before building the Docker image, replace
Logging in to Docker Hub:
Run the command:docker login -u <your-docker-hub-username> -p <your-docker-hub-password>
This will authenticate you with Docker Hub, allowing you to push and pull private images.
Build the Docker image with the specific tag:
docker build -t <your-docker-hub-username>/spark-nlp-healthcare:<JSL_VERSION> .
2. Pushing Docker Image to Docker Hub
Tag the image with your Docker Hub username:
docker tag spark-nlp-healthcare:<JSL_VERSION> <your-docker-hub-username>/spark-nlp-healthcare:<JSL_VERSION>
Push the image to Docker Hub:
docker push <your-docker-hub-username>/spark-nlp-healthcare:<JSL_VERSION>
3. Setting Up the Kubernetes Cluster with kind
Before deploying the application, you’ll need to set up a local Kubernetes cluster using kind. Run the following command:
kind create cluster
4. Setting up Secrets in Kubernetes
Make sure your Spark NLP Healthcare license key file (e.g.,
Replace
kubectl create secret generic spark-nlp-healthcare-secret --from-file=license=<licence_filename>
5. Deploying the Spark NLP Healthcare Application
Before proceeding, ensure that you replace the placeholders
apiVersion: apps/v1
kind: Deployment
metadata:
  name: spark-nlp-healthcare-deployment
spec:
  replicas: 1
  selector:
    matchLabels:
      app: spark-nlp-healthcare
  template:
    metadata:
      labels:
        app: spark-nlp-healthcare
    spec:
      containers:
      - name: spark-nlp-healthcare
        image: <your-docker-hub-username>/spark-nlp-healthcare:<JSL_VERSION>
        ports:
        - containerPort: 8888
        env:
        - name: SPARK_NLP_LICENSE
          valueFrom:
            secretKeyRef:
              name: spark-nlp-healthcare-secret
              key: license
Apply the deployment:
kubectl apply -f spark-nlp-healthcare-deployment.yaml
To verify, run commands below:
kubectl get deployments
kubectl get pods
The output will look like as following;
kubectl get deployments
NAME                              READY   UP-TO-DATE   AVAILABLE   AGE
spark-nlp-healthcare-deployment   0/1     1            0           2m42s

kubectl get pods
NAME                                               READY   STATUS              RESTARTS   AGE
spark-nlp-healthcare-deployment-7fc4c6b4ff-rdj97   0/1     ContainerCreating   0          2m50s
Wait until the output becomes as following;
kubectl get deployments
NAME                              READY   UP-TO-DATE   AVAILABLE   AGE
spark-nlp-healthcare-deployment   1/1     1            1           8m46s

kubectl get pods
NAME                                               READY   STATUS    RESTARTS   AGE
spark-nlp-healthcare-deployment-7fc4c6b4ff-rdj97   1/1     Running   0          8m54s
Now the pod is ready and running.
6. Validating the Deployment
To get the name of the pod:
kubectl get pods -l app=spark-nlp-healthcare -o jsonpath="{.items[0].metadata.name}"
You can verify if the application is running properly within the Kubernetes cluster by executing a shell within the pod:
kubectl exec -it <kubernetes_pod_name> -- /bin/bash
This command will open a bash shell and the program can be run with python3 main.py command. It will output the following;
[OK!]
{'document': ['A 28-year-old female with a history of gestational diabetes mellitus diagnosed eight years prior to presentation and subsequent type two diabetes mellitus ( T2DM )'], 'jsl_ner_chunk': ['28-year-old', 'female', 'gestational diabetes mellitus', 'eight years prior', 'type two diabetes mellitus', 'T2DM'], 'jsl_ner': ['O', 'B-Age', 'B-Gender', 'O', 'O', 'O', 'O', 'B-Diabetes', 'I-Diabetes', 'I-Diabetes', 'O', 'B-RelativeDate', 'I-RelativeDate', 'I-RelativeDate', 'O', 'O', 'O', 'O', 'B-Diabetes', 'I-Diabetes', 'I-Diabetes', 'I-Diabetes', 'O', 'B-Diabetes', 'O'], 'token': ['A', '28-year-old', 'female', 'with', 'a', 'history', 'of', 'gestational', 'diabetes', 'mellitus', 'diagnosed', 'eight', 'years', 'prior', 'to', 'presentation', 'and', 'subsequent', 'type', 'two', 'diabetes', 'mellitus', '(', 'T2DM', ')'], 'embeddings': ['A', '28-year-old', 'female', 'with', 'a', 'history', 'of', 'gestational', 'diabetes', 'mellitus', 'diagnosed', 'eight', 'years', 'prior', 'to', 'presentation', 'and', 'subsequent', 'type', 'two', 'diabetes', 'mellitus', '(', 'T2DM', ')'], 'sentence': ['A 28-year-old female with a history of gestational diabetes mellitus diagnosed eight years prior to presentation and subsequent type two diabetes mellitus ( T2DM )']}
If you have any questions or face any issues during the deployment process, please feel free to reach out to me at burhan@johnsnowlabs.com. I’m here to help!
Fancy trying?
You can ask for a free trial for Enterprise Spark NLP here. This will automatically create a new account for you on my.JohnSnowLabs.com. Login in to your new account and from My Subscriptions section, you can download your license key as a json file.
The license json file contains:
- the secrets for installing the Enterprise Spark NLP and Spark OCR libraries,
- the license key as well as
- AWS credentials that you need to access the s3 bucket where the healthcare models and pipelines are published.
If you have asked for a trial license, but you cannot access your account on my.JohnSnowLabs.com and you did not receive the license information via email, please contact us at support@johnsnowlabs.com.
Azure Synapse Analytics Support
Step 1: Sign in to Azure portal
- Sign in to the Azure portal at https://portal.azure.com.
Step 2: Create a new Resource Group
- On the left-hand menu, click on “Resource groups”.
- In the new window, click “Create”.
- Provide a unique name for the Resource Group and select the Region where you want to create it.
- Click “Review + Create” and then “Create”.
Step 3: Create a Storage Account
- On the left-hand menu, click on “Create a resource”.
- In the “New” window, search for “Storage Account”.
- In the search results, select “Storage Account” and then click “Create”.
- In the new window, select the Resource Group you just created, provide a unique name for your Storage Account, and select the Region.
- Select the Performance, Account kind, Replication, and Access tier according to your requirements.
- Click “Review + Create” and then “Create”.
Step 4: Create a Synapse workspace
- On the left-hand menu, click on “Create a resource”.
- In the “New” window, search for “Azure Synapse Analytics”.
- In the search results, select “Azure Synapse Analytics” and then click “Create”.
- In the new window, select the Resource Group you just created, provide a unique name for your Synapse Workspace, select the Region, and provide the Storage Account you created earlier.
- You also need to create a new file system in your storage account for Synapse workspace, provide a unique name for it.
- Fill the Security & networking details as per your requirements.
- Click “Review + Create” and then “Create”.
Step 5: Configuring the Synapse Studio
- Once your workspace is created, open the Azure Synapse Studio.
- Navigate to the “Manage” section within Azure Synapse Studio.
- Under the “Workspace settings” section, find and select “Workspace Packages”.
- Click “Upload” to upload the necessary JAR and wheel files.
- For running licensed models, navigate to the “Apache Spark configurations” under the “Manage” section.
- Click on “New” to add a new configuration.
- For licensed Healthcare models, Add the following properties:
spark.hadoop.fs.s3a.access.key:spark.hadoop.fs.s3a.secret.key:spark.yarn.appMasterEnv.SPARK_NLP_LICENSE:
After adding these properties, the Apache Spark configuration is ready.
- Navigate to “Apache Spark pools” under the “Analytics pools” section.
- Click on “New” to create a new Spark pool. Configure the pool settings as required, selecting a “Medium” Node size under “Performance Settings”. Under “Additional settings”, allow “session level packages”. Add the Apache Spark configuration created above (this is needed for licensed models only). Review your settings, then click “Create”.
- Navigate to the “Develop” section in Azure Synapse Studio.
- Create a new notebook or import an existing one. Attach the notebook to the Apache Spark pool created above.
Now, all the necessary licenses and JARs are ready to be used. You can proceed to run your notebook.
For running OCR models, upload the following JAR and wheel files to the Workspace packages.
- For licensed OCR models, Add the following properties:
spark.hadoop.fs.s3a.access.key:spark.hadoop.fs.s3a.secret.key:spark.yarn.appMasterEnv.SPARK_OCR_LICENSE:spark.driver.extraJavaOptions: -Dorg.fluentd.logger.sender.NullSender=org.fluentd.logger.sender.NullSenderspark.executor.extraJavaOptions: -Dorg.fluentd.logger.sender.NullSender=org.fluentd.logger.sender.NullSenderspark.sql.legacy.allowUntypedScalaUDF: True
Now, you can proceed to run your OCR models and notebooks.
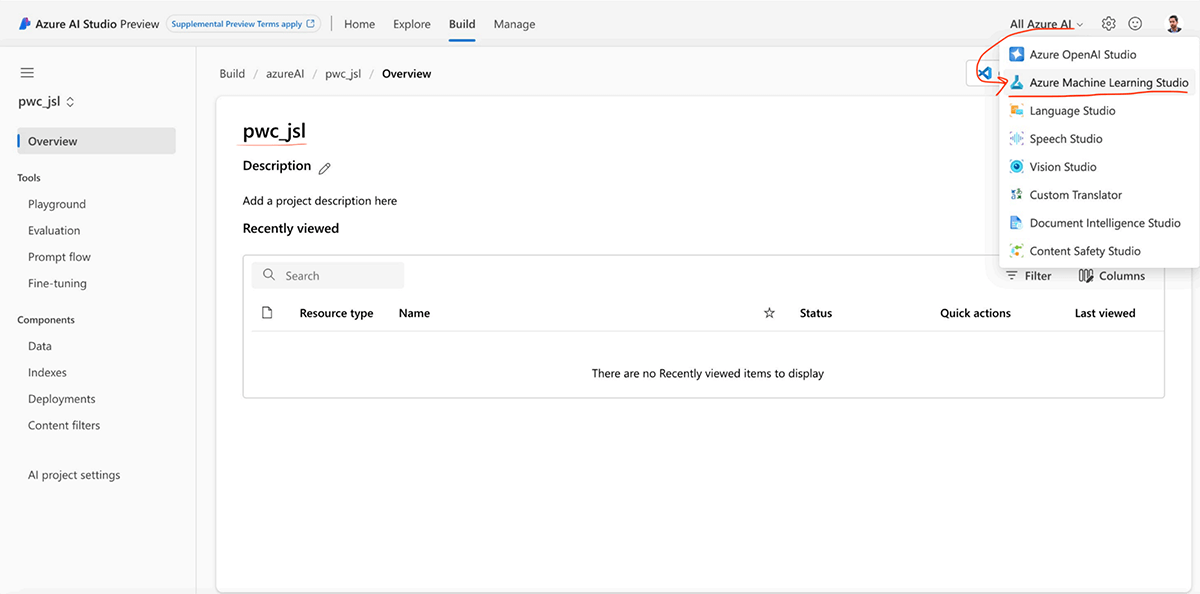
Azure ML Studio instructions
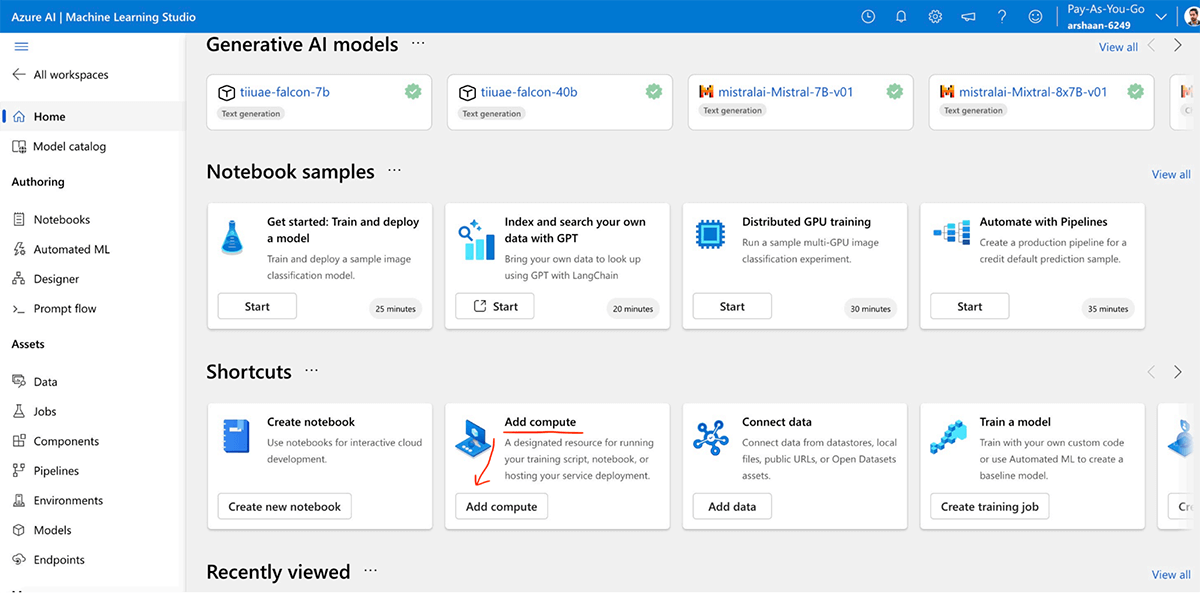
- Go to All Azure AI dropdown and choose Azure Machine Learning Studio.
- Such a window will Appear. Go to Add compute.
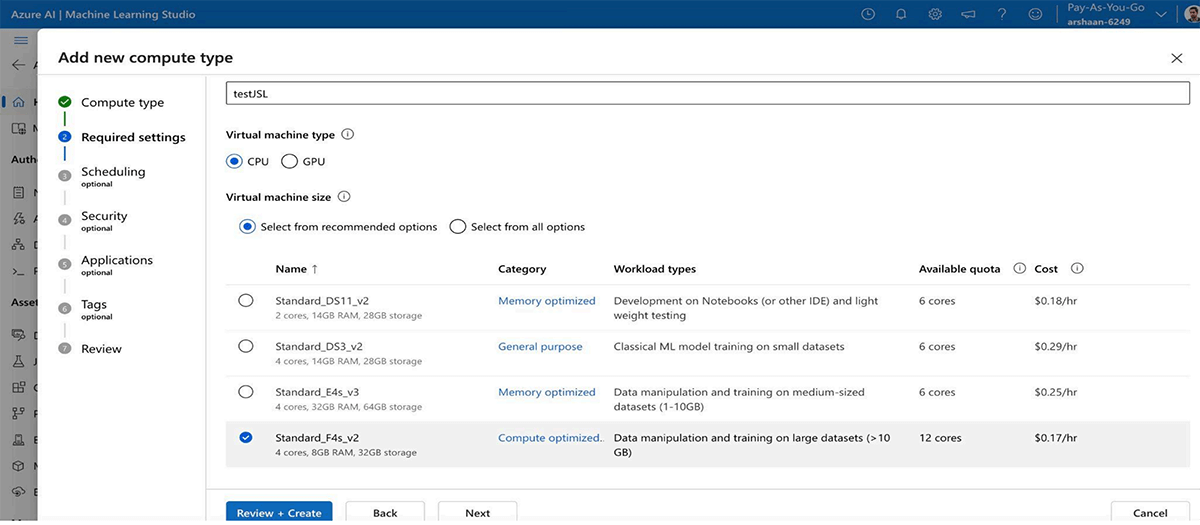
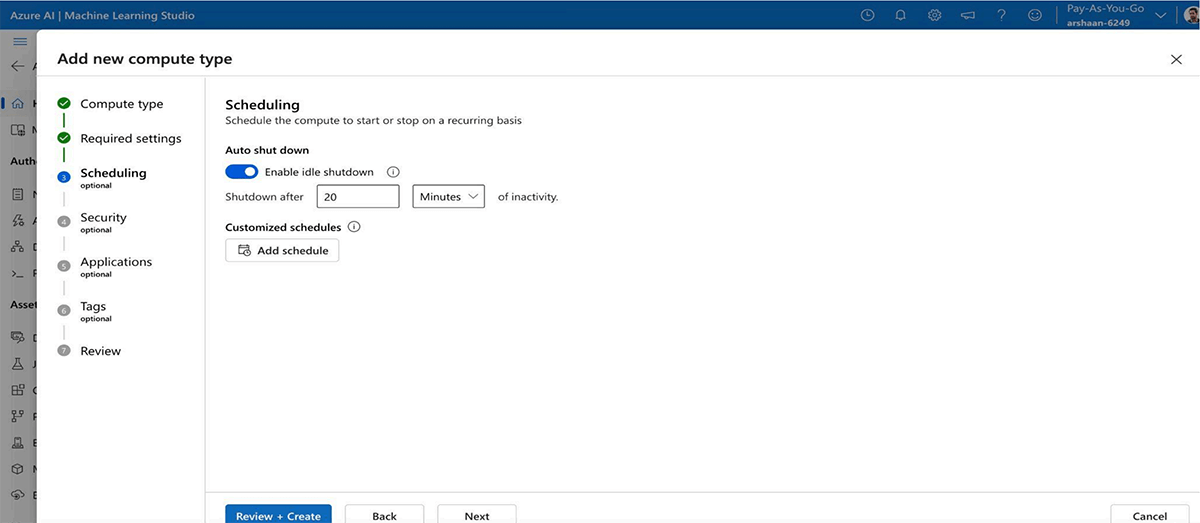
- Choose the compute type and enable auto-shutdown as well.

- Then go to the Notebooks Section.
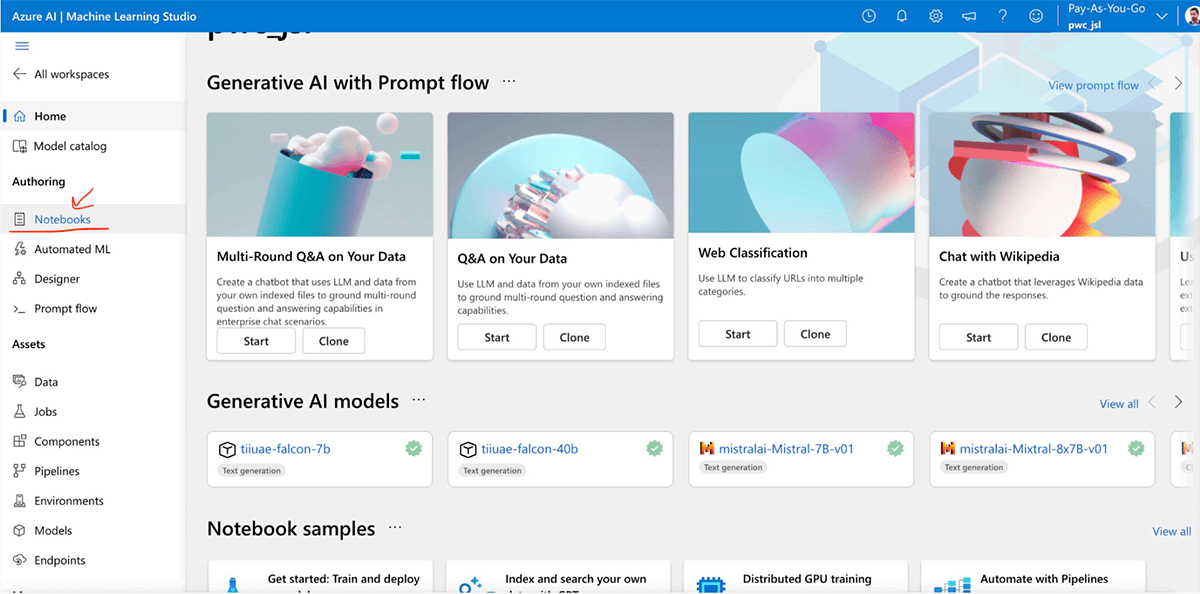
In NB section, you can create your own NB or load existing NBs.
- Here I uploaded a NB and attached the compute we created above, with Python 3.8 Azure ML as kernel.
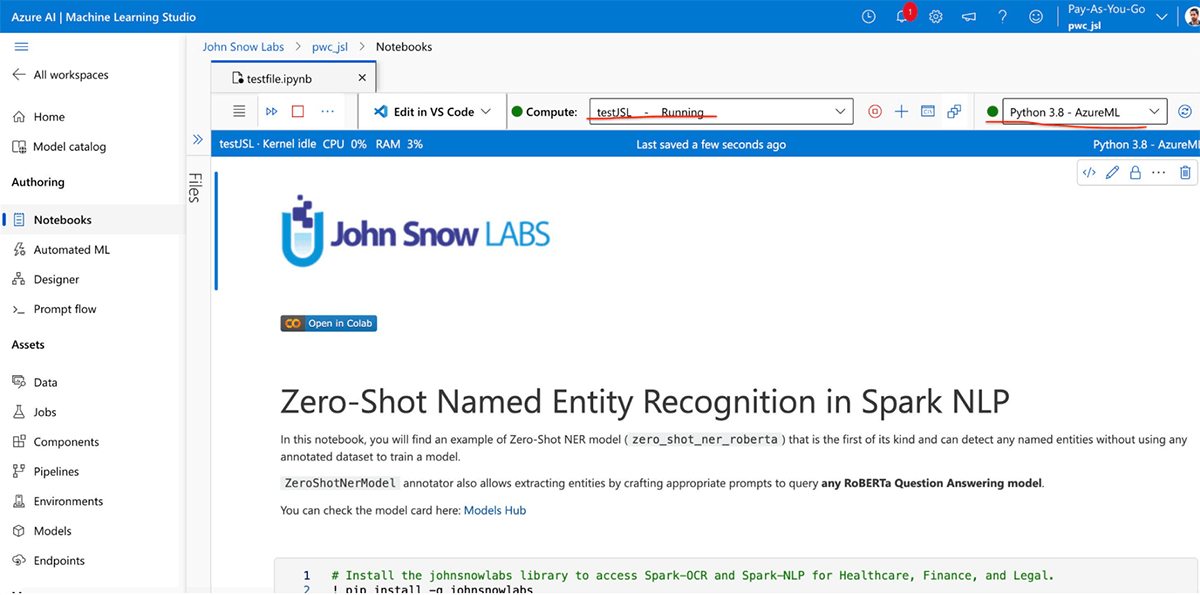
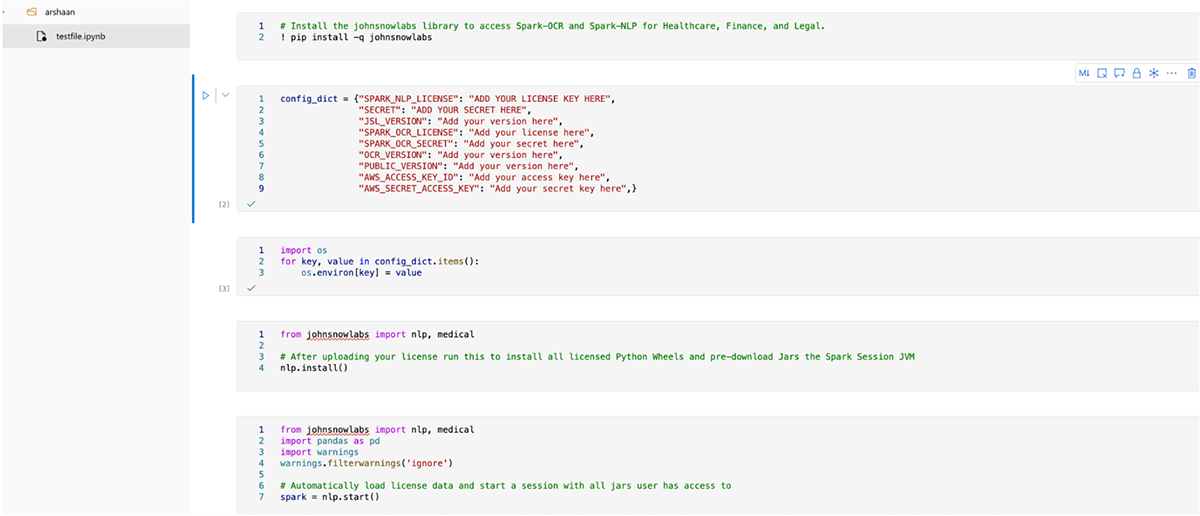
- Once the session starts, you just need to install the johnsnowlabs library and update the environment with license keys in this way. Then using
nlp.install()andnlp.start()you can install the required jars and wheels and start the spark session.
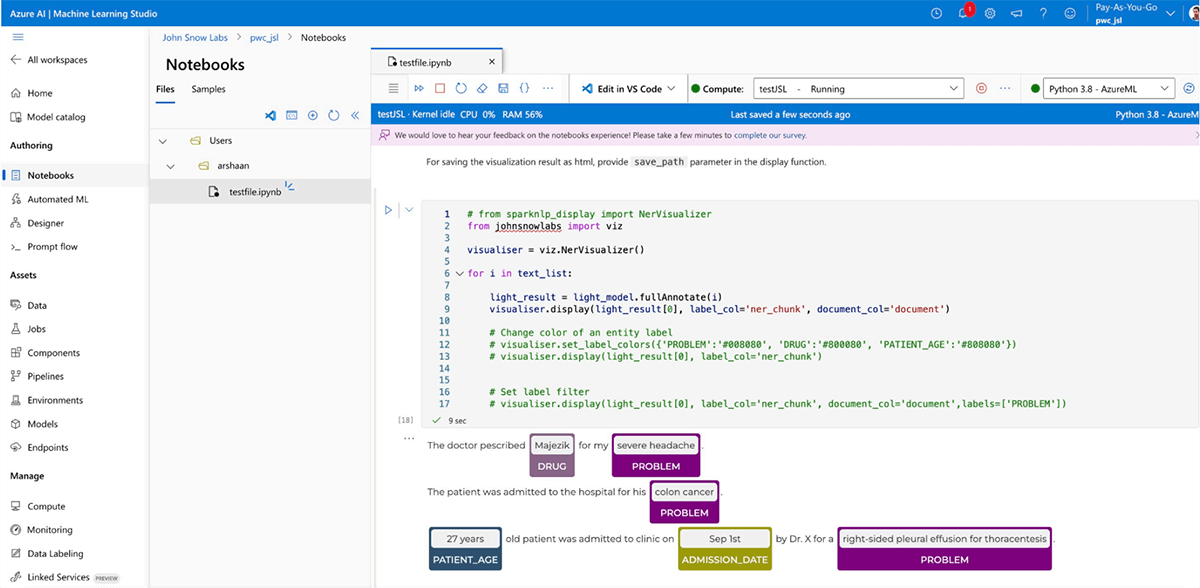
- Once spark session is created. Then you can run the johnsnowlabs models and pipelines there (licensed as well as open source).
Microsoft Fabric Instructions
Step 1: Log into MS Fabric
Navigate to MS Fabric and sign in with your MS Fabric Account credentials.
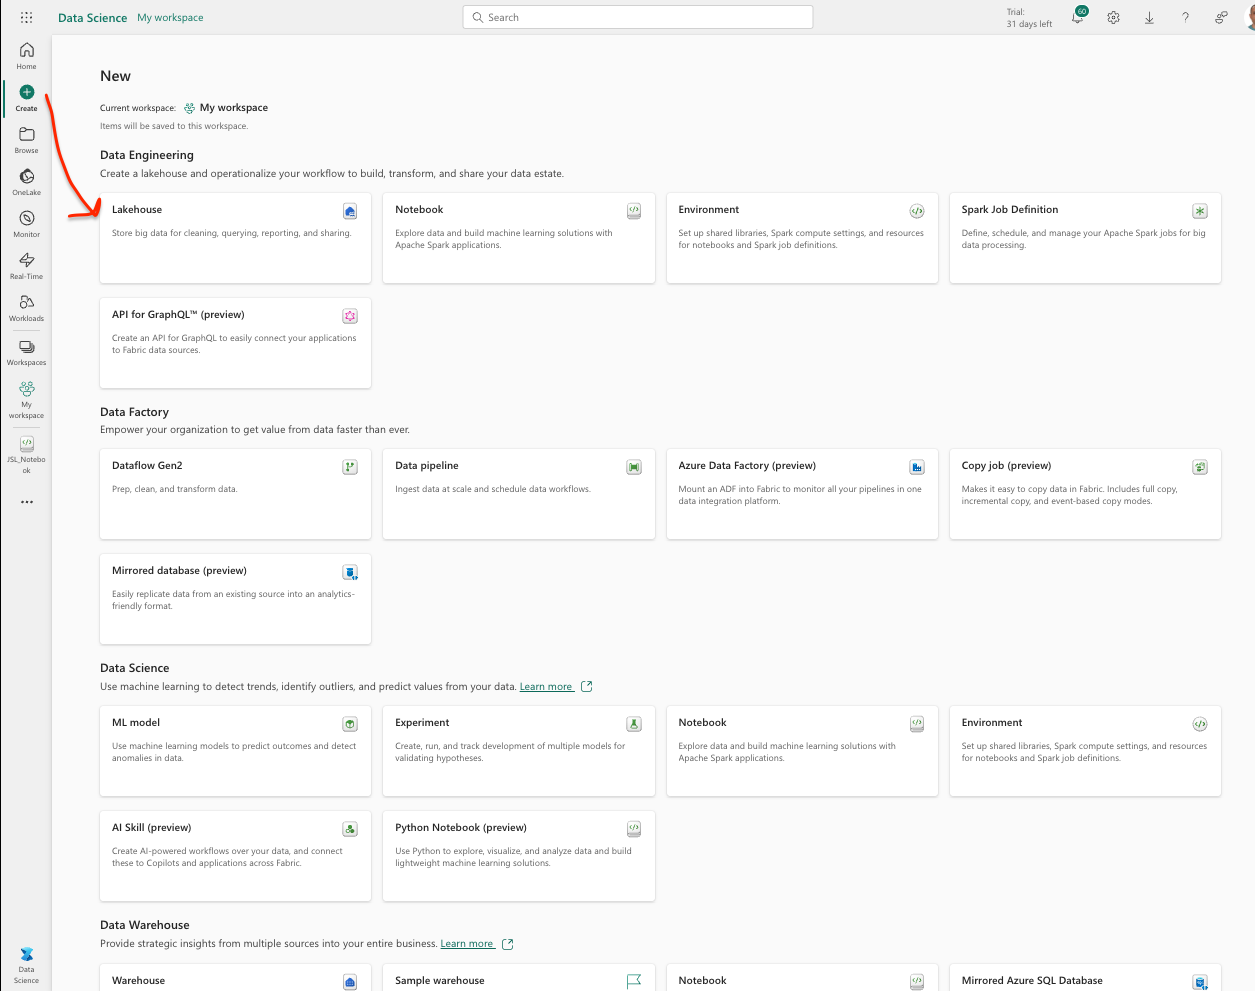
Step 2: Create a Lakehouse
- Go to the Data Science section.
- Navigate to the Create section.
- Create a new lakehouse, (for instance let us name it
jsl_workspace.)
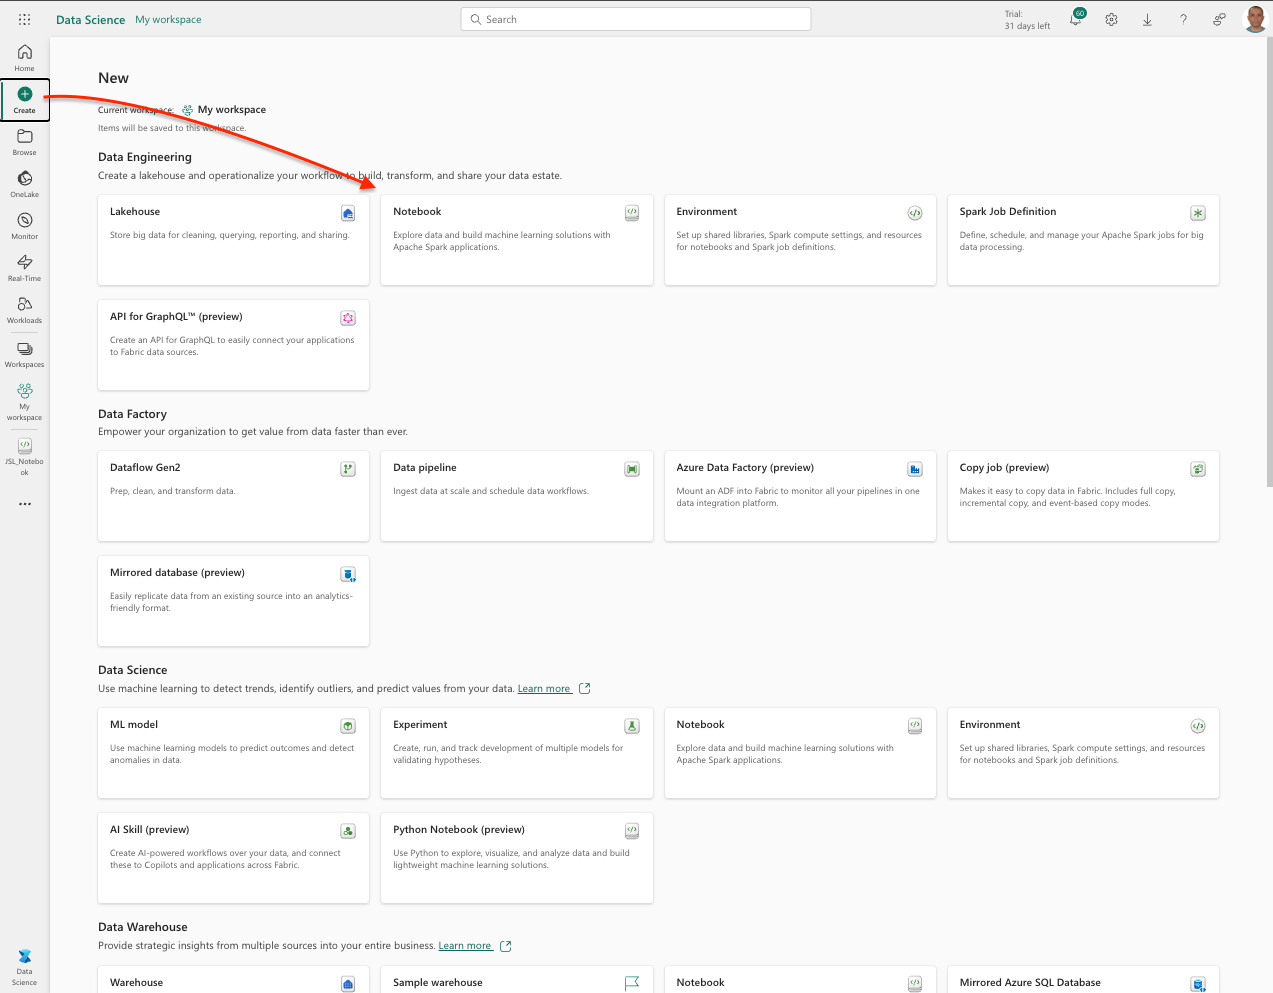
Step 3: Create a Notebook
- Similarly, create a new notebook ( for instance let us name it
JSL_Notebook.)
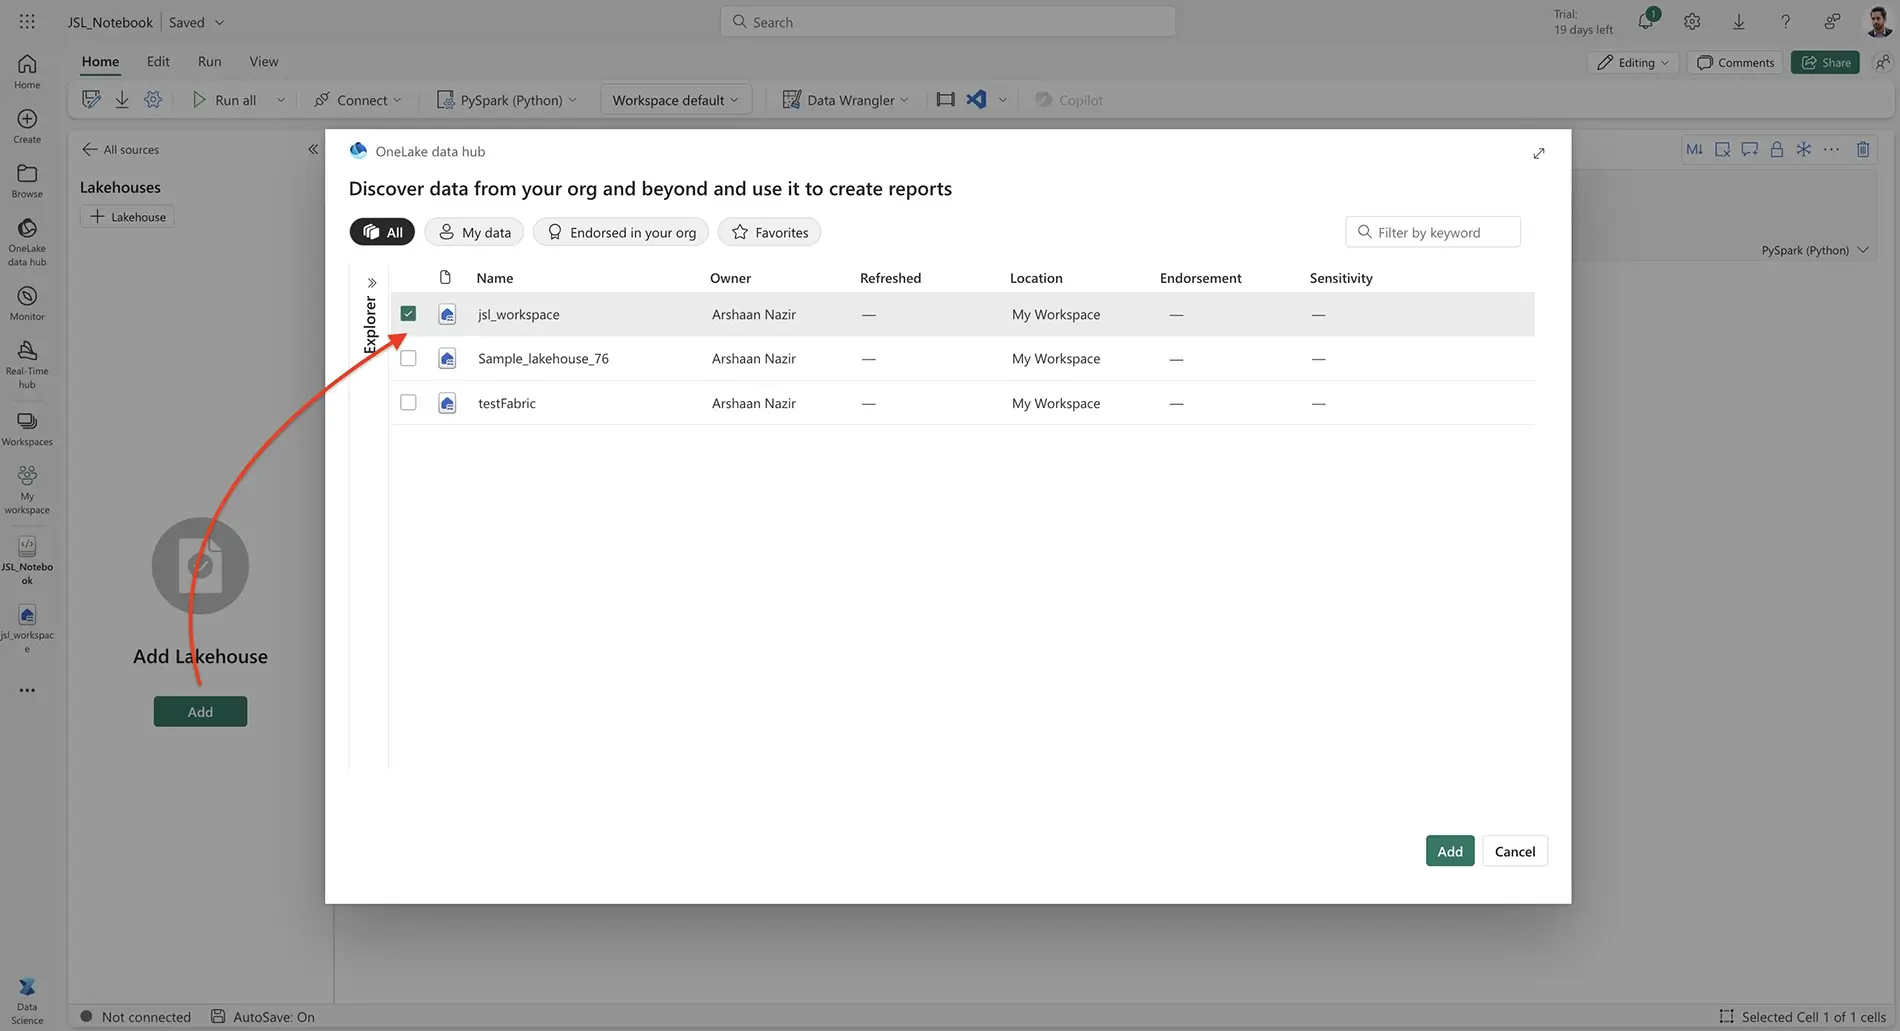
Step 4: Attach the Lakehouse
Attach the newly created lakehouse (jsl_workspace) to your notebook.
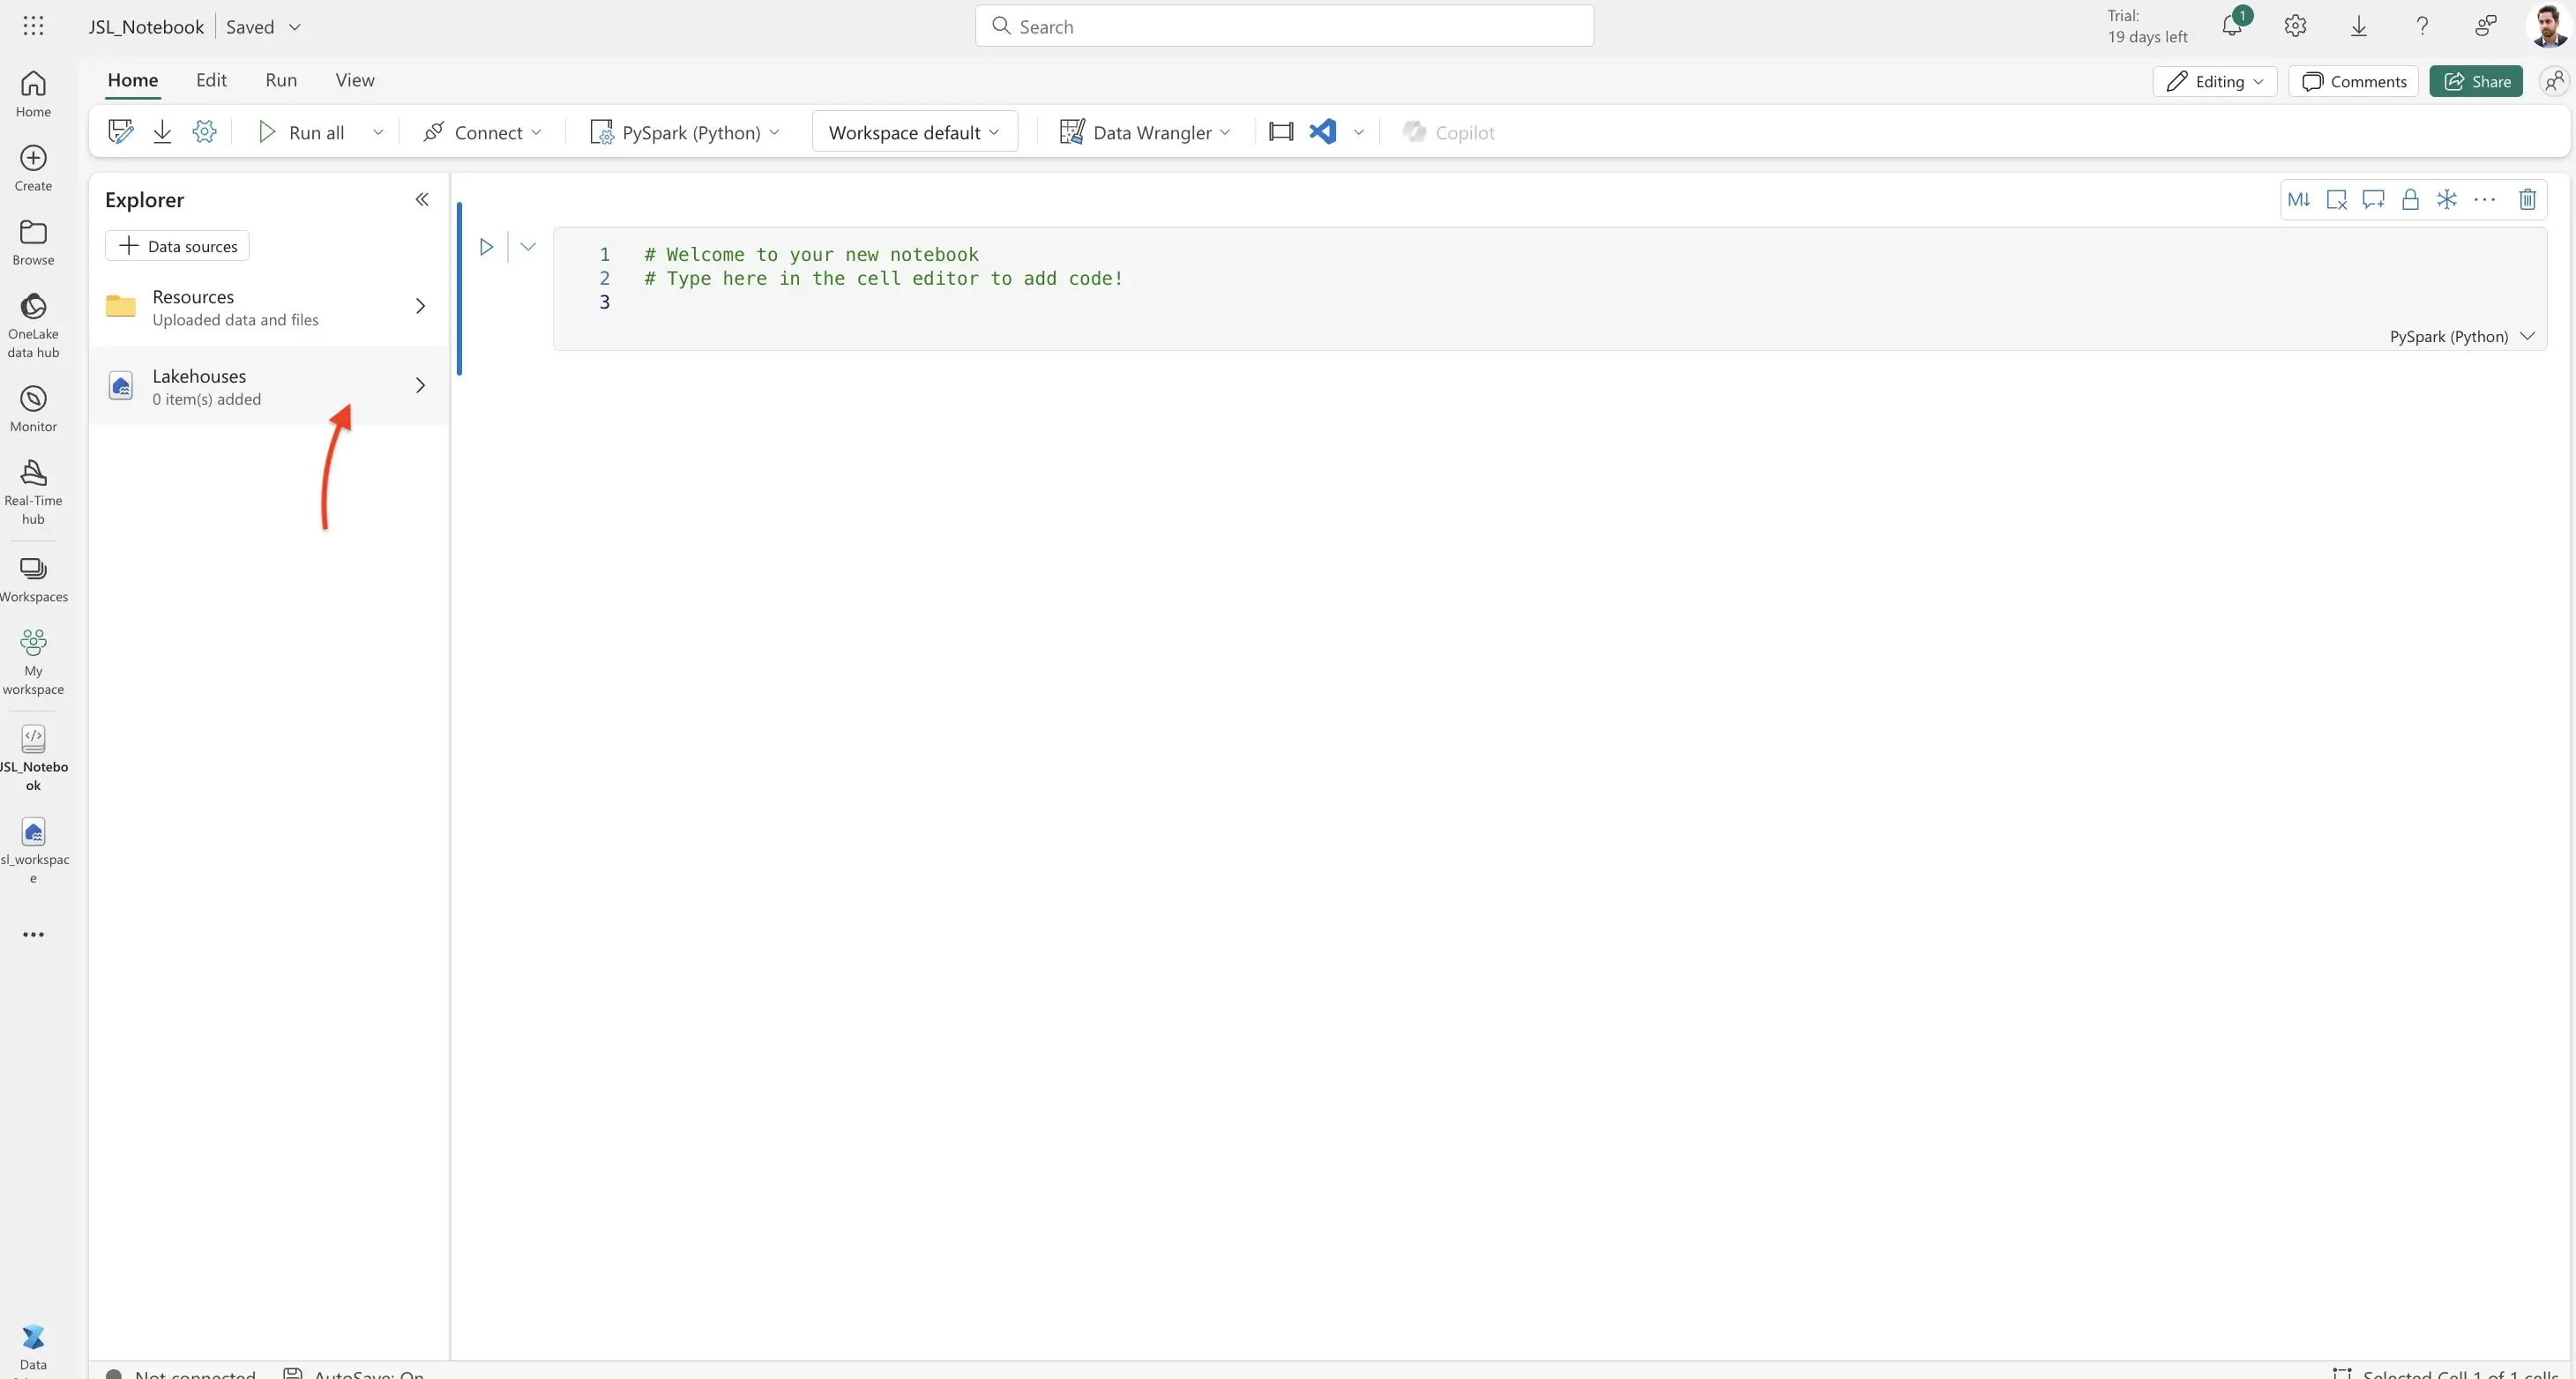
Step 5: Upload Files
Upload the necessary .jar and .whl files to the attached lakehouse.
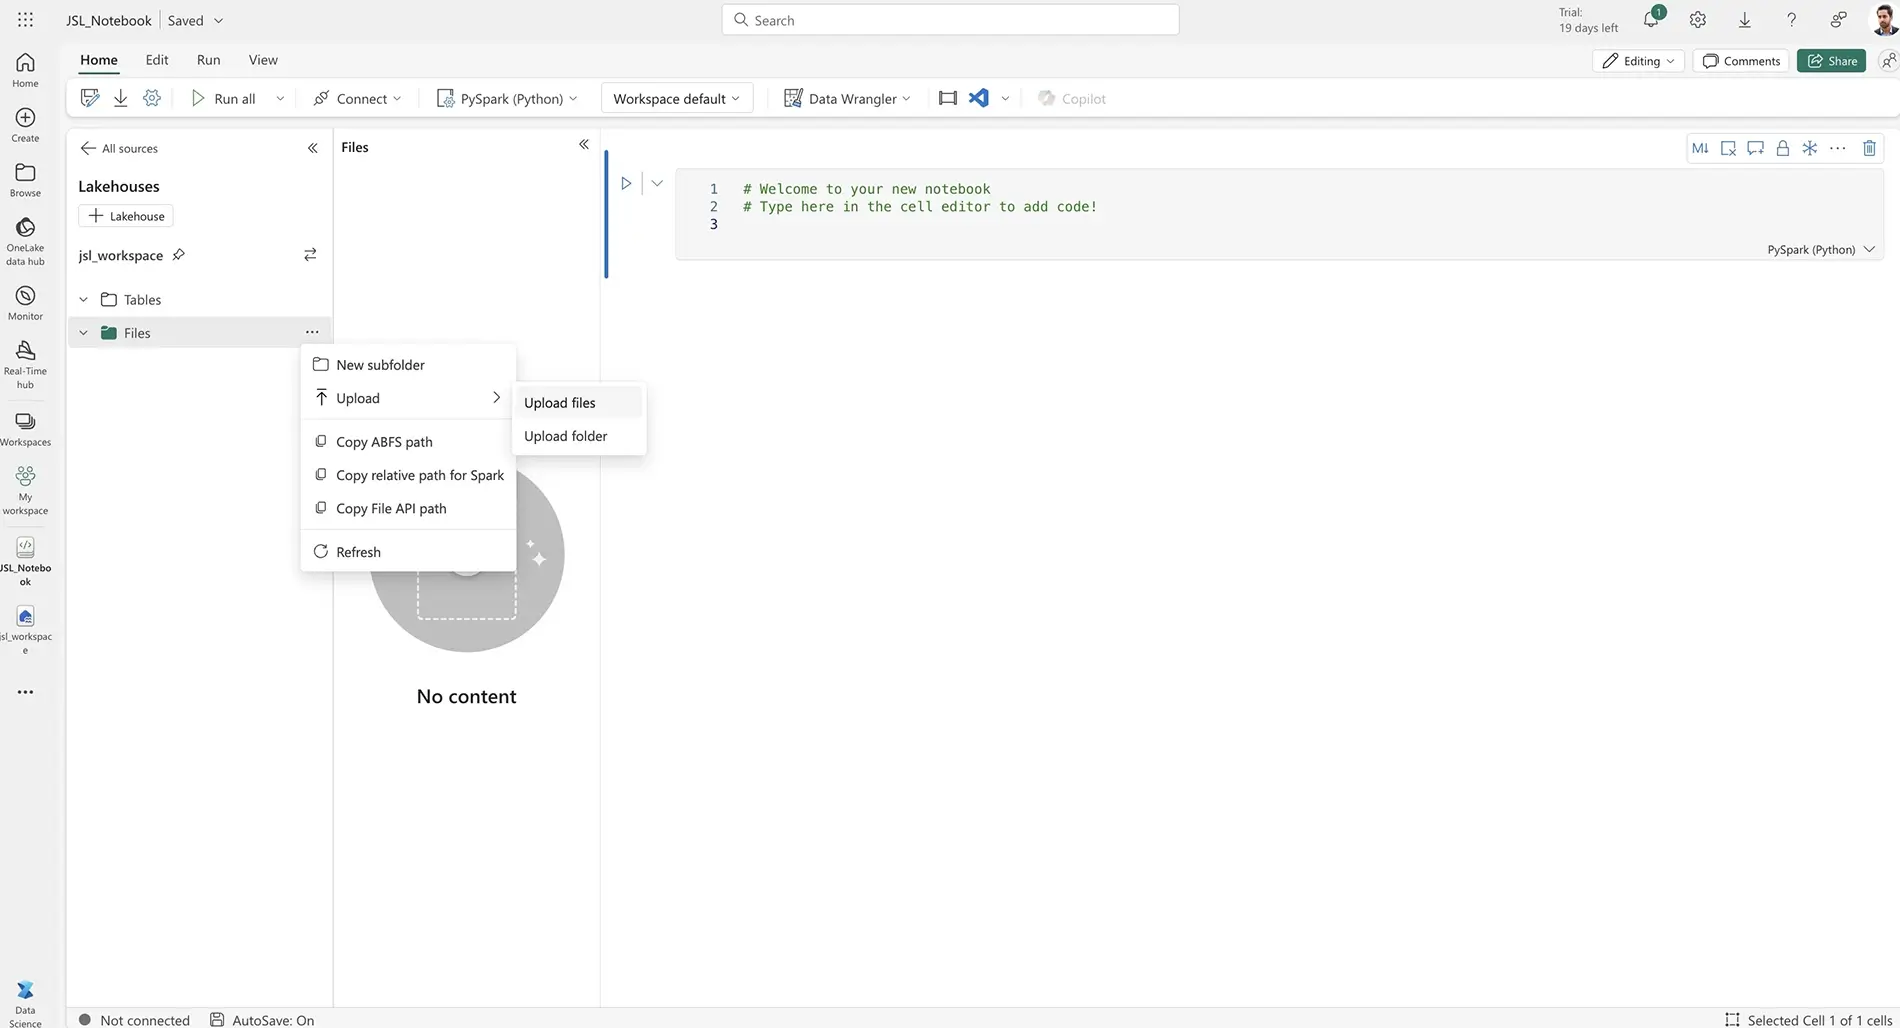
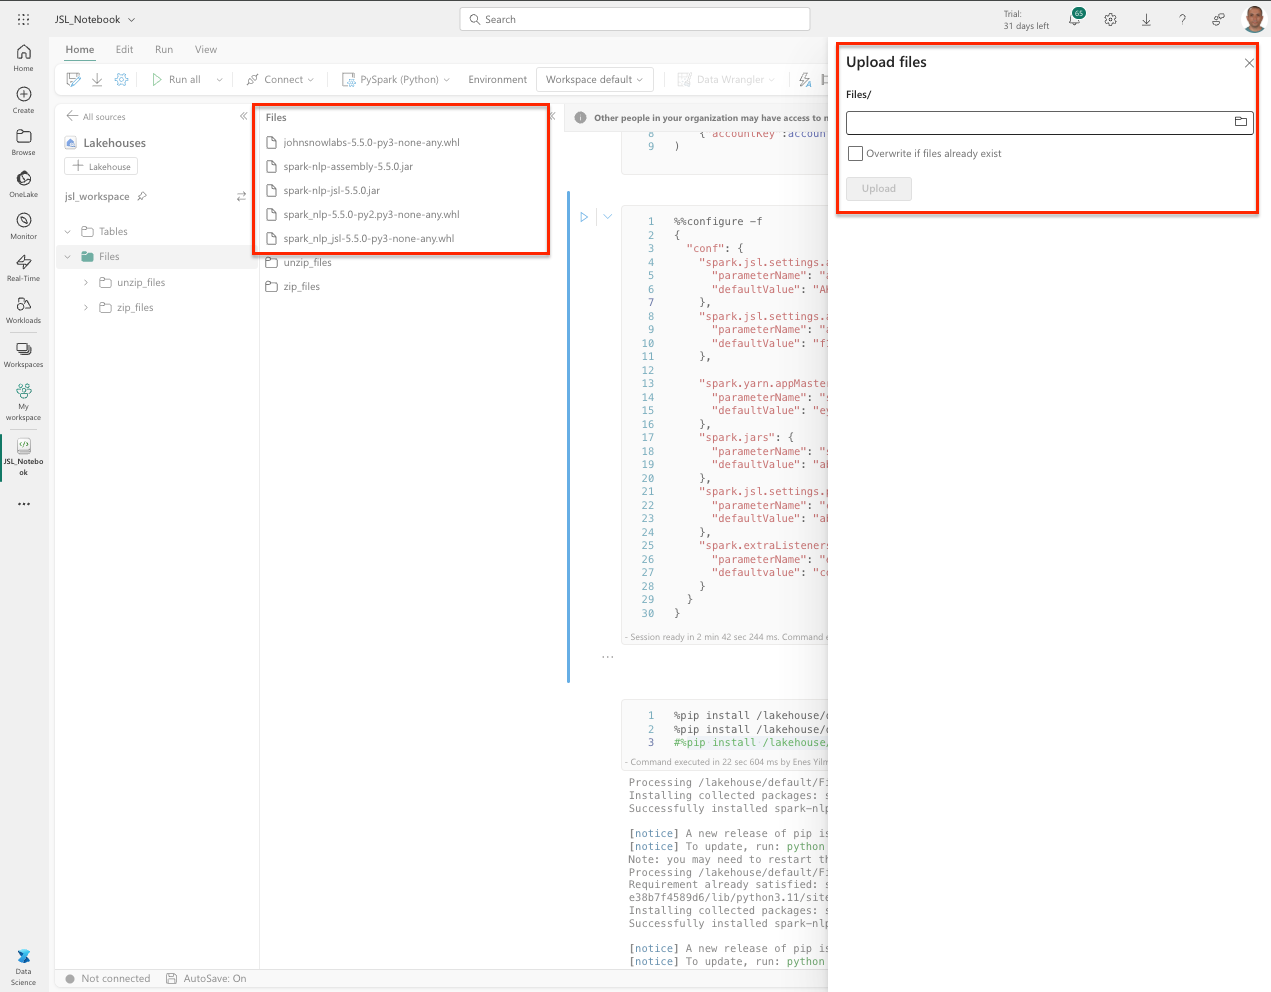
After uploading is complete, you can configure and run the notebook.
Step 6: Configure the Notebook Session
Configure the session within the notebook as follows:
%%configure -f
{
  "conf": {
    "spark.jsl.settings.aws.credentials.access_key_id": {
      "parameterName": "awsAccessKey",
      "defaultValue": "<AWS_ACCESS_KEY_ID>"
    },
    "spark.jsl.settings.aws.credentials.secret_access_key": {
      "parameterName": "awsSecretKey",
      "defaultValue": "<AWS_SECRET_ACCESS_KEY>"
    },

    "spark.yarn.appMasterEnv.SPARK_NLP_LICENSE": {
      "parameterName": "sparkNlpLicense",
      "defaultValue": "<SPARK_NLP_LICENSE>"
    },
    "spark.jars": {
      "parameterName": "sparkJars",
      "defaultValue": "abfss://&&&&&&/Files/spark-nlp-assembly-5.5.0.jar, abfss://&&&&&&/Files/spark-nlp-jsl-5.5.0.jar"
    },
    "spark.jsl.settings.pretrained.cache_folder": {
      "parameterName": "cacheFolder",
      "defaultValue": "abfss://&&&&&&/Files/unzip_files"
    },
    "spark.extraListeners": {
      "parameterName": "extraListener",
      "defaultvalue": "com.johnsnowlabs.license.LicenseLifeCycleManager"
    }
  }
}
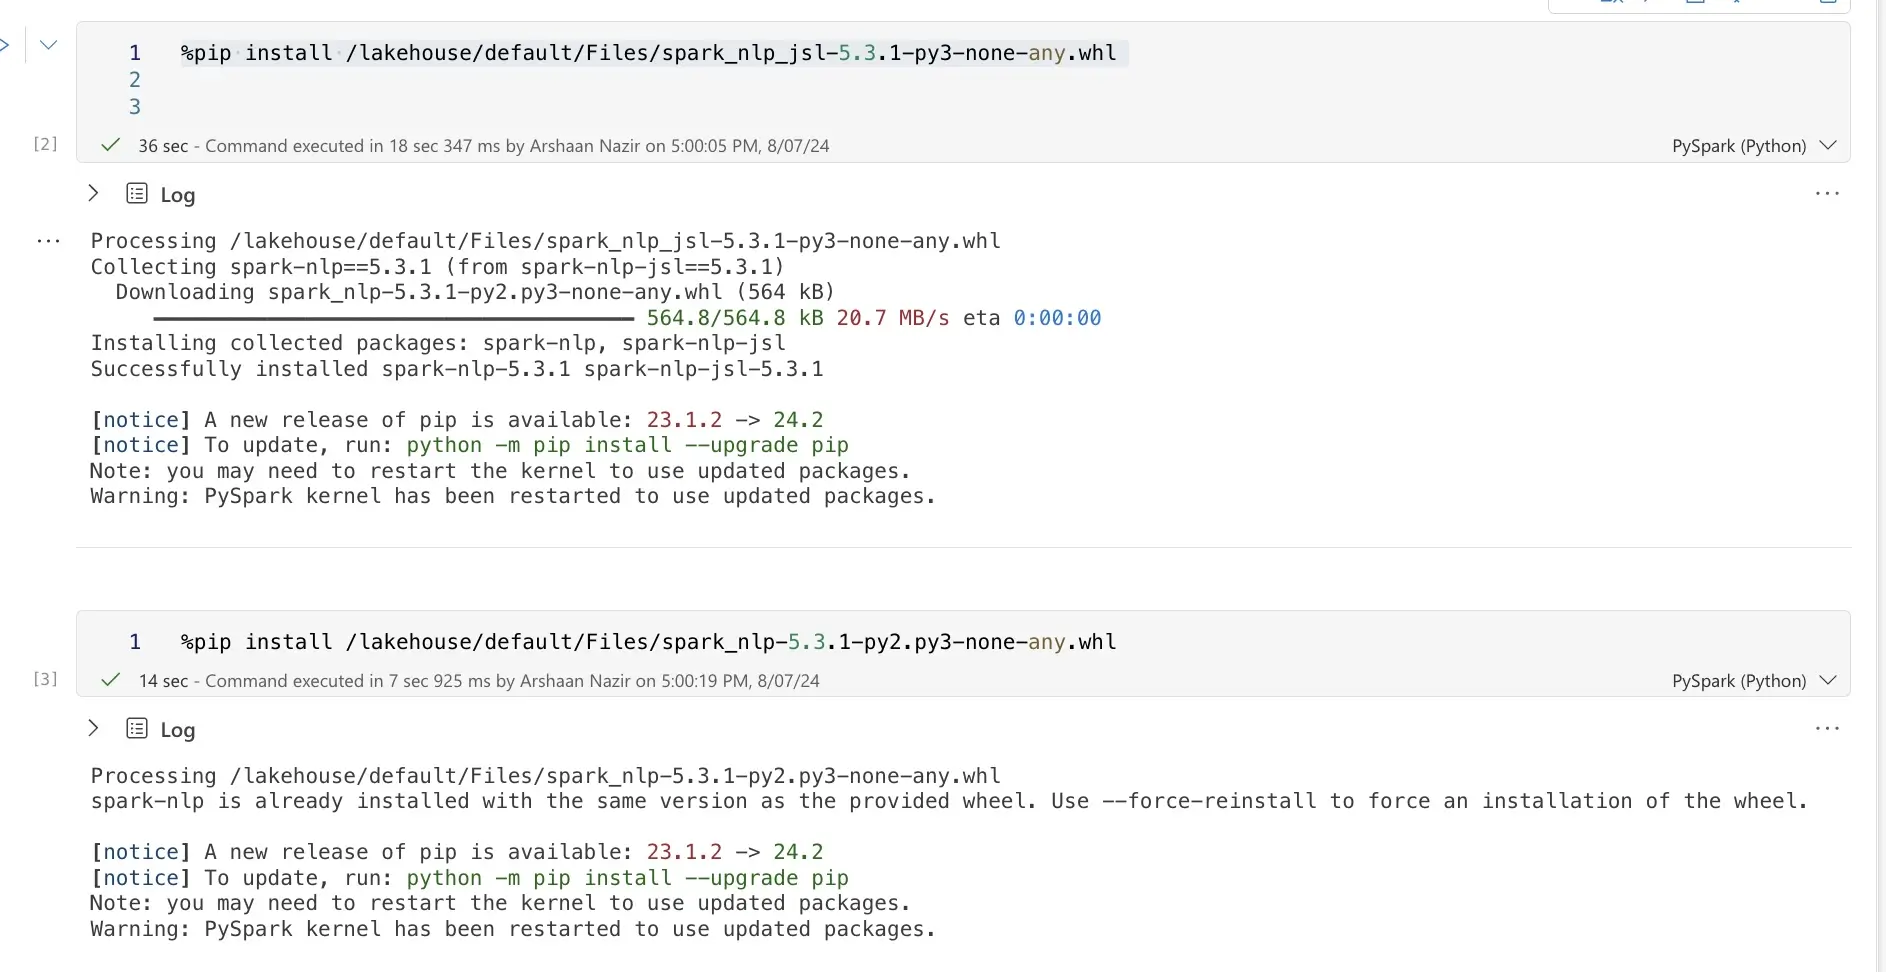
Step 7: Install Spark NLP Libraries
Install the required Spark NLP libraries using pip commands:
%pip install <johnsnowlabs whl File API path>
%pip install <spark-nlp whl File API path>
%pip install <spark-nlp-jsl whl File API path>
Example Usage:
Step 8: Make Necessary Imports
Import the necessary Python and Spark libraries:
import functools
import numpy as np
import pandas as pd
from scipy import spatial

import pyspark.sql.types as T
from pyspark.ml import Pipeline
from pyspark.sql import SparkSession
from pyspark.sql import functions as F

import sparknlp
import sparknlp_jsl
from sparknlp.base import *
from sparknlp.annotator import *
from sparknlp_jsl.annotator import *
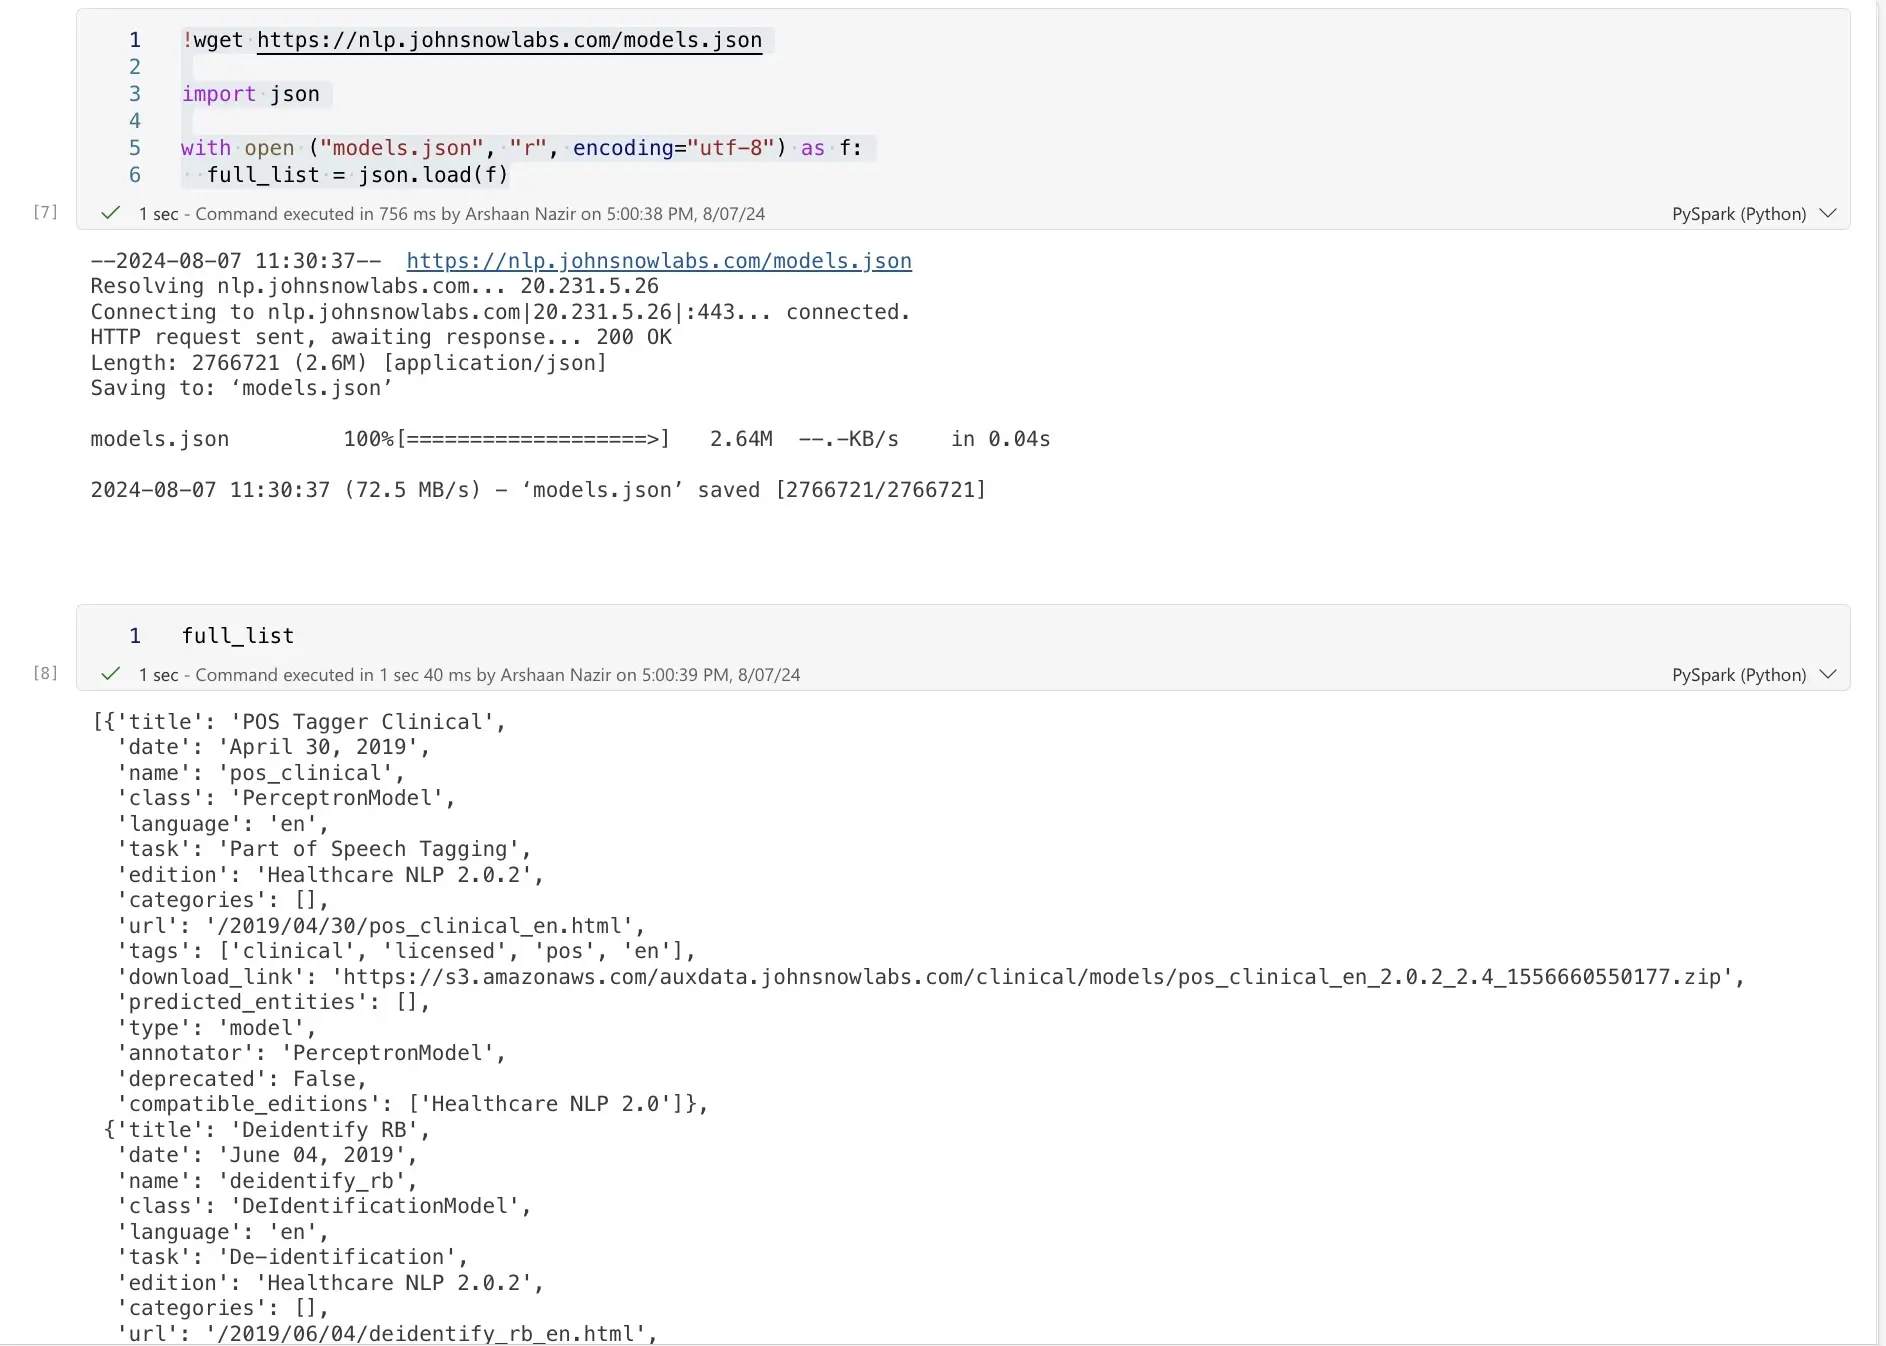
Step 9: Explore Available Licensed Models
Download and explore the list of available licensed models:
! pip install -q boto3
! wget https://nlp.johnsnowlabs.com/models.json

import json
with open("models.json", "r", encoding="utf-8") as f:
    full_list = json.load(f)
Example Usage:
Step 10: Download and Extract Required Models
Set up AWS credentials and use Boto3 to handle files:
import shutil
import boto3
# Setup AWS credentials
ACCESS_KEY = "<AWS-ACCESS-KEY>"
SECRET_KEY = "<AWS-SECRET-KEY>"
# Connect to S3
s3 = boto3.resource('s3', aws_access_key_id=ACCESS_KEY, aws_secret_access_key=SECRET_KEY)
buck_auxdata = s3.Bucket('auxdata.johnsnowlabs.com')
!mkdir -p /lakehouse/default/Files/zip_files /lakehouse/default/Files/
# Download and extract model
import shutil
from sparknlp.pretrained import PretrainedPipeline
zip_file_path = '/lakehouse/default/Files/zip_files/<Model-ZIP>'
unzip_dir_path = '/lakehouse/default/Files/<MODEL-NAME>'
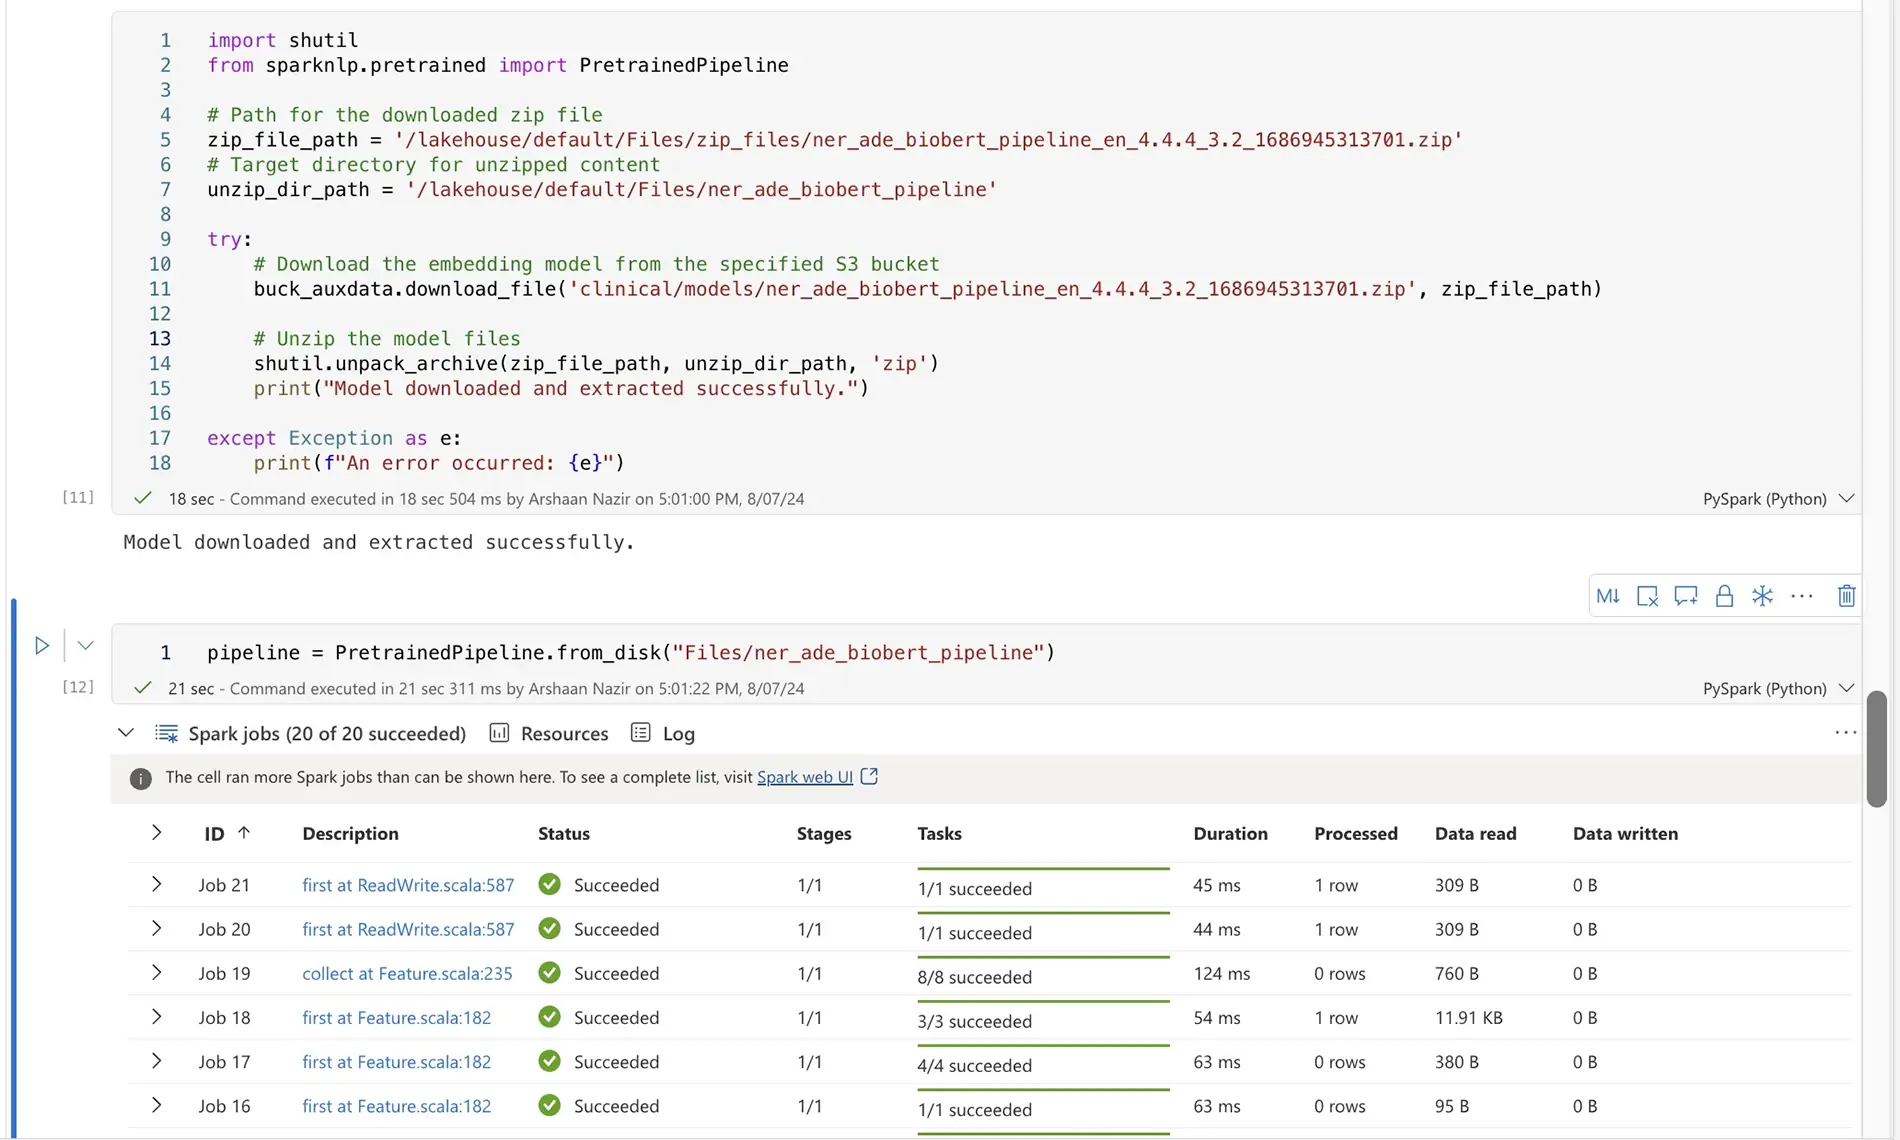
try:
buck_auxdata.download_file('clinical/models/<Model-ZIP>', zip_file_path)
shutil.unpack_archive(zip_file_path, unzip_dir_path, 'zip')
print("Model downloaded and extracted successfully.")
except Exception as e:
print(f"An error occurred: {e}")
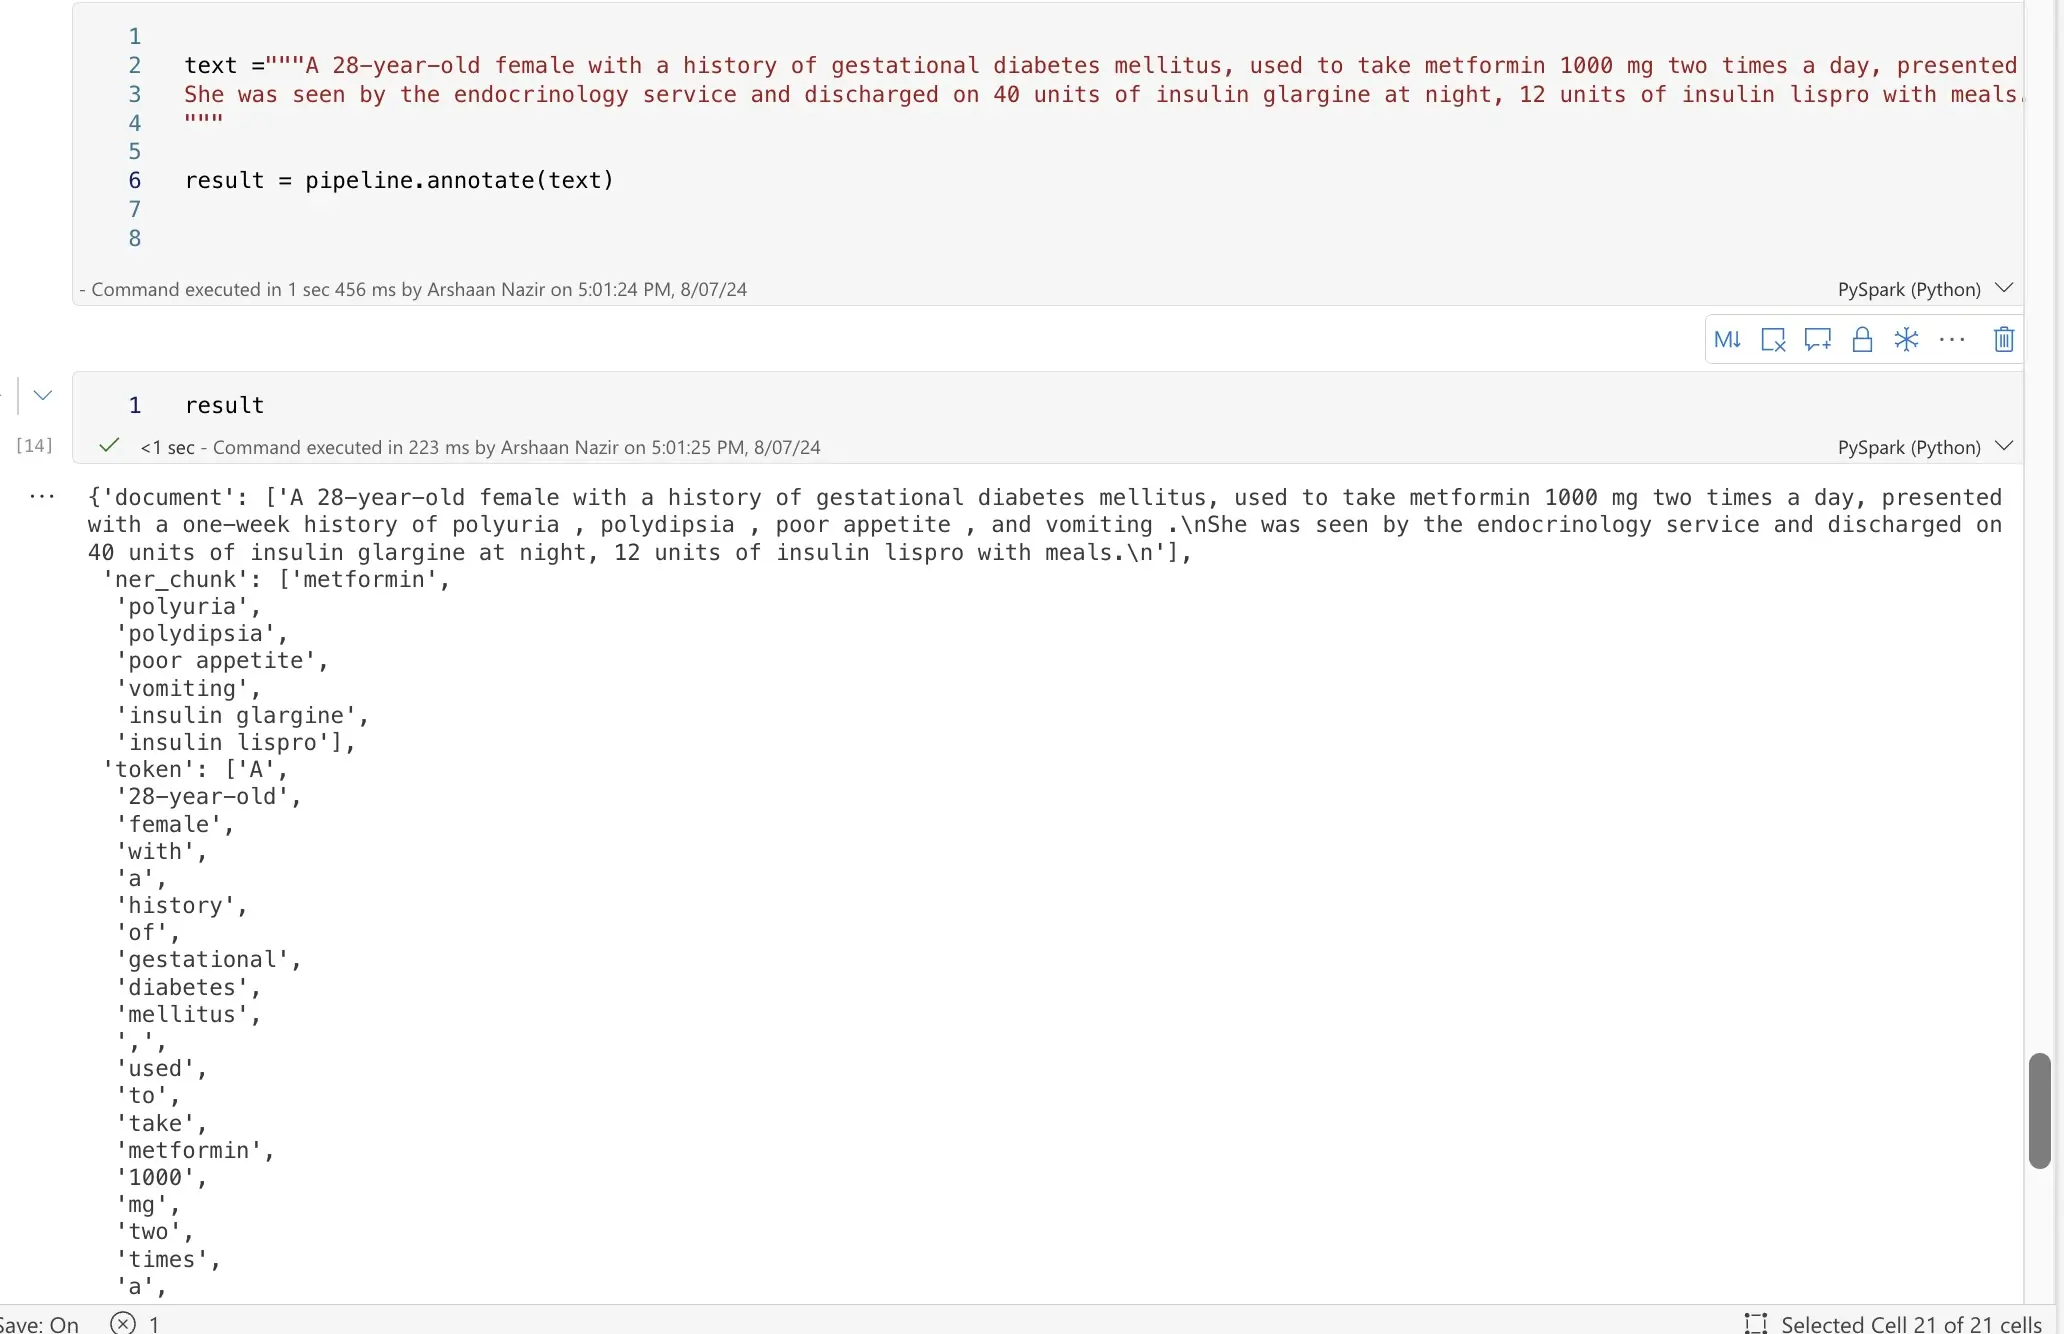
Step 11: Load the Model and Make Predictions
Load the model and perform predictions on the desired text:
pipeline = PretrainedPipeline.from_disk("Files/<MODEL-NAME>")
text = "<INPUT-TEXT>"
result = pipeline.annotate(text)
Example Usage:
Step 12: Run the pipeline with .pretrained() method
You can also run the pipelines without using the .load() or .from_disk() methods
AWS Marketplace
The entire suite of John Snow Labs NLP and Visual NLP libraries are offered as a pay-as-you-go product on AWS Marketplace, pre-installed and ready to use. 30+ Notebooks are included in the AWS product to allow you to start experimenting on your own data right away. To subscribe to the pay-as-you-go product on AWS Marketplace navigate to the product page and follow the instructions in the video below.
Note: 30-day free trial are available for AWS and Azure subscriptions.
Azure Marketplace
John Snow Labs NLP and Visual NLP libraries are also offered as a pay-as-you-go product on Azure Marketplace, pre-installed and ready to use. 30+ Notebooks are included in the Azure product to allow you to start experimenting on your own data right away. To subscribe to the pay-as-you-go product on Azure Marketplace navigate to the product page and follow the instructions in the video below.
Note: 30-day free trial are available for AWS and Azure subscriptions.
Private Endpoints - SageMaker, Snowflake, Databricks
Some of the most popular Medical Language Models we offer are now available as private endpoints on platforms like AWS SageMaker, Snowflake, or Databricks, providing organizations with powerful tools to enhance their data capabilities while ensuring security and control.
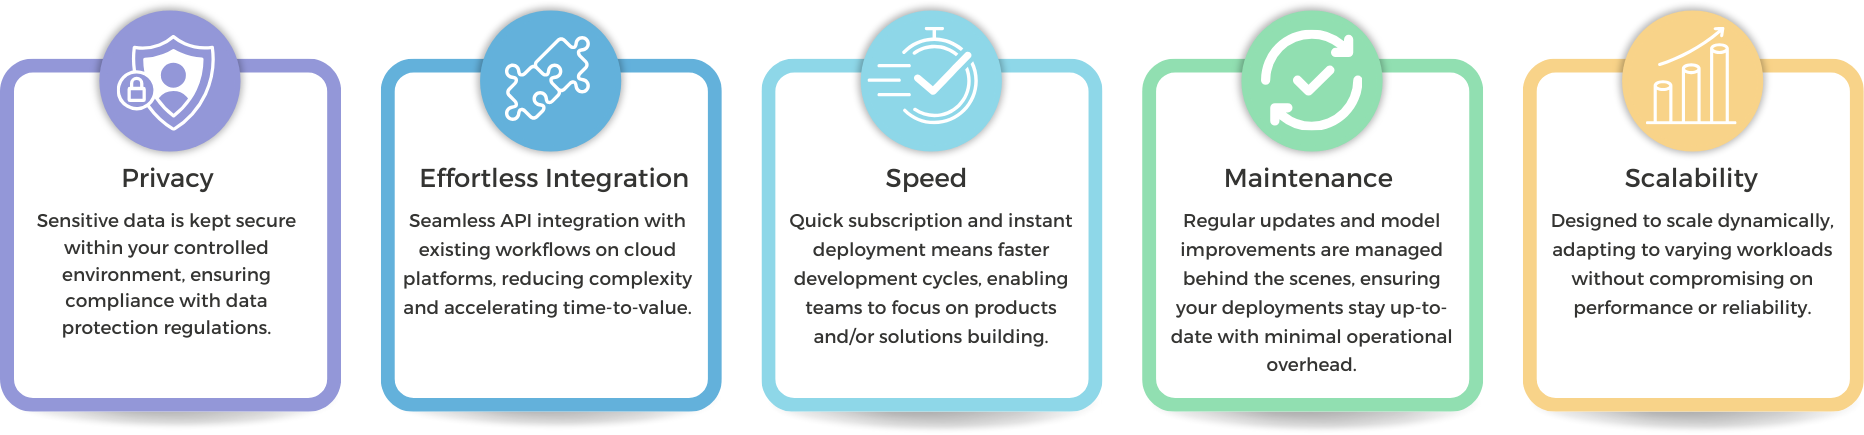
Deploying these models as private endpoints offers several advantages. First, it allows for enhanced data privacy, as sensitive information remains within your own private network and infrastructure, reducing exposure to potential breaches. This facilitates compliance with industry regulations by enabling organizations to manage their data according to specific governance policies.
Working with John Snow Labs API endpoints is straightforward. You get rapid access to advanced language models with minimal setup, while eliminating the limitations of relying on specific programming languages. This flexibility allows you to work across different platforms and languages, unlocking valuable insights, automating text processing tasks, and driving innovation—all while maintaining high standards of security and operational efficiency.
Subscribing, deploying, and managing these API endpoints is also effortless. You can easily adjust resources according to your processing needs. With just a few clicks, you can subscribe to the desired Language Models, deploy them as private endpoints on your preferred cloud platform, and easily scale or stop them as your workloads demand. This flexibility ensures optimal resource utilization while keeping costs in check, without the hassle of long-term commitments, complex configurations, and without compromising on speed or reliability.
AWS SageMaker
You can discover the language models available on AWS SageMaker by visiting this page.
The following video illustrates the steps to discover the language models available as API endpoints on AWS Sagemaker via the NLP Models Hub, how to subscribe to those, how to deploy them, how to query them and how to stop them.
Snowflake
You can discover the language models available on Snowflake Marketplace by visiting this page.
The following video illustrates the steps to discover the language models available as API endpoints on Snowflake via the NLP Models Hub, how to subscribe to those, how to deploy them, how to query them and how to stop them.
Databricks
You can discover the language models available on Databricks Marketplace by visiting this page.
The following video illustrates the steps to discover the language models available as API endpoints on Databricks via the NLP Models Hub, how to subscribe to those, how to deploy them, how to query them and how to stop them.