Type of installation
Dedicated Server AWS Marketplace Azure Marketplace EKS deployment AKS deployment AirGap Environment OpenShift
Dedicated Server
Install Generative AI Lab (NLP Lab) on a dedicated server to reduce the likelihood of conflicts or unexpected behavior.
Fresh install
To install Generative AI Lab run the following command:
wget https://setup.johnsnowlabs.com/annotationlab/install.sh -O - | sudo bash -s $VERSION
Replace $VERSION in the above one liners with the version you want to install.
For installing the latest available version of the Generative AI Lab use:
wget https://setup.johnsnowlabs.com/annotationlab/install.sh -O - | sudo bash -s --
Fresh GPU installation
Use gpu (case-insensitive) optional parameter with annotationlab-installer.sh script to enable usage of GPU resources. This will only work if your host has GPU resources. This parameter is used as a flag, it will enable GPU resources when used, otherwise, the installer will ignore anything related to GPU.
$ ./annotationlab-installer.sh gpu
Notice: GPU usage can be disabled at a later time, by simply editing the annotationlab-updater.sh script and set useGPU variable to false. However, this will only prevent the app from using GPU resources, it will not remove the already installed Nvidia drivers and plugins.
Upgrade
To upgrade your Generative AI Lab installation to a newer version, run the following command on a terminal:
wget https://setup.johnsnowlabs.com/annotationlab/upgrade.sh -O - | sudo bash -s $VERSION
Replace $VERSION in the above one liners with the version you want to upgrade to.
For upgrading to the latest version of the Generative AI Lab, use:
wget https://setup.johnsnowlabs.com/annotationlab/upgrade.sh -O - | sudo bash -s --
NOTE: The install/upgrade script displays the login credentials for the admin user on the terminal.
After running the install/upgrade script, the Generative AI Lab is available at http://INSTANCE_IP or https://INSTANCE_IP
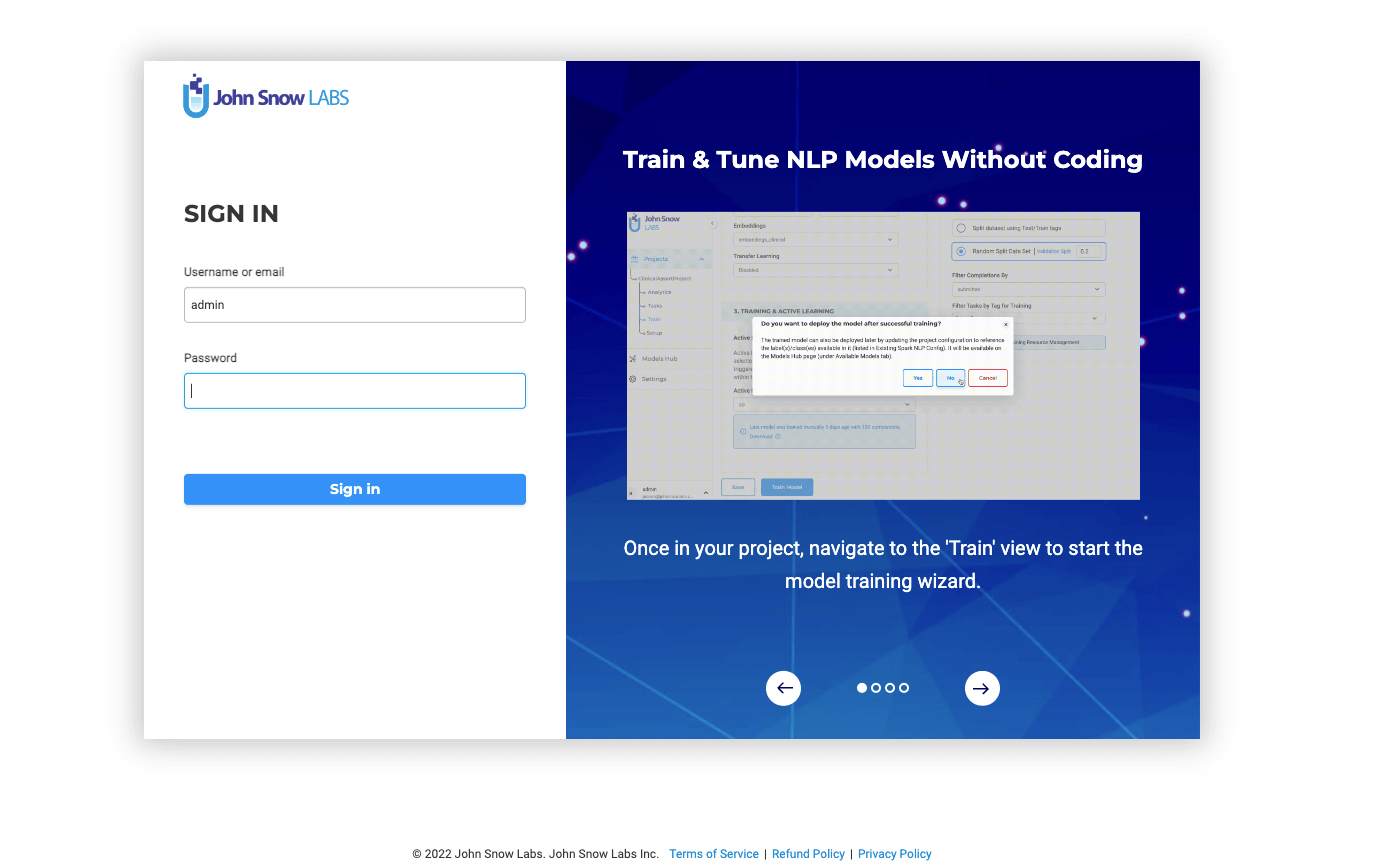
We have an aesthetically pleasing Sign-In Page with a section highlighting the key features of Generative AI Lab using animated GIFs.
AWS Marketplace
The Generative AI Lab needs to be installed on a virtual machine. One of the most straight forward method is an installation from AWS Marketplace (also available on Azure). The fee for the Generative AI Lab depends on the number of CPU and GPU in the selected instance (Details can be listed in the product page in AWS marketplace). You will also have to pay for the underlying AWS EC2 instance.
Visit the product page on AWS Marketplace and follow the instructions on the video below to subscribe and deploy.
Steps to get started:
- Subscribe to the product on the AWS Marketplace.
- Deploy it on a new machine.
- Attach IAM role to the AMI (IAM role attached to the AMI machine should have access to both
aws-marketplace:MeterUsageandec2:DescribeInstanceTypespermission) - Access the login page for a guided experience on
http://INSTANCE_IP. For the first login use the following credentials: Username: admin Password: INSTANCE_ID
Secure access to Generative AI Lab on AWS
When installed via the AWS Marketplace, Generative AI Lab has a private IP address and listens on an unsecured HTTP port. You can ask your DevOps department to incorporate the resource to your standard procedures to access from the internet in a secure manner. Alternatively, a Cloud Formation script is available that can be used to create a front end proxy (CloudFront, ELB, and auxiliary Lambda Function). Those resources are Free Tier Eligible.
Create the AWS Cloud Formation Script in YAML format:
vi cloudformation_https.yaml
AWSTemplateFormatVersion: '2010-09-09'
Metadata:
  License: Apache-2.0
Description: 'AWS CloudFormation To access Generative AI Lab via https:
  Create an Amazon EC2 instance running the Generative AI Lab Amazon Linux AMI. Once the
  Generative AI Lab instance is created, provide instance hostname as input. This Cloudfromation
  Creates Cloudfront. You can use Cloudfront Domain URL to access Generative AI Lab
  via https protocol.
  '
Parameters:
  NLPlabInstanceHostName:
    Description: HostName of the Generative AI Lab InstanceID
    Type: String
    ConstraintDescription: HostName of the Generative AI Lab InstanceID

Resources:
  CloudFront:
    Type: AWS::CloudFront::Distribution
    Properties:
      DistributionConfig:
        Enabled: True
        DefaultCacheBehavior:
          AllowedMethods:
            - DELETE
            - GET
            - HEAD
            - OPTIONS
            - PATCH
            - POST
            - PUT
          DefaultTTL: 0
          MaxTTL: 0
          MinTTL: 0
          Compress: True
          ForwardedValues:
            QueryString: true
            Headers:
              - '*'
            Cookies:
              Forward: all
          TargetOriginId: EC2CustomOrigin
          ViewerProtocolPolicy: redirect-to-https
        Origins:
          - DomainName: !Ref NLPlabInstanceHostName
            Id: EC2CustomOrigin
            CustomOriginConfig:
              HTTPPort: '80'
              OriginProtocolPolicy: http-only
Outputs:
  CloudfrontURL:
    Description: Cloudfront URL to access Generative AI Lab
    Value: !Join ["", ['https://', !GetAtt [CloudFront, DomainName]]]
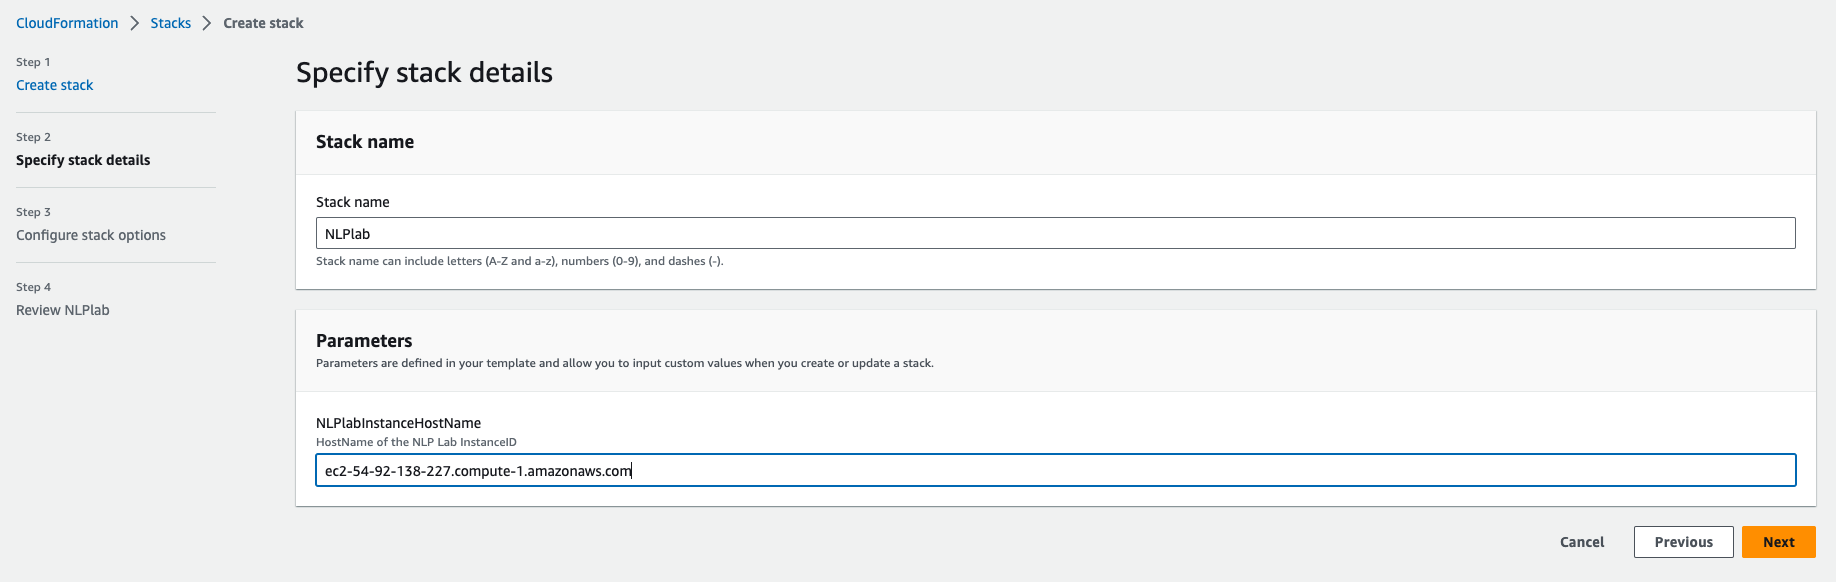
Click Create a stack, “Upload a template file”. Give the Stack a name and enter the Generative AI Lab instance Hostname(from the EC2 console) as a parameter.
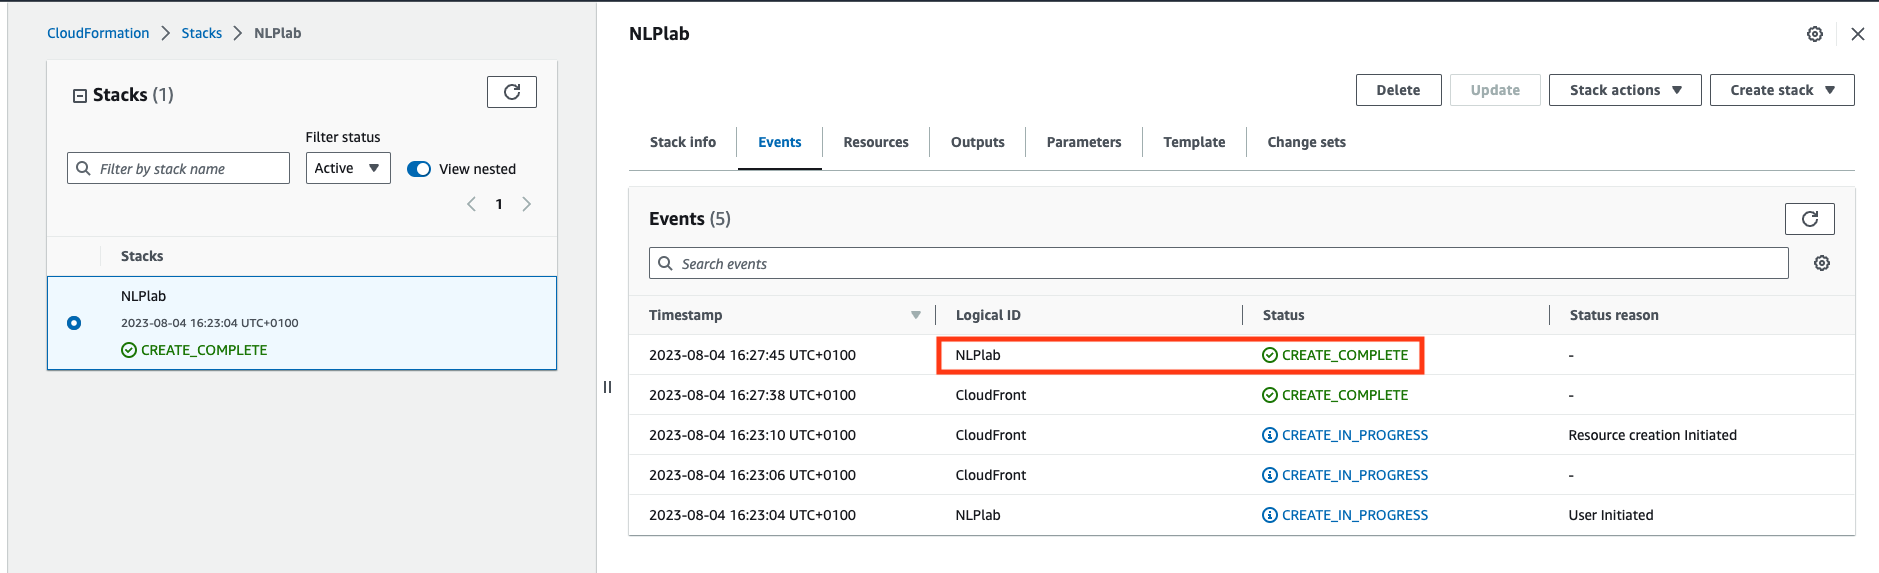
Next -> Next -> Acknowledge that AWS CloudFormation might create IAM resources. -> Submit. Wait a few minutes until all resources are created.
Once created, go do the Outputs tab and click on the Generative AI Lab URL. You may need to refresh the view.
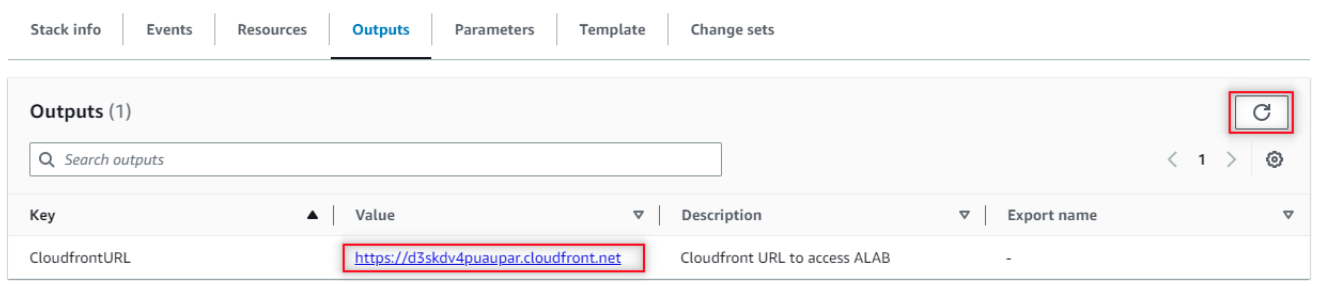
Now, to access the Generative AI Lab, you go to the CloudFront URL and log in with username “admin” and password equal to the EC2 Instance ID noted earlier.
Azure Marketplace
Visit the product page on Azure Marketplace and follow the instructions on the video below to subscribe and deploy.
EKS deployment
-
Create NodeGroup for a given cluster
eksctl create nodegroup --config-file eks-nodegroup.yaml

kind: ClusterConfig
apiVersion: eksctl.io/v1alpha5
metadata:
  name: <cluster-name>
  region: <region>
  version: "1.21"
availabilityZones:
  - <zone-1>
  - <zone-2>
vpc:
  id: "<vpc-id>"
  subnets:
    private:
      us-east-1d:
        id: "<subnet-id"
      us-east-1f:
        id: "<subent-id>"
  securityGroup: "<security-group>"
iam:
  withOIDC: true
managedNodeGroups:
  - name: alab-workers
    instanceType: m5.large
    desiredCapacity: 3
    VolumeSize: 50
    VolumeType: gp2
    privateNetworking: true
    ssh:
      publicKeyPath: <path/to/id_rsa_pub>
eksctl utils associate-iam-oidc-provider --region=us-east-1 --cluster=<cluster-name> --approve -
Create an EFS as shared storage. EFS stands for Elastic File System and is a scalable storage solution that can be used for general purpose workloads.
curl -S https://raw.githubusercontent.com/kubernetes-sigs/aws-efs-csi-driver/v1.2.0/docs/iam-policy-example.json -o iam-policy.json
aws iam create-policy \
  --policy-name EFSCSIControllerIAMPolicy \
  --policy-document file://iam-policy.json
eksctl create iamserviceaccount \ --cluster=<cluster> \ --region <AWS Region> \ --namespace=kube-system \ --name=efs-csi-controller-sa \ --override-existing-serviceaccounts \ --attach-policy-arn=arn:aws:iam::<AWS account ID>:policy/EFSCSIControllerIAMPolicy \ --approvehelm repo add aws-efs-csi-driver https://kubernetes-sigs.github.io/aws-efs-csi-driverhelm repo updatehelm upgrade -i aws-efs-csi-driver aws-efs-csi-driver/aws-efs-csi-driver \ --namespace kube-system \ --set image.repository=602401143452.dkr.ecr.us-east-1.amazonaws.com/eks/aws-efs-csi-driver \ --set controller.serviceAccount.create=false \ --set controller.serviceAccount.name=efs-csi-controller-sa -
Create storageClass.yaml
cat <<EOF > storageClass.yaml
kind: StorageClass
apiVersion: storage.k8s.io/v1
metadata:
  name: efs-sc
provisioner: efs.csi.aws.com
parameters:
  provisioningMode: efs-ap
  fileSystemId: <EFS file system ID>
  directoryPerms: "700"
EOF
kubectl apply -f storageClass.yamlEdit annotationlab-installer.sh inside artifact folder as follows:
helm install annotationlab annotationlab-${ANNOTATIONLAB_VERSION}.tgz \ --set image.tag=${ANNOTATIONLAB_VERSION} \ --set model_server.count=1 \ --set ingress.enabled=true \ --set networkPolicy.enabled=true \ --set networkPolicy.enabled=true --set extraNetworkPolicies='- namespaceSelector: matchLabels: kubernetes.io/metadata.name: kube-system podSelector: matchLabels: app.kubernetes.io/name: traefik app.kubernetes.io/instance: traefik' \ --set keycloak.postgresql.networkPolicy.enabled=true \ --set sharedData.storageClass=efs-sc \ --set airflow.postgresql.networkPolicy.enabled=true \ --set postgresql.networkPolicy.enabled=true \ --set airflow.networkPolicies.enabled=true \ --set ingress.defaultBackend=true \ --set ingress.uploadLimitInMegabytes=16 \ --set 'ingress.hosts[0].host=domain.tld' \ --set airflow.model_server.count=1 \ --set airflow.redis.password=$(bash -c "echo ${password_gen_string}") \ --set configuration.FLASK_SECRET_KEY=$(bash -c "echo ${password_gen_string}") \ --set configuration.KEYCLOAK_CLIENT_SECRET_KEY=$(bash -c "echo ${uuid_gen_string}") \ --set postgresql.postgresqlPassword=$(bash -c "echo ${password_gen_string}") \ --set keycloak.postgresql.postgresqlPassword=$(bash -c "echo ${password_gen_string}") \ --set keycloak.secrets.admincreds.stringData.user=admin \ --set keycloak.secrets.admincreds.stringData.password=$(bash -c "echo ${password_gen_string}") -
Run annotationlab-installer.sh script
./artifacts/annotationlab-installer.sh -
Install ingress Controller
helm repo add nginx-stable https://helm.nginx.com/stable helm repo update helm install my-release nginx-stable/nginx-ingress -
Apply ingress.yaml
cat <<EOF > ingress.yaml
apiVersion: networking.k8s.io/v1
kind: Ingress
metadata:
  annotations:
    kubernetes.io/ingress.class: nginx
    meta.helm.sh/release-name: annotationlab
    meta.helm.sh/release-namespace: default
  name: annotationlab
spec:
  defaultBackend:
    service:
      name: annotationlab
      port:
        name: http
  rules:
  - host: domain.tld
    http:
      paths:
      - backend:
          service:
              name: annotationlab
              port:
                name: http
        path: /
        pathType: ImplementationSpecific
      - backend:
          service:
              name: annotationlab-keyclo-http
              port:
                name: http
        path: /auth
        pathType: ImplementationSpecific
EOF
kubectl apply -f ingress.yaml
AKS deployment
To deploy Generative AI Lab on Azure Kubernetes Service (AKS) a Kubernetes cluster needs to be created in Microsoft Azure.
-
Login to your Azure Portal and search for Kubernetes services.
-
On the
Kubernetes services page click on theCreatedropdown and selectCreate a Kubernetes cluster. -
On the
Create Kubernetes cluster page, select the resource group and provide the name you want to give to the cluster.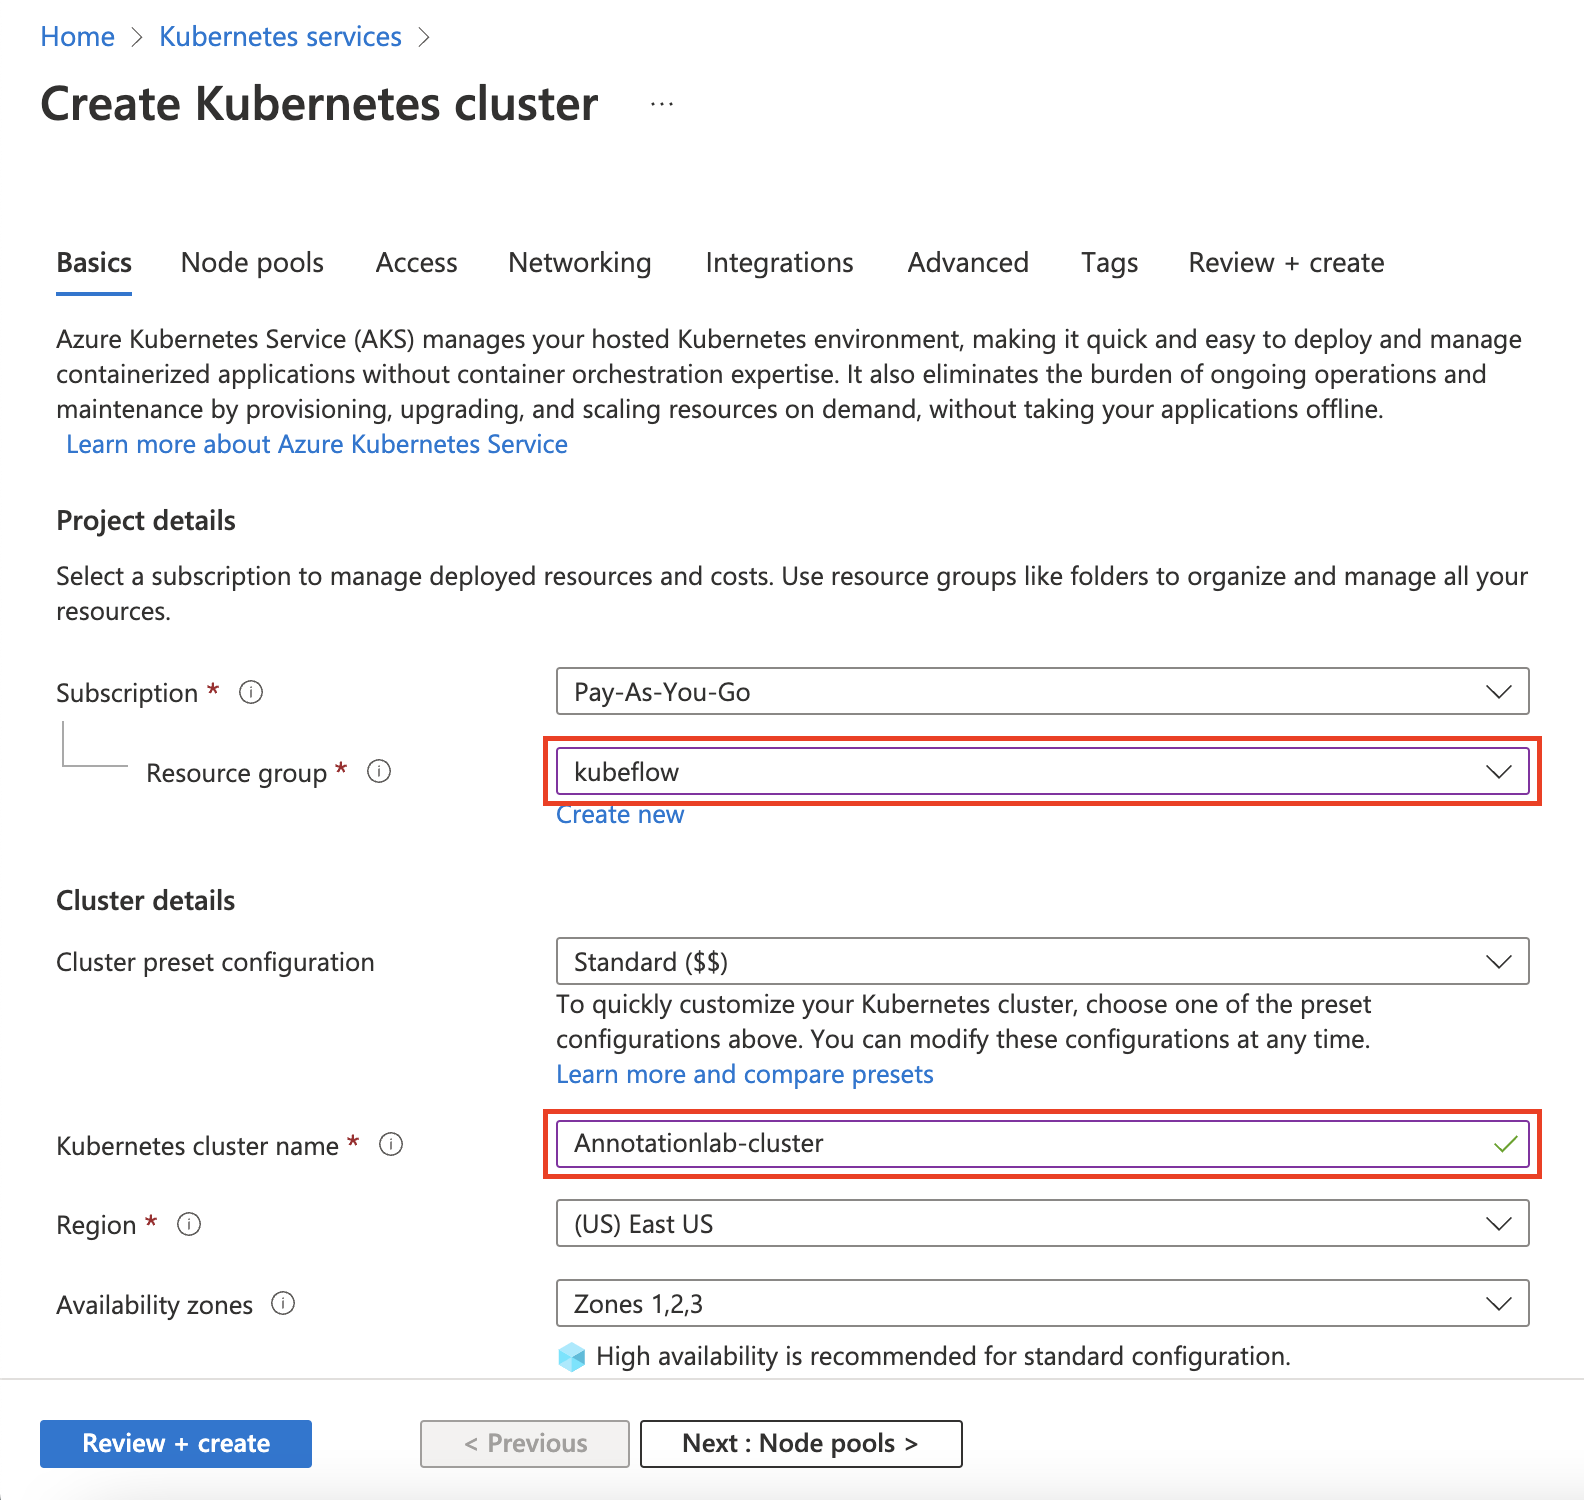
-
You can keep the rest of the fields to default values and click on
Review + create.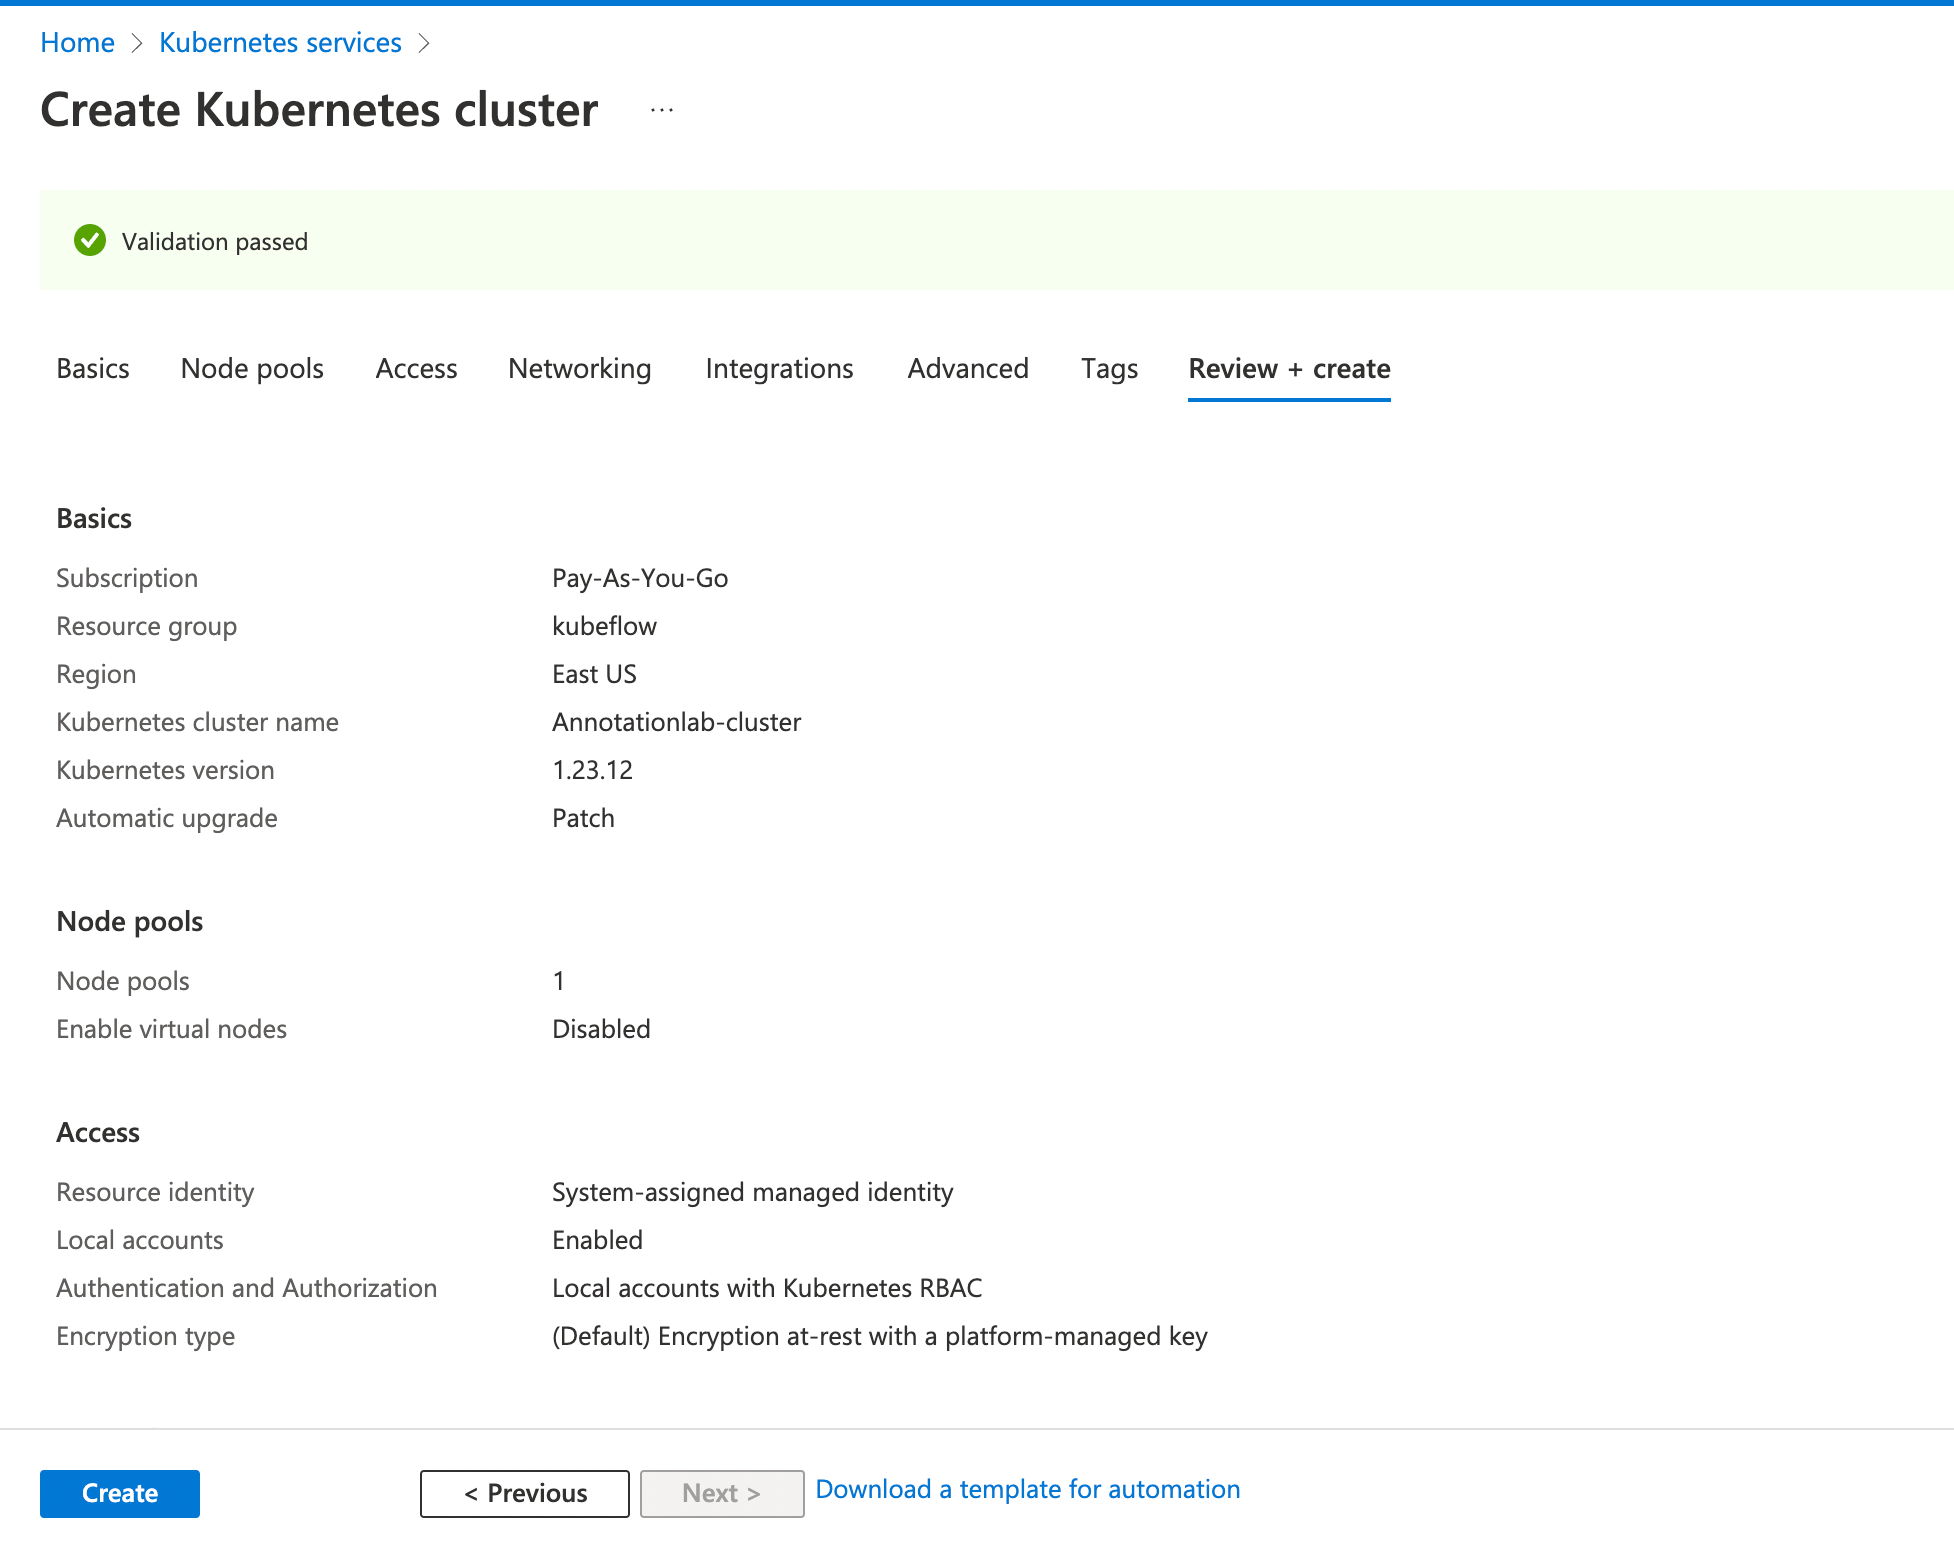
-
Click on
Createbutton to start the deployment process.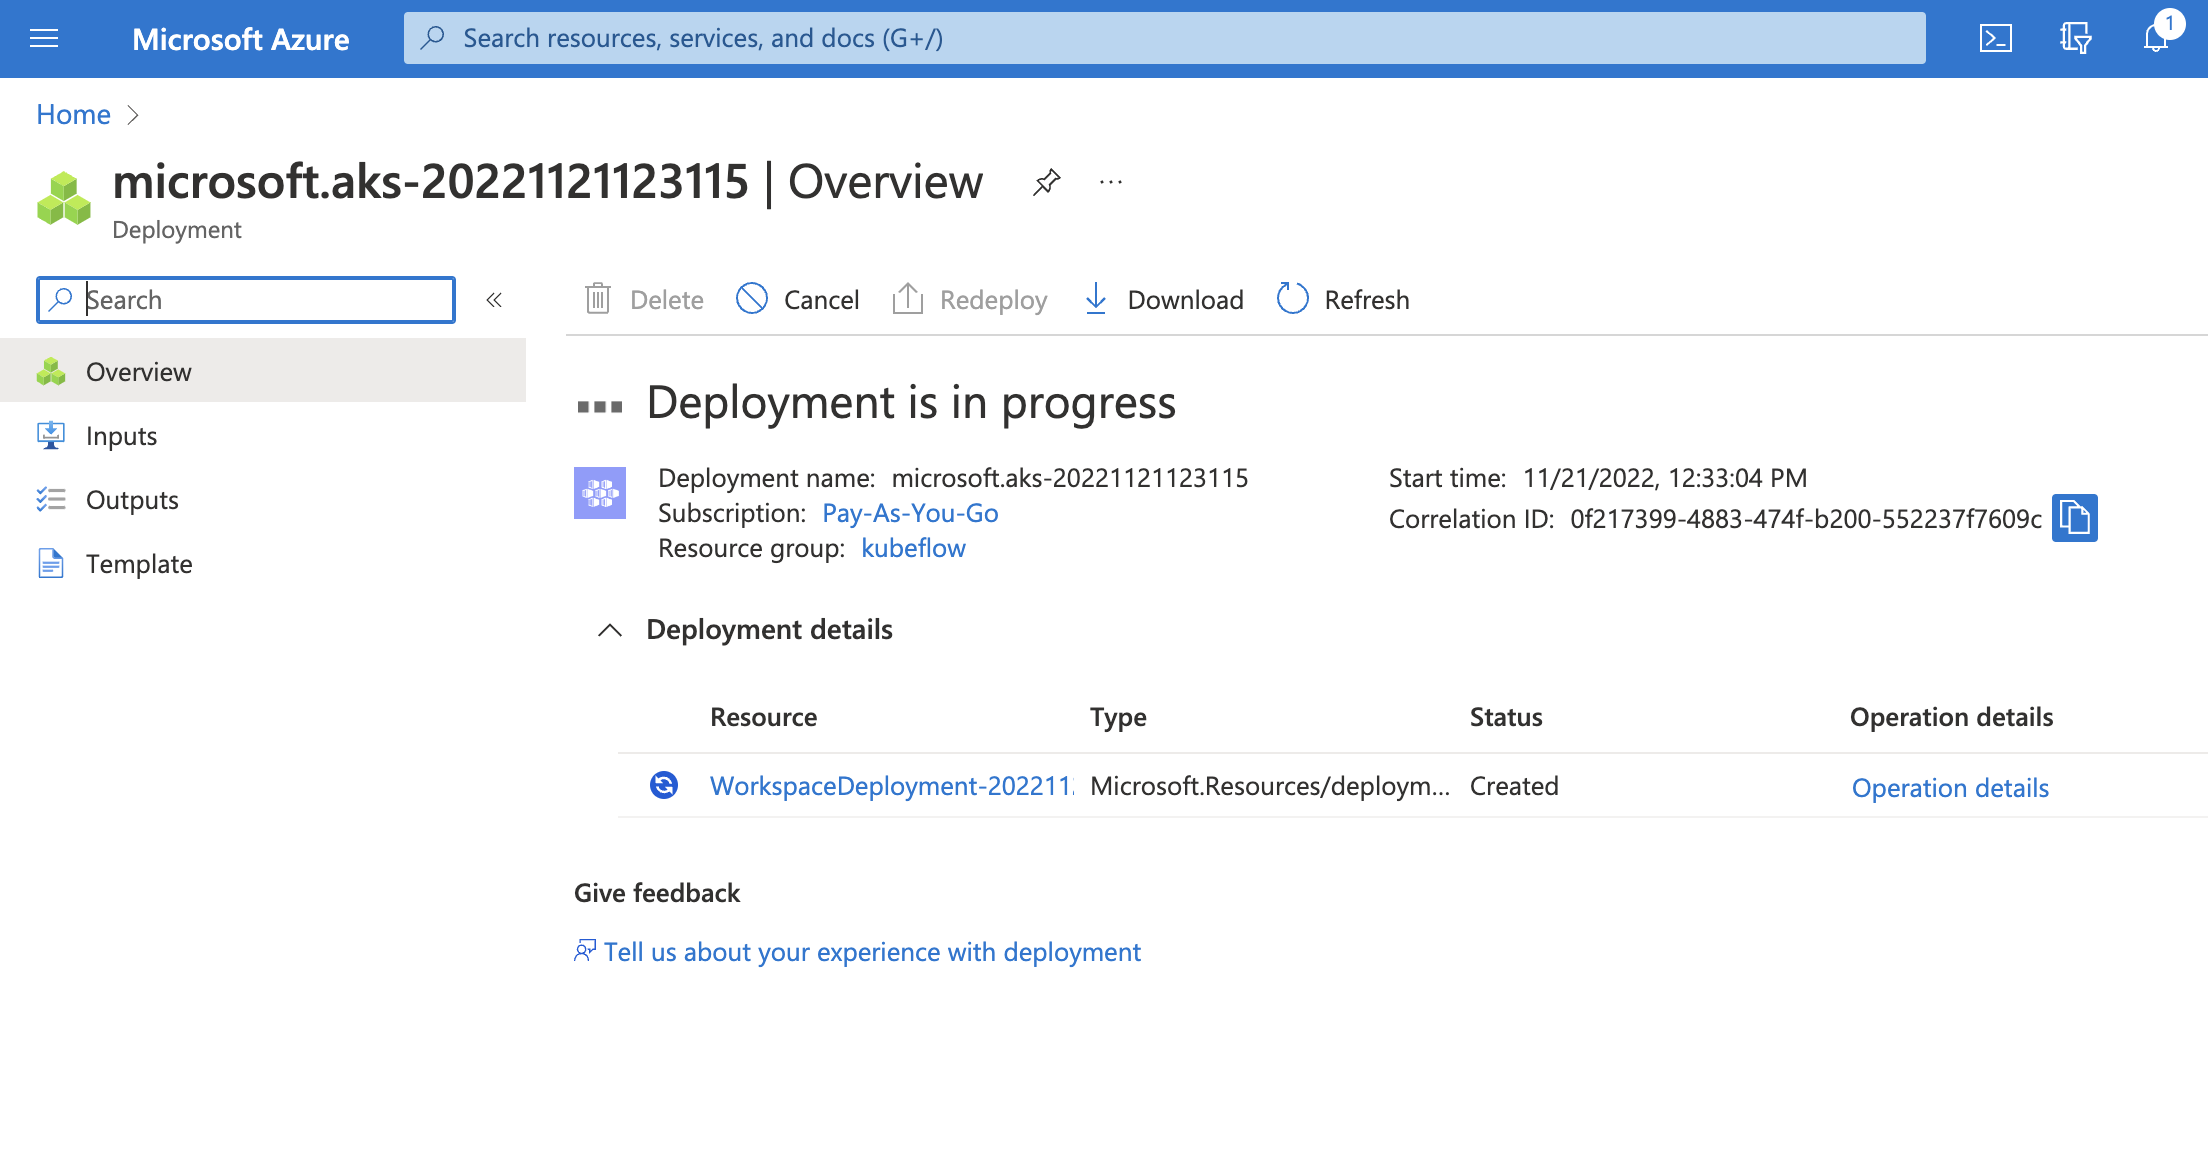
-
Once the deployment is completed, click on
Go to resourcebutton. -
On the newly created resource page, click on
Connectbutton. You will be shown a list of commands to run on theCloud ShellorAzure CLIto connect to this resource. We will execute them successively in the following steps. -
Run the following commands to connect to Azure Kubernetes Service.
az account set --subscription <subscription-id>NOTE: Replace
with your account's subscription id. az aks get-credentials --resource-group <resource-group-name> --name <cluster-name>NOTE: Replace
and with what you selected in Step 3. -
Check to see if
azurefileorazurediskstorage class is present by running the following command:kubectl get storageclassLater in the helm script we need to update the value of
sharedData.storageClasswith the respective storage class. -
Go to the
artifactdirectory and from there edit theannotationlab-installer.shscript.helm install annotationlab annotationlab-${ANNOTATIONLAB_VERSION}.tgz \ --set image.tag=${ANNOTATIONLAB_VERSION} \ --set model_server.count=1 \ --set ingress.enabled=true \ --set networkPolicy.enabled=true \ --set networkPolicy.enabled=true --set extraNetworkPolicies='- namespaceSelector: matchLabels: kubernetes.io/metadata.name: kube-system podSelector: matchLabels: app.kubernetes.io/name: traefik app.kubernetes.io/instance: traefik' \ --set keycloak.postgresql.networkPolicy.enabled=true \ --set sharedData.storageClass=azurefile \ --set airflow.postgresql.networkPolicy.enabled=true \ --set postgresql.networkPolicy.enabled=true \ --set airflow.networkPolicies.enabled=true \ --set ingress.defaultBackend=true \ --set ingress.uploadLimitInMegabytes=16 \ --set 'ingress.hosts[0].host=domain.tld' \ --set airflow.model_server.count=1 \ --set airflow.redis.password=$(bash -c "echo ${password_gen_string}") \ --set configuration.FLASK_SECRET_KEY=$(bash -c "echo ${password_gen_string}") \ --set configuration.KEYCLOAK_CLIENT_SECRET_KEY=$(bash -c "echo ${uuid_gen_string}") \ --set postgresql.postgresqlPassword=$(bash -c "echo ${password_gen_string}") \ --set keycloak.postgresql.postgresqlPassword=$(bash -c "echo ${password_gen_string}") \ --set keycloak.secrets.admincreds.stringData.user=admin \ --set keycloak.secrets.admincreds.stringData.password=$(bash -c "echo ${password_gen_string}") -
Execute the
annotationlab-installer.shscript to run the Generative AI Lab installation../annotationlab-installer.sh -
Verify if the installation was successful.
kubectl get pods -
Install ingress controller. This will be required for load-balancing purpose.
helm repo add nginx-stable https://helm.nginx.com/stable helm repo update helm install my-release nginx-stable/nginx-ingress -
Create a YAML configuration file named
ingress.yamlwith the following configurationapiVersion: networking.k8s.io/v1 kind: Ingress metadata: annotations: kubernetes.io/ingress.class: nginx meta.helm.sh/release-name: annotationlab meta.helm.sh/release-namespace: default name: annotationlab spec: defaultBackend: service: name: annotationlab port: name: http rules: - host: domain.tld http: paths: - backend: service: name: annotationlab port: name: http path: / pathType: ImplementationSpecific - backend: service: name: annotationlab-keyclo-http port: name: http path: /auth pathType: ImplementationSpecific -
Apply the
ingress.yamlby running the following commandkubectl apply -f ingress.yaml
AirGap Environment
Get Artifact
Run the following command on a terminal to fetch the compressed artifact (tarball) of the Generative AI Lab.
wget https://s3.amazonaws.com/auxdata.johnsnowlabs.com/annotationlab/annotationlab-$VERSION.tar.gz
Extract the tarball and the change directory to the extracted folder (artifacts):
tar -xzf annotationlab-$VERSION.tar.gz
cd artifacts
Replace $VERSION with the version you want to download and install.
Fresh Install
Run the installer script annotationlab-installer.sh with sudo privileges.
$ sudo su
$ ./annotationlab-installer.sh
Upgrade
Run the upgrade script annotationlab-updater.sh with sudo privileges.
$ sudo su
$ ./annotationlab-updater.sh
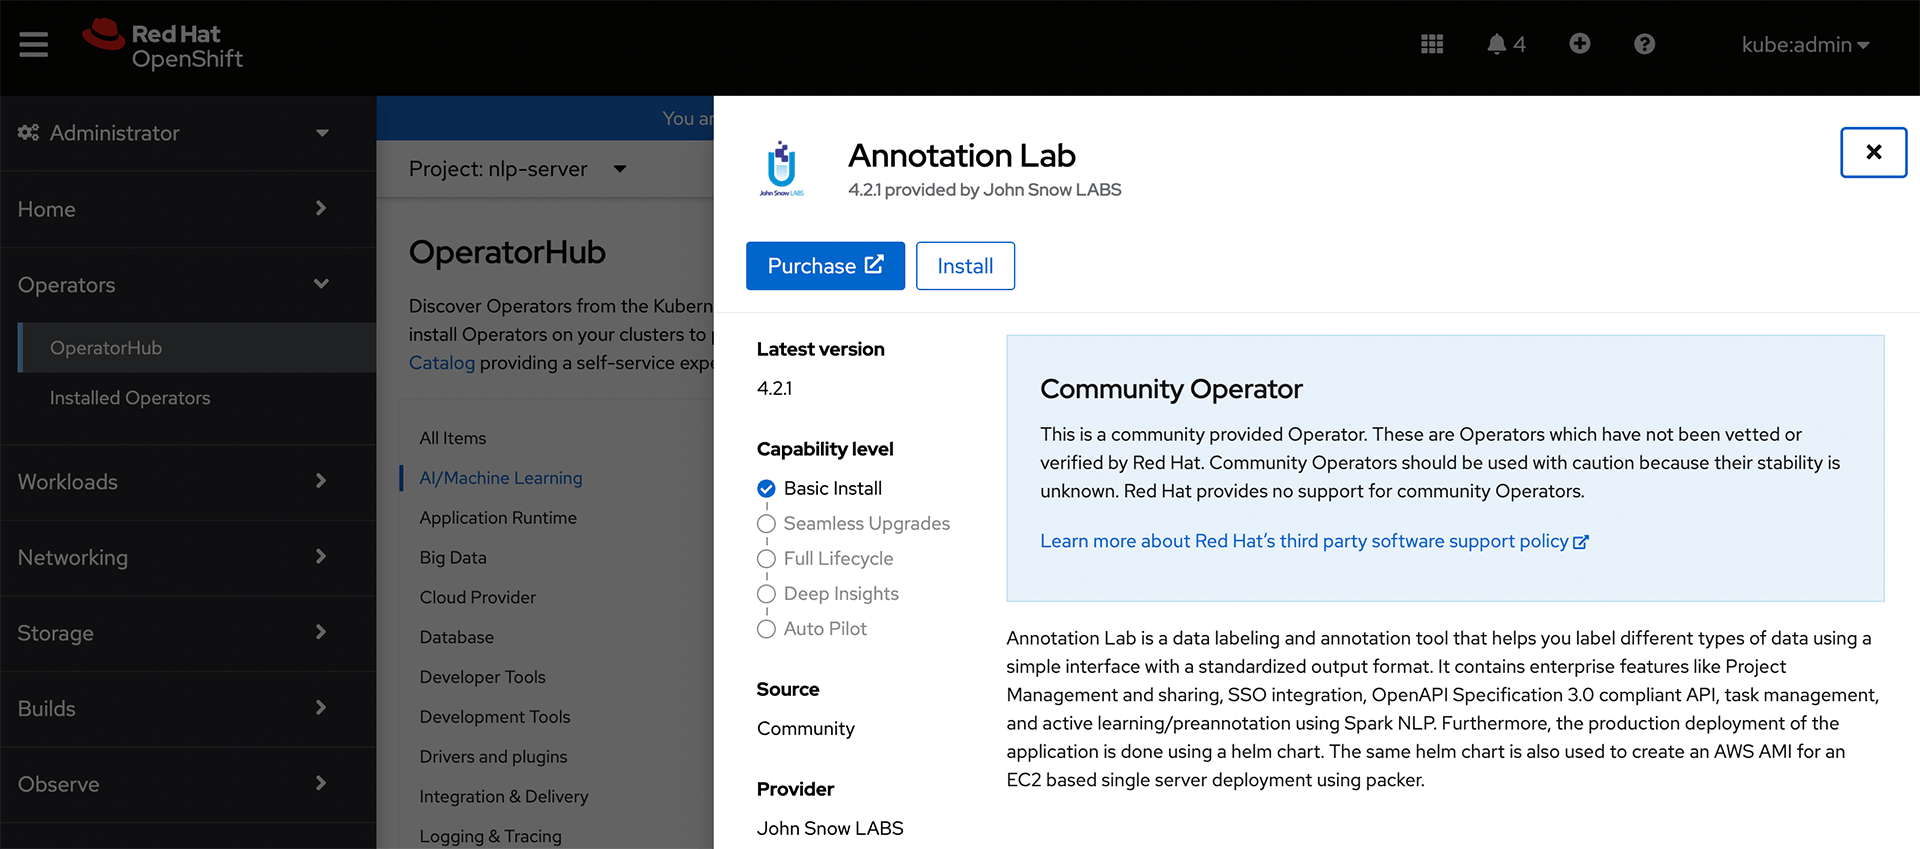
OpenShift
Generative AI Lab can also be installed using the operator framework on an OpenShift cluster. The Generative AI Lab operator can be found under the
Find and select
The
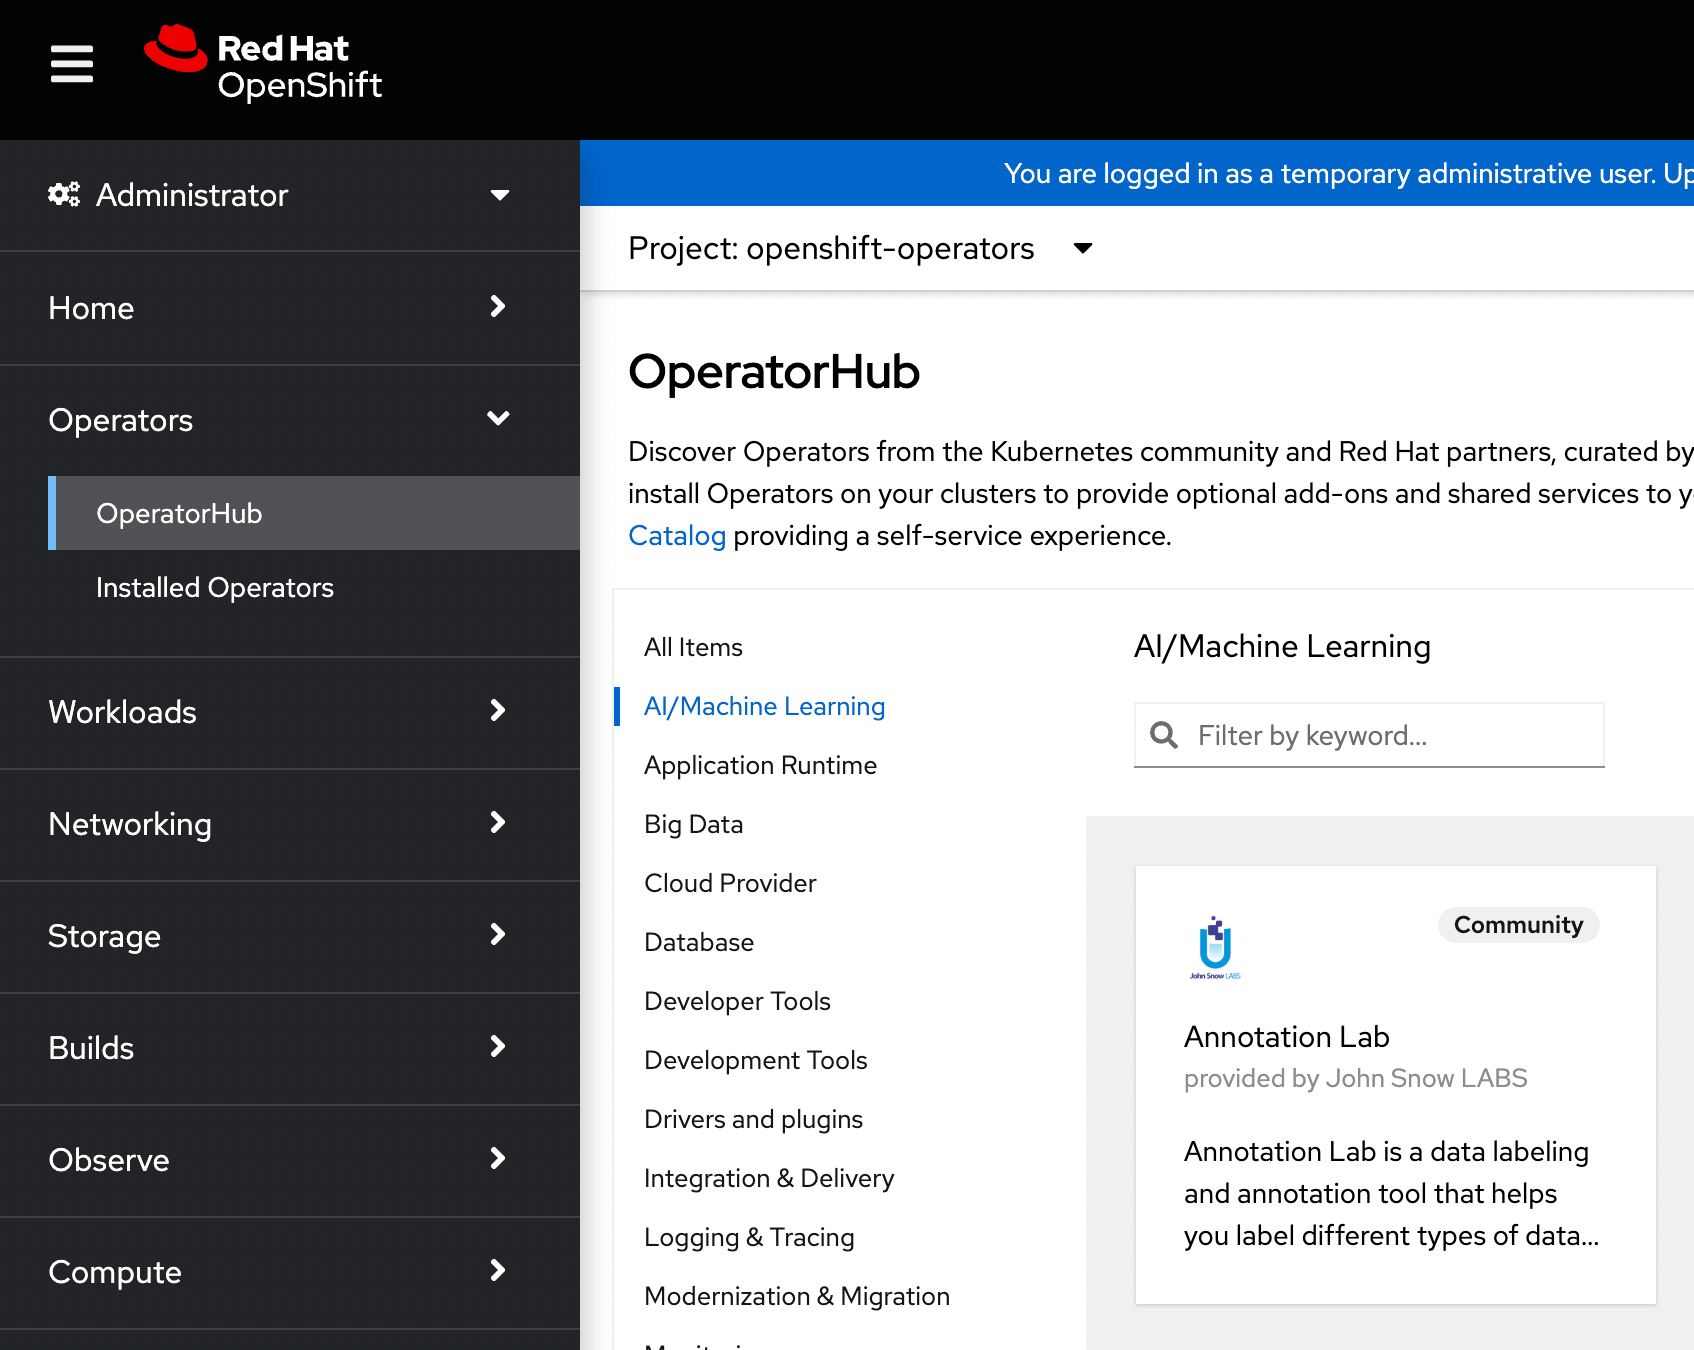
Install
Some basic information about this operator is provided on the navigation panel that opens after selecting Generative AI Lab on the previous step.
NOTE: Make sure you have defined shared storage such as
efs/nfs/cephfsprior to installing the Generative AI Lab Operator.
Click on the Install button located on the top-left corner of this panel to start the installation process.
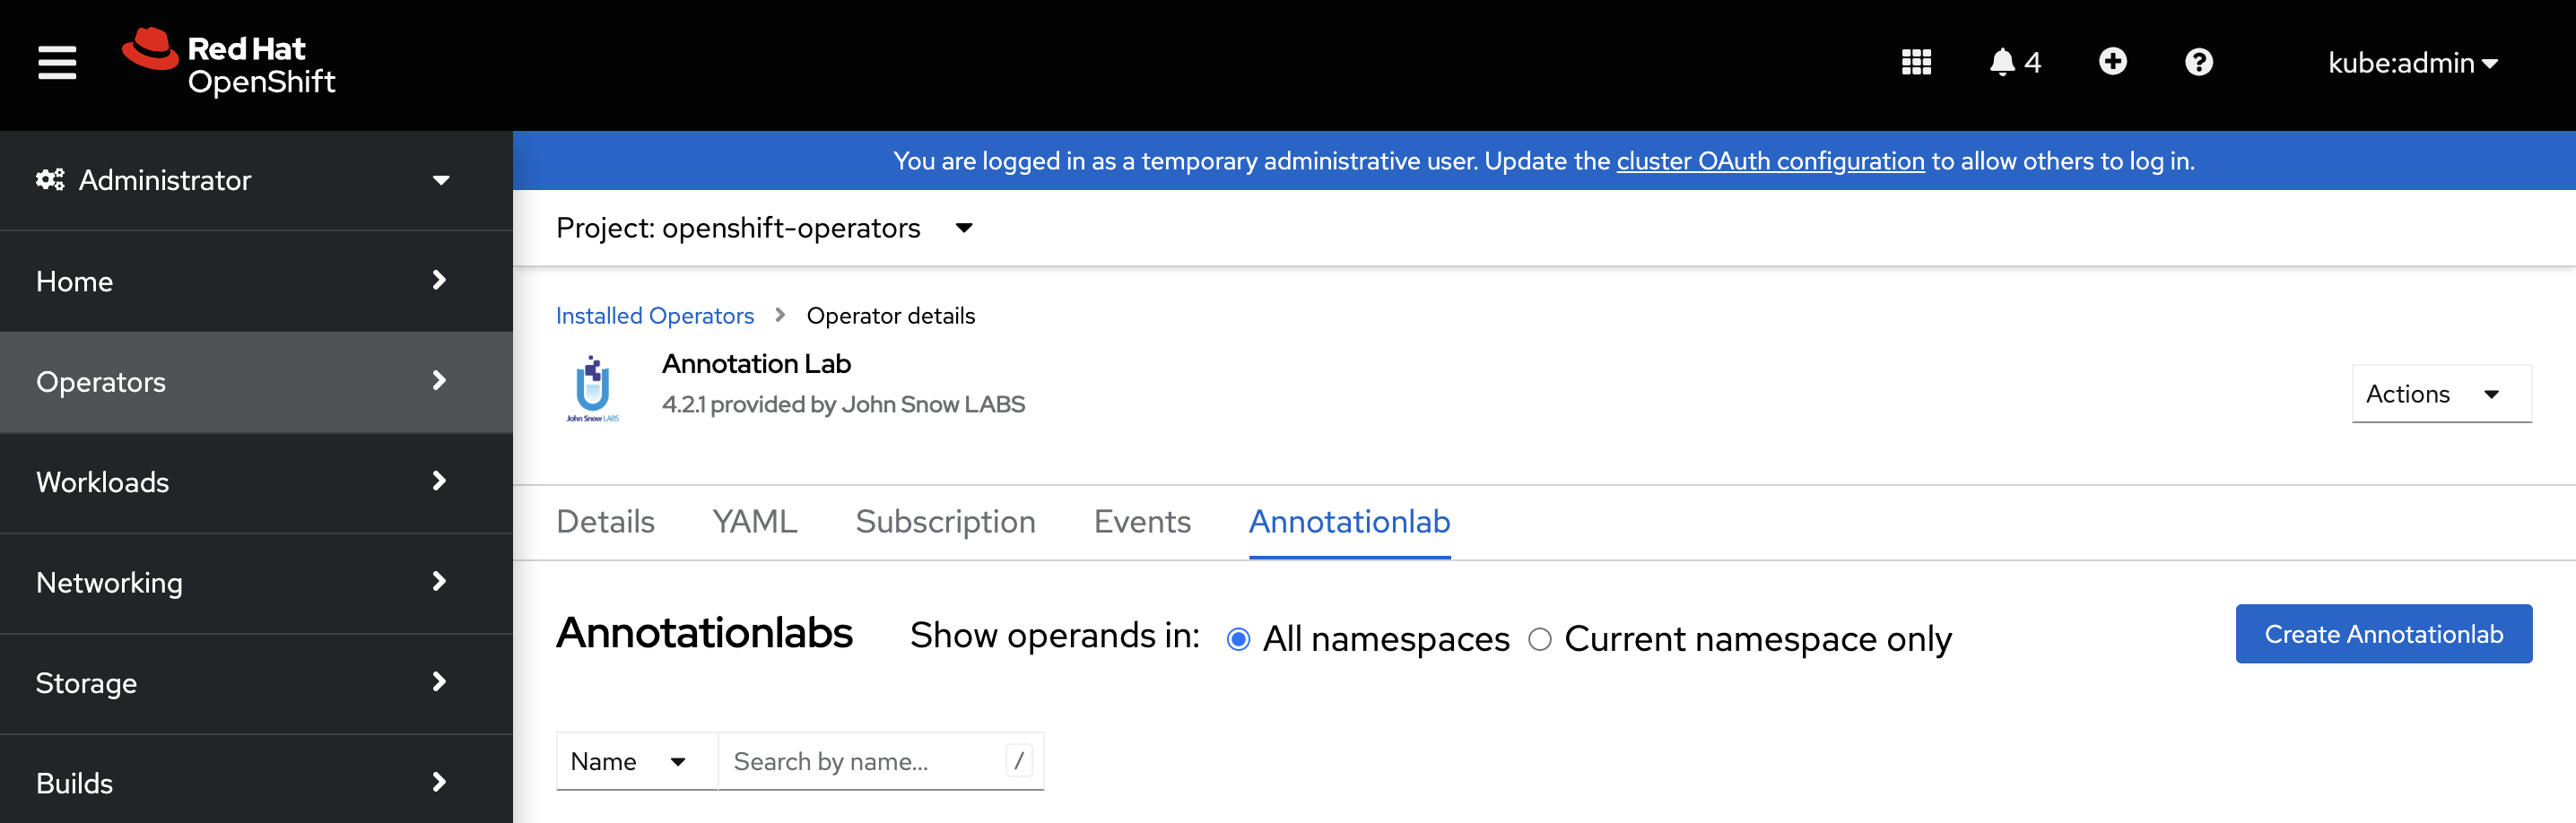
After successful installation of the Generative AI Lab operator, you can access it by navigating to the
Create Instance
Next step is to create a cluster instance of the Generative AI Lab. For this, select the Generative AI Lab operator under the Create Annotationlab button to spawn a new instance of Generative AI Lab.
Define shared Storage Class
Update the storageClass property in the YAML configuration to define the storage class to one of efs, nfs, or cephfs depending upon what storage you set up before Generative AI Lab operator installation.

Define domain name
Update the host property in the YAML configuration to define the required domain name to use instead of the default hostname annotationlab as shown in the image below.
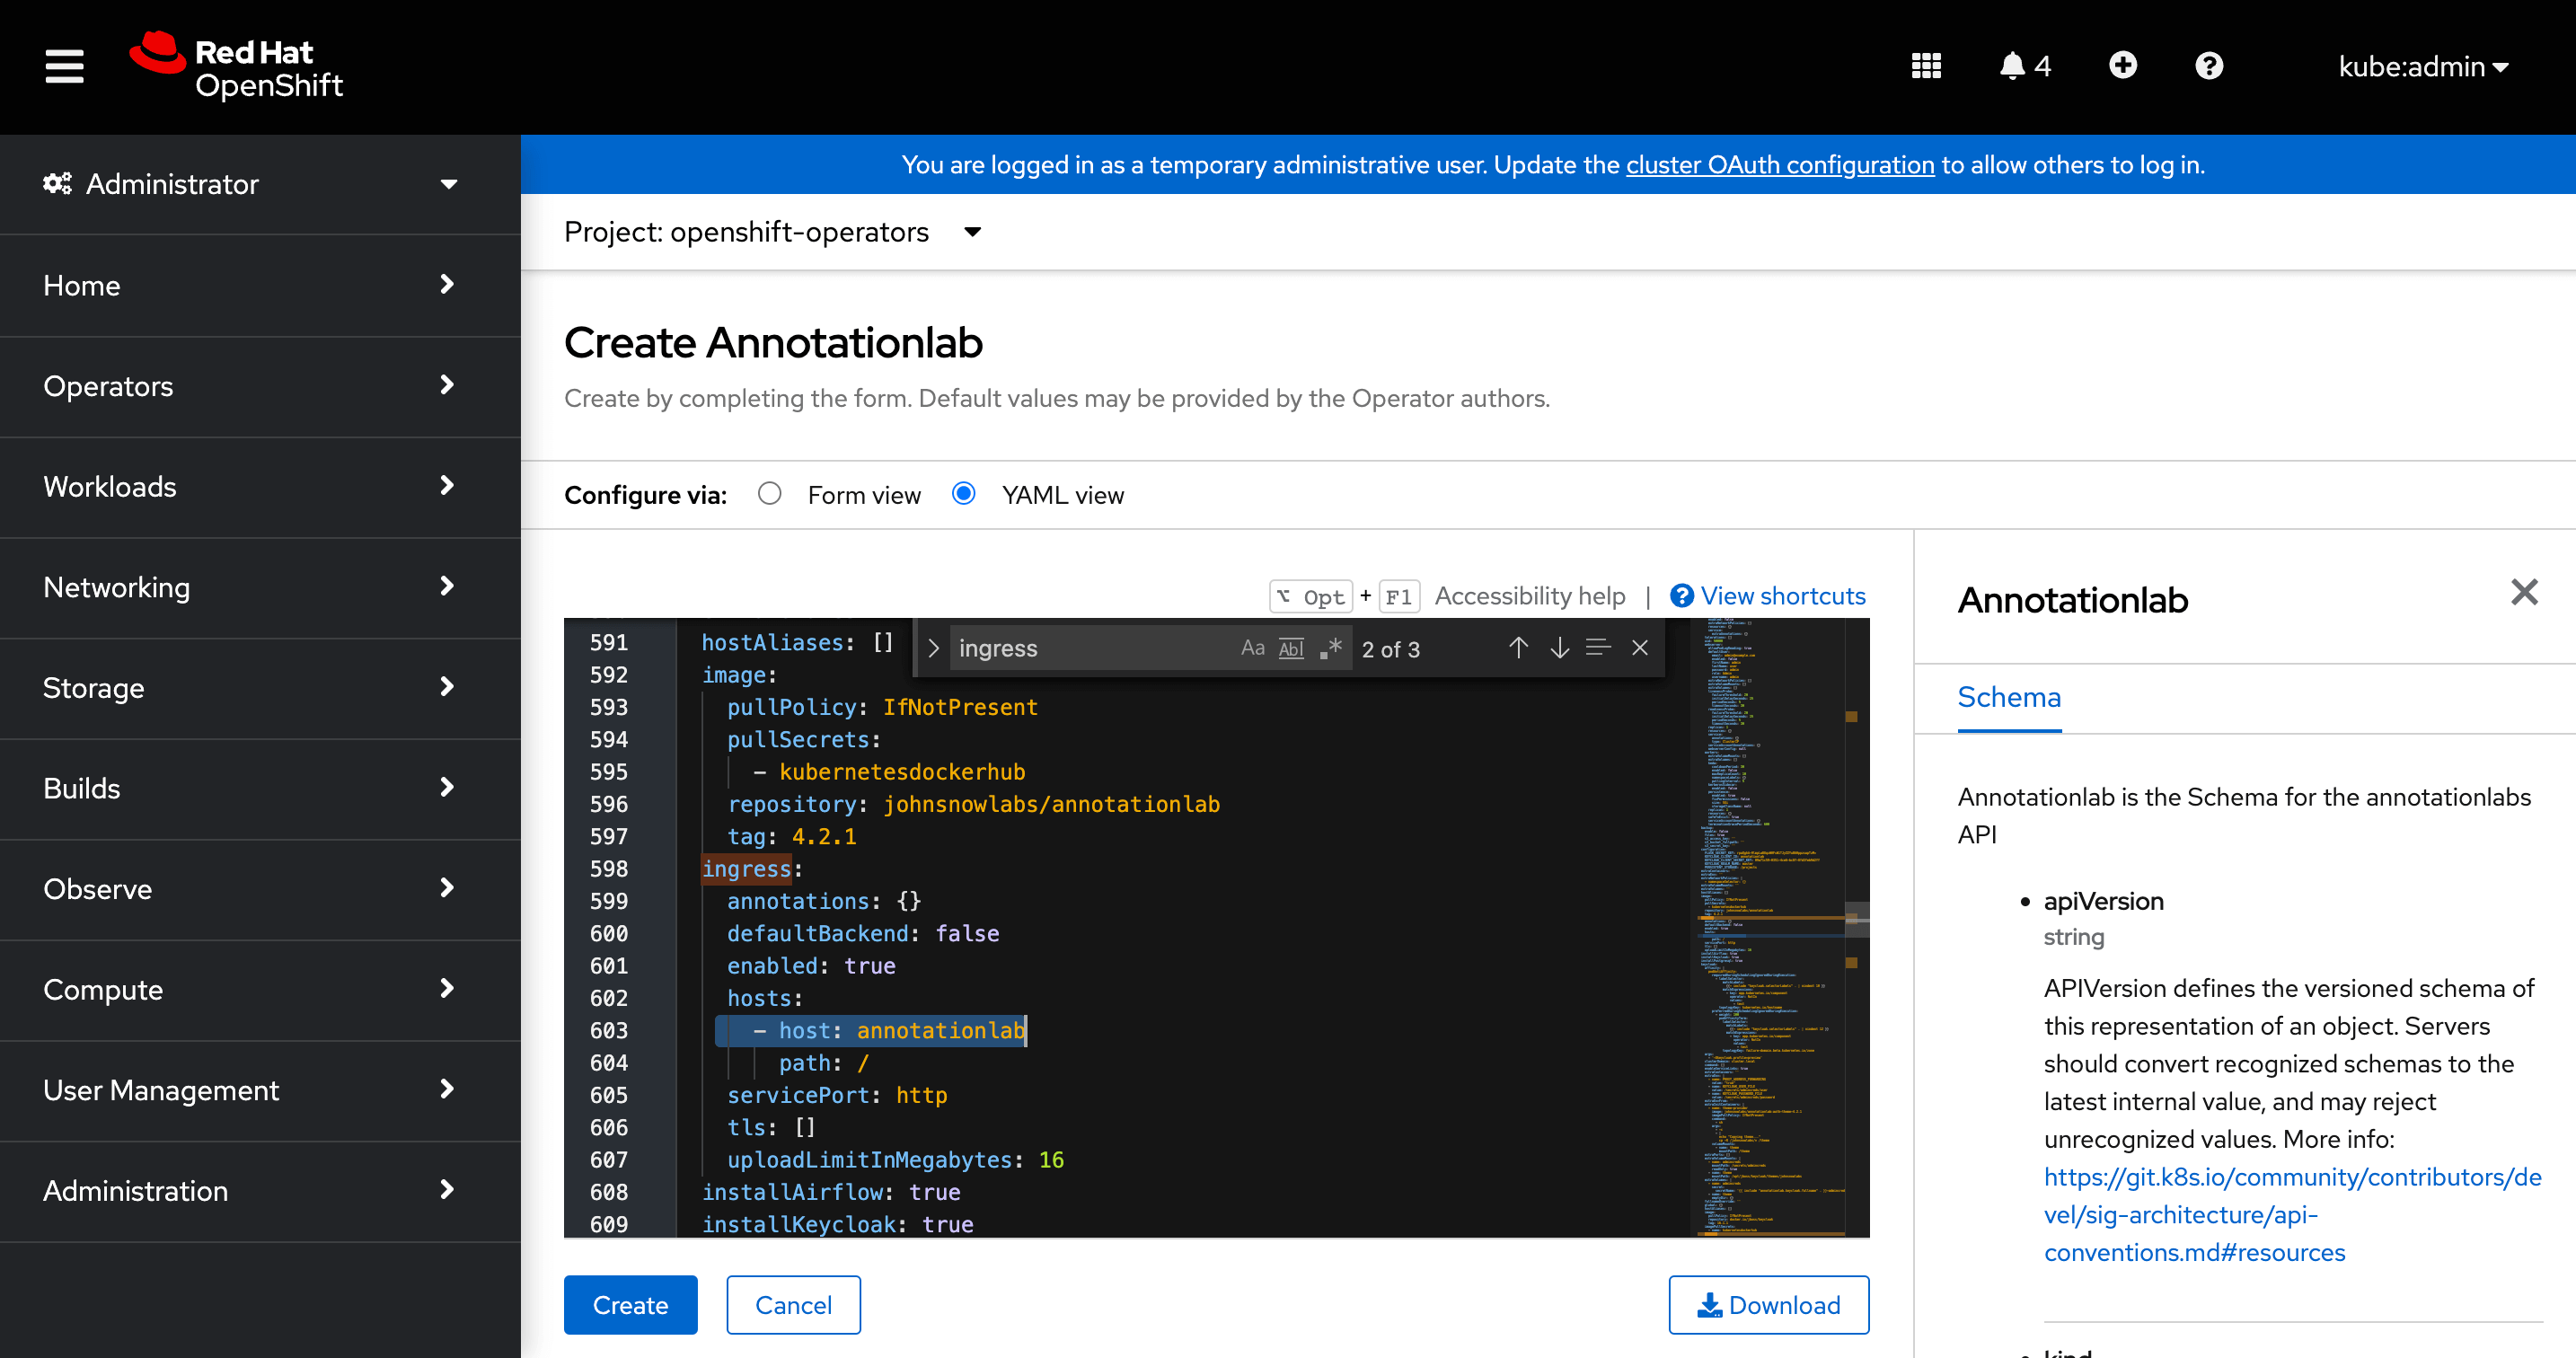
Click on Create button once you have made all the necessary changes. This will also set up all the necessary resources to run the instance in addition to standing up the services themselves.
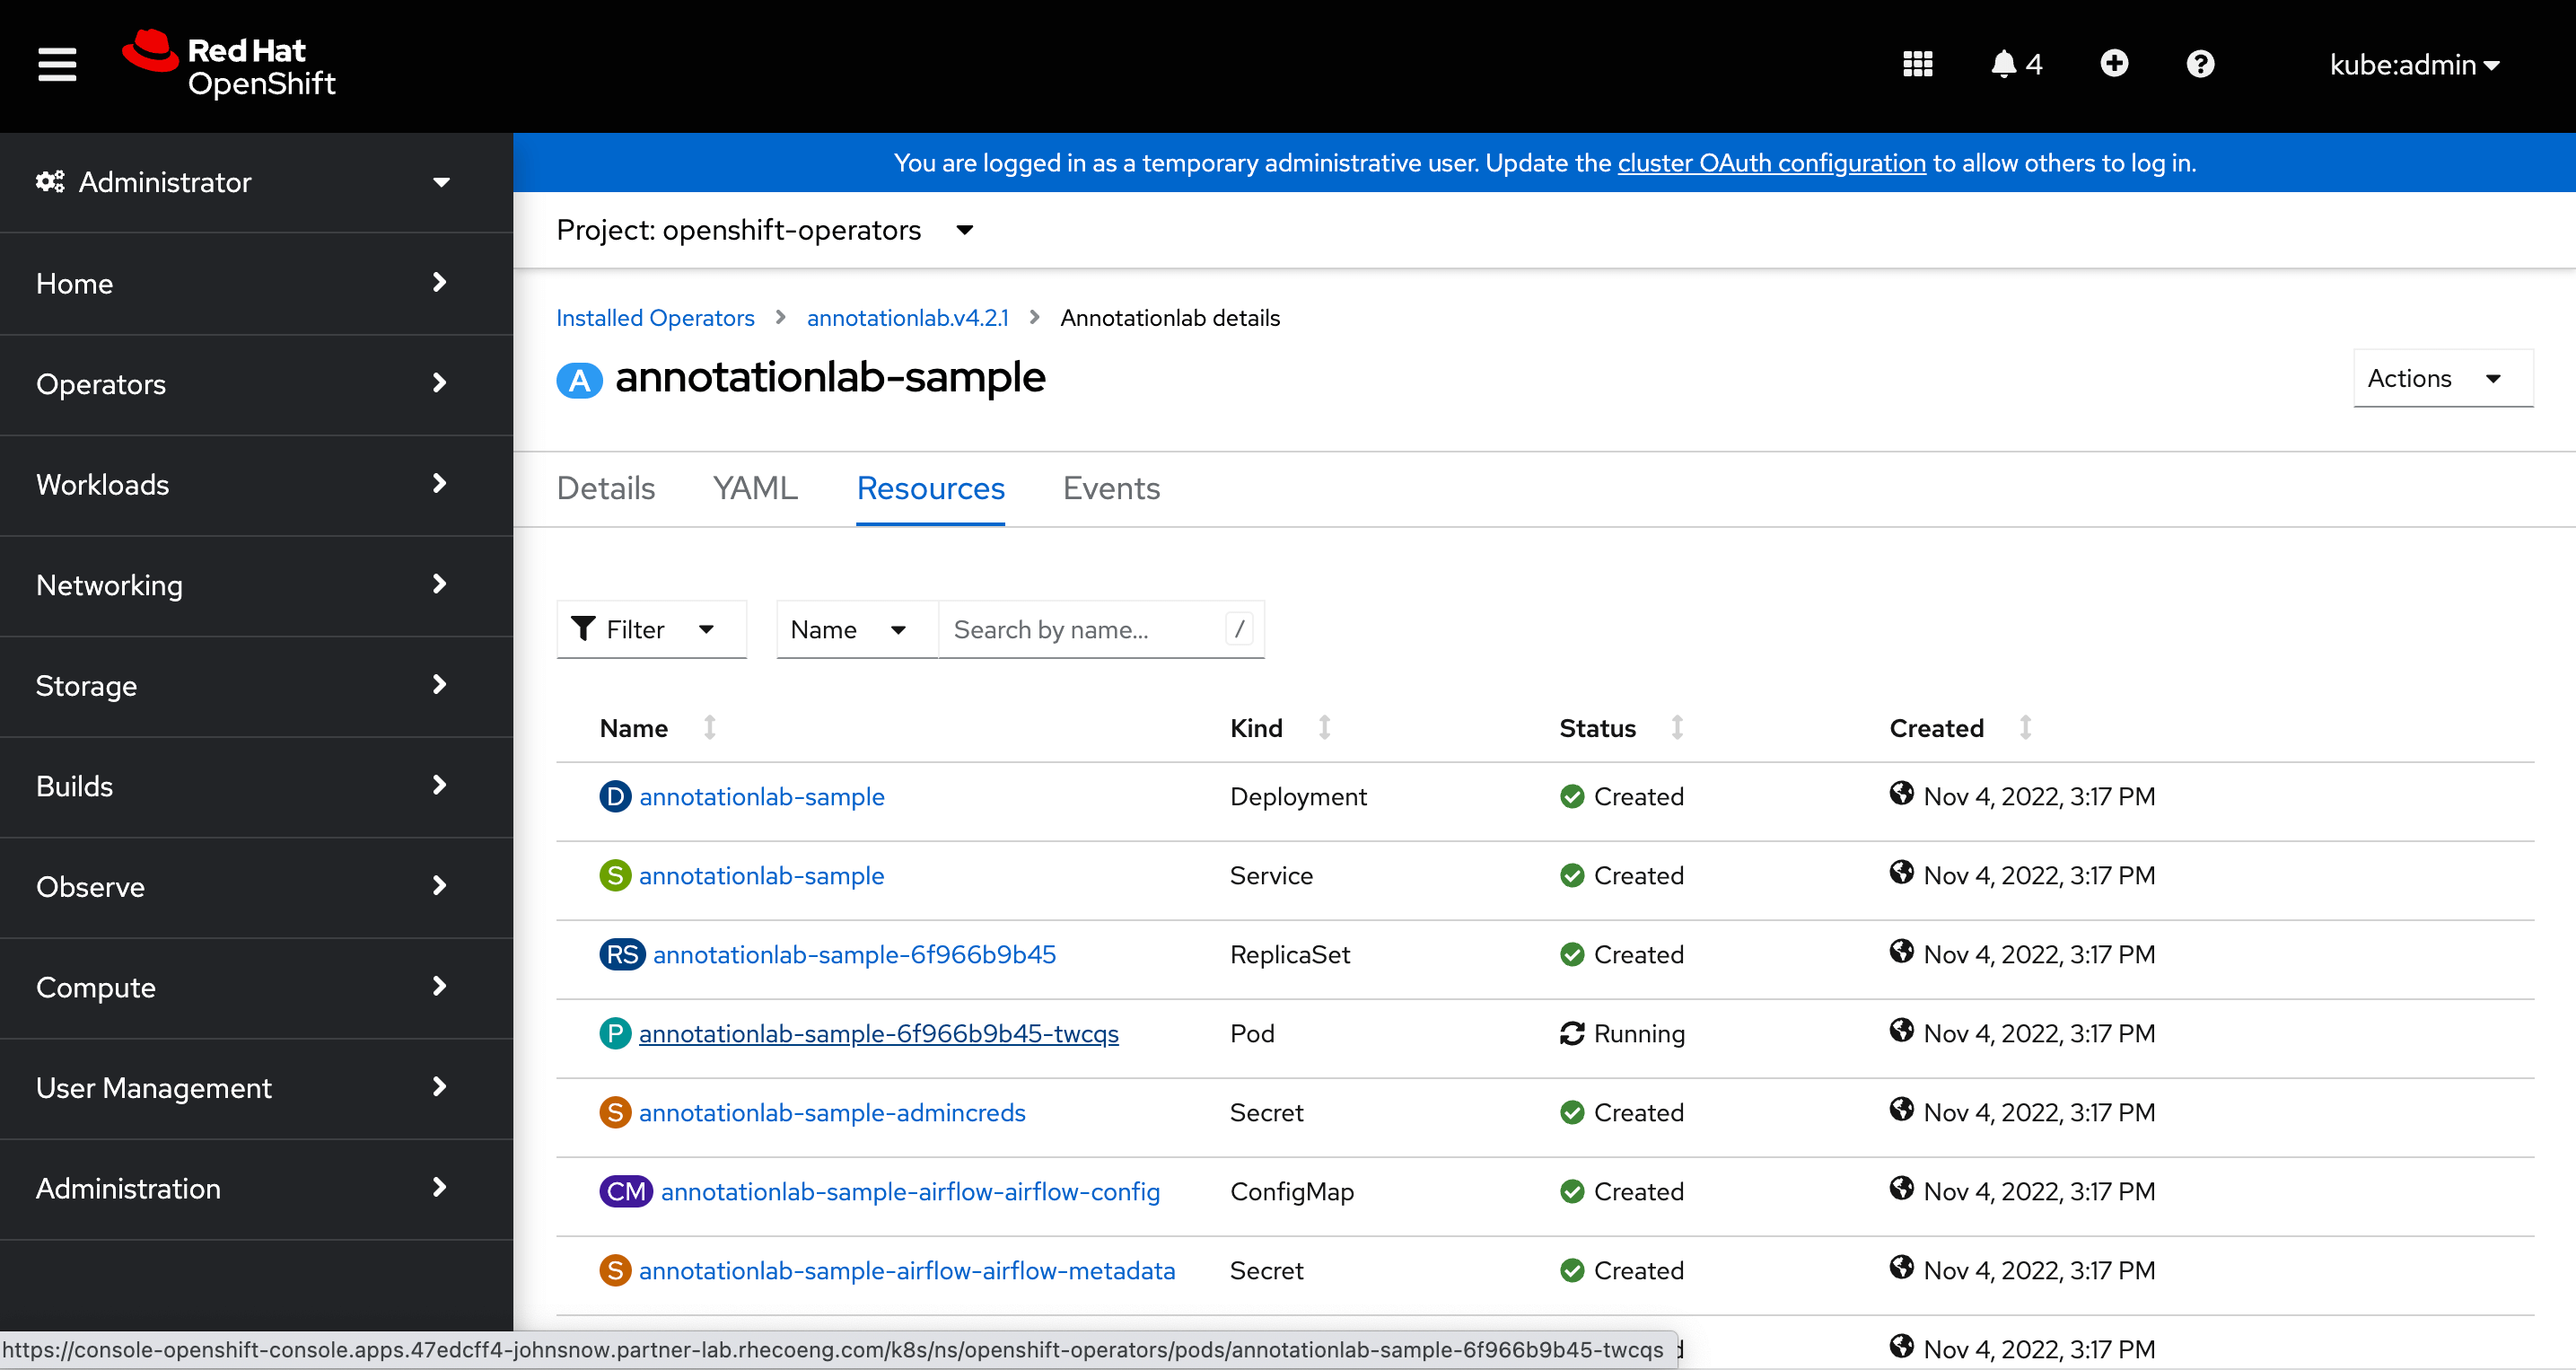
View Resources
After the instance is successfully created we can visit its page to view all the resources as well as supporting resources like the secrets, configuration maps, etc that were created.
Now, we can access the Generative AI Lab from the provided domain name or also from the location defined for this service under the Networking > Routes page
Work over proxy
Custom CA certificate
You can provide a custom CA certificate chain to be included into the deployment. To do it add --set-file custom_cacert=./cachain.pem options to helm install/upgrade command inside annotationlab-installer.sh and annotationlab-updater.sh files.
cachain.pem must include a certificate in the following format:
-----BEGIN CERTIFICATE-----
....
-----END CERTIFICATE-----
Proxy env variables
You can provide a proxy to use for external communications. To do that add
`--set proxy.http=[protocol://]<host>[:port]`,
`--set proxy.https=[protocol://]<host>[:port]`,
`--set proxy.no=<comma-separated list of hosts/domains>`
commands inside annotationlab-installer.sh and annotationlab-updater.sh files.
Recommended Configurations
| System requirements | You can install Generative AI Lab on a Ubuntu 20+ machine. |
|---|---|
| Port requirements | Generative AI Lab expects ports |
| Server requirements | The minimal required configuration is The ideal configuration in case model training and preannotations are required on a large number of tasks is |
| Web browser support | Generative AI Lab is tested with the latest version of Google Chrome and is expected to work in the latest versions of:
|