Serialization and Experiment Tracking with MLFlow (Python)
About MLFLow
Spark NLP uses Spark MLlib Pipelines, what are natively supported by MLFlow. MLFlow is, as stated in their official webpage, an open source platform for the machine learning lifecycle, that includes:
- Mlflow Tracking: Record and query experiments: code, data, config, and results
- MLflow Projects: Package data science code in a format to reproduce runs on any platform
- MLflow Models: Deploy machine learning models in diverse serving environments
- Model Registry: Store, annotate, discover, and manage models in a central repository
MLFlow is also integrated in Databricks, so you will be able to track your experiments in any Databricks environment, and even use MLFLow Model Registry to serve models for production purposes, using the REST API (see section “Productionizing Spark NLP”).
We will be using in this documentation Jupyter Notebook syntax.
Available configurations
There are several ways of deploying a MLFlow Model Registry:
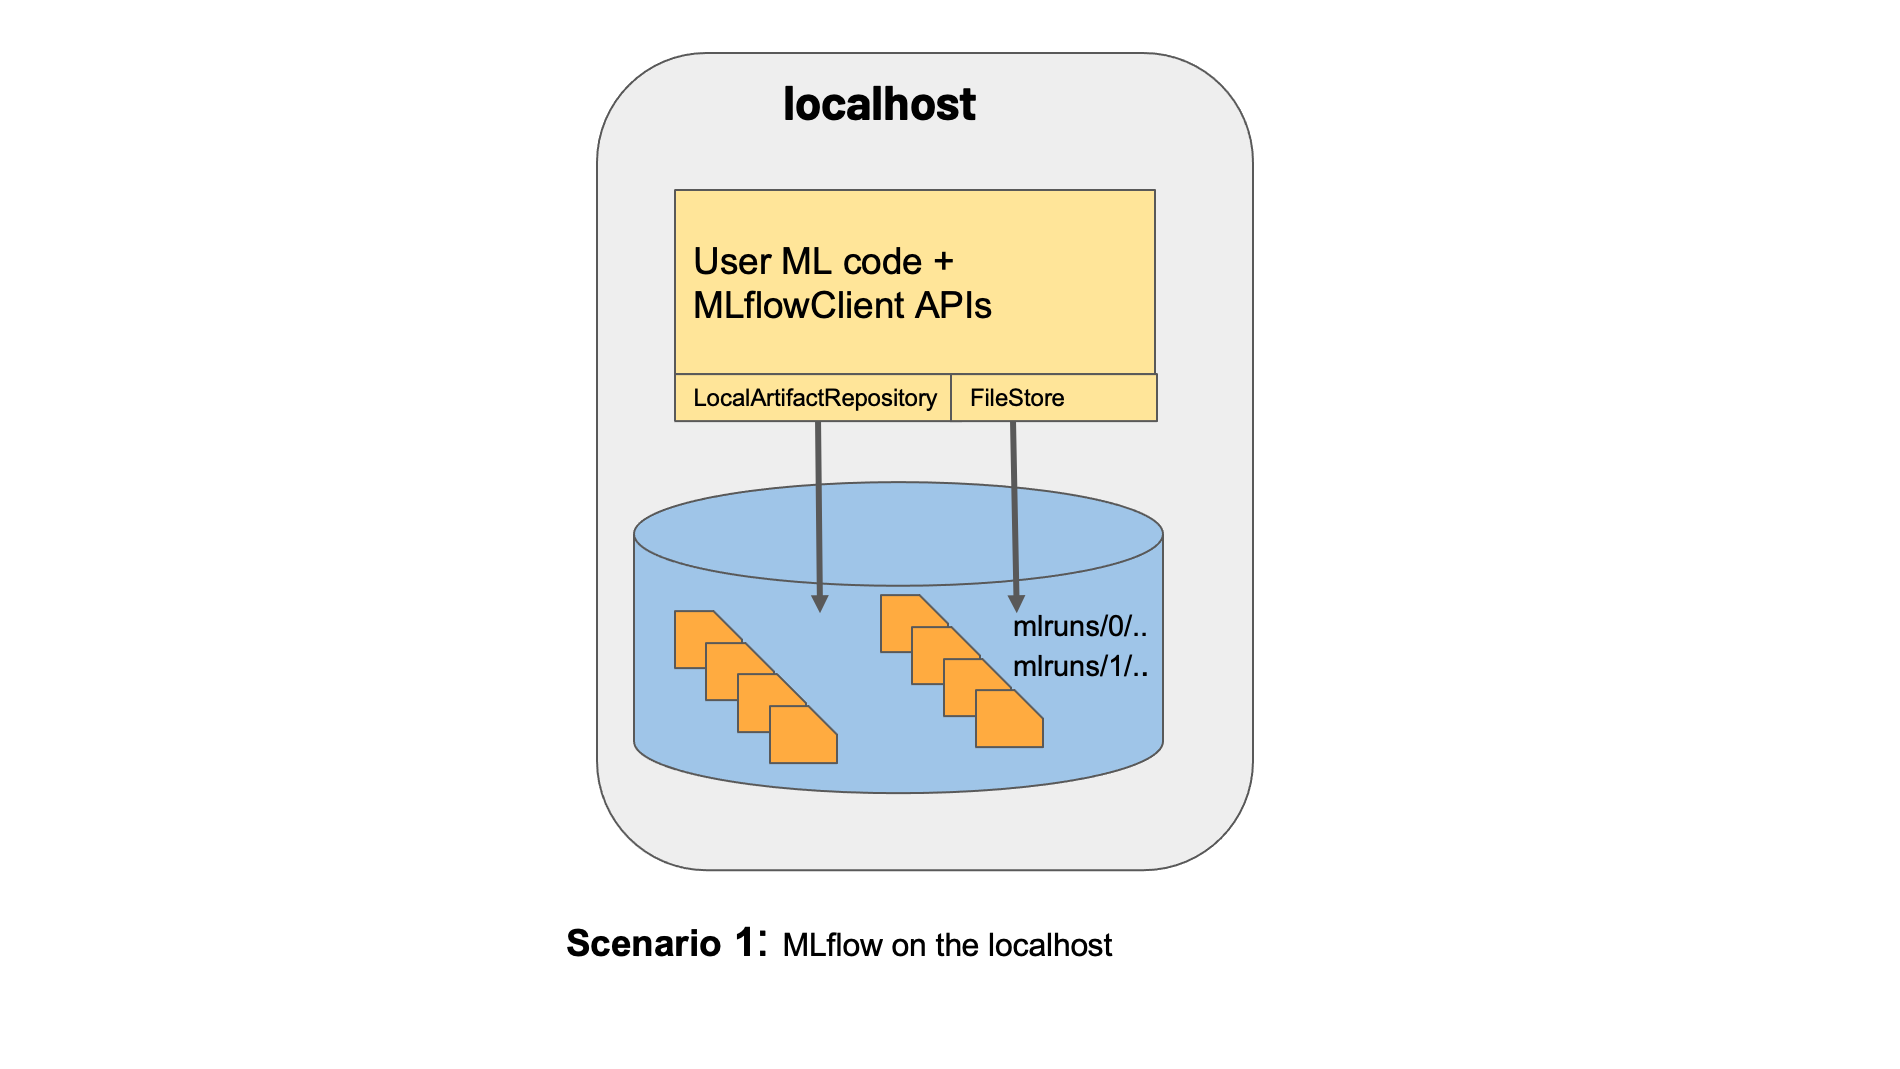
1) Scenario 1: MLflow on localhost with no Tracking Server:
This scenario uses a localhost folder (./mlruns by default) to serialize and store your models, but there is no tracking server available (version tracking will be disabled).
2) Scenario 2: MLflow on localhost with a Tracking Server
This scenario uses a localhost folder (./mlruns by default) to serialize and store your mdoels, and a database as a Tracking Sever. It uses SQLAlchemy under the hood, so the following databases are supported: mssql, postgresql, mysql, sqlite.
We are going to show how to implement this scenario with a mysql database.
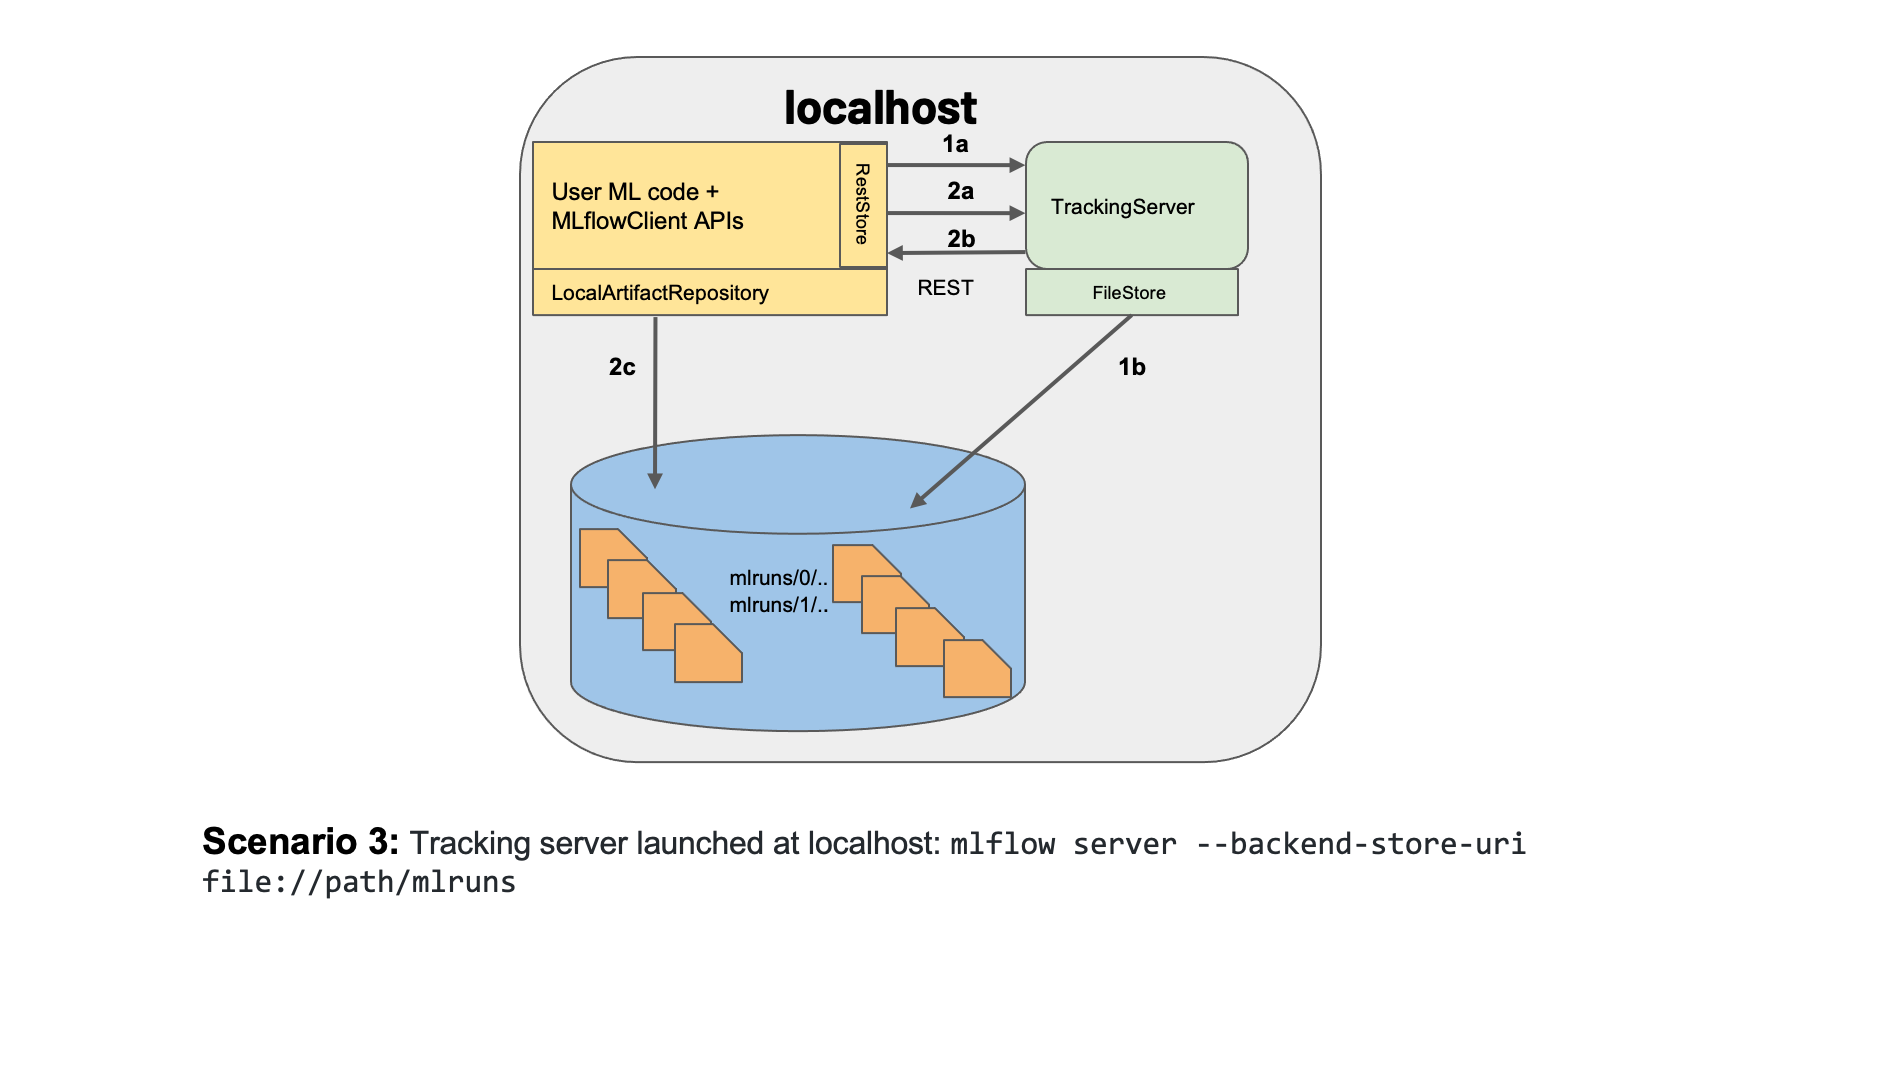
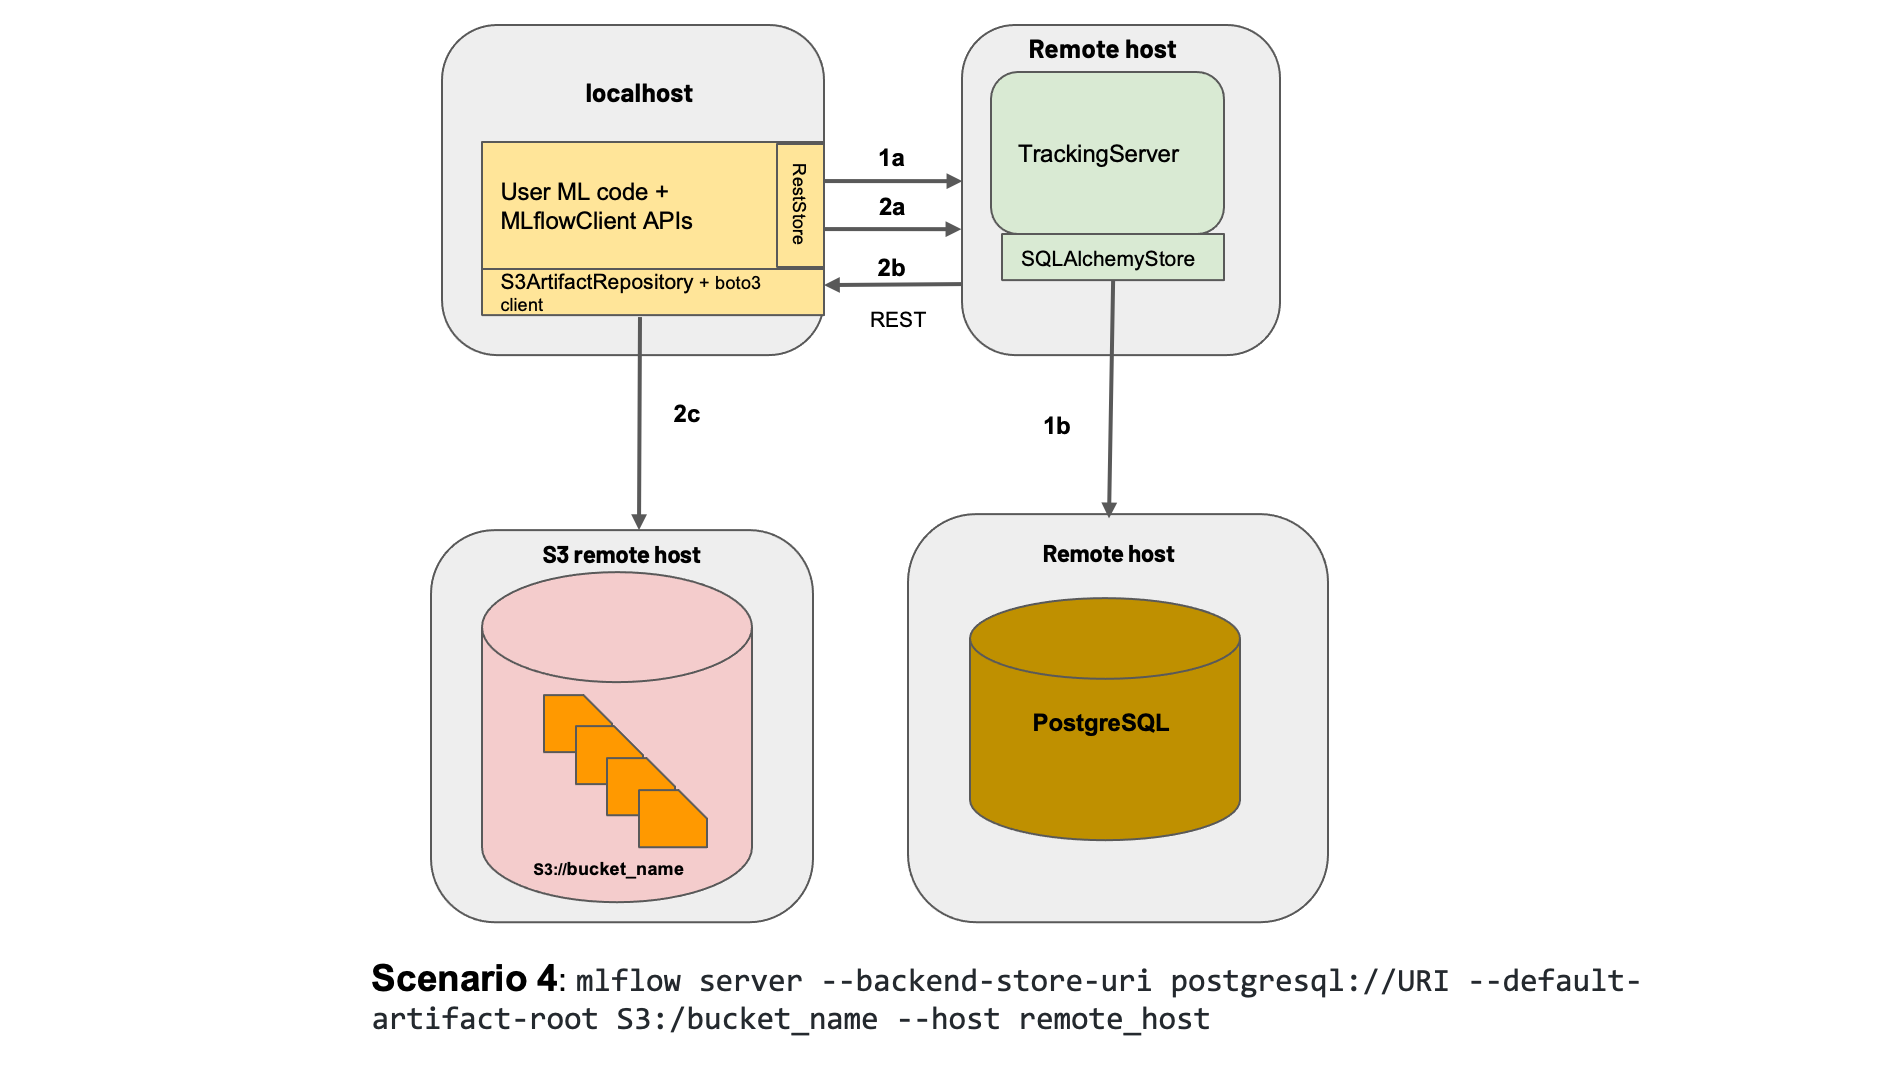
3) Scenario 3: MLflow on remote with a Tracking Server
This scenario is a remote version of Scenario 2. It uses a remote S3 bucket to serialize and store your mdoels, and a database as a Tracking Sever. Again, it uses SQLAlchemy for the Tracking Server under the hood, so the following databases are supported: mssql, postgresql, mysql, sqlite. In this case, you can use any service as AWS RDS or Azure SQL Database.
Requirements
As we said before, we are going to showcase Scenario 2. Since we want to have a Experiment Tracking Server with mysql, we will need to install in our server the requirements for it.
!sudo apt-get install -y python-mysqldb mysql-server libmysqlclient-dev
Also, let’s install a mysql Python interface library, called pymsql, to access mysql databases.
!pip install mysqlclient pymysql
We will also need MLFlow (this example was tested with version 1.21.0)
!pip install mlflow
Finally, make sure you follow the Spark NLP installation, available here
Instantiating a MySQL database
We are going to use Docker to instantiate a MySQL container with a persistent volume, but you can install it directly on your machine without Docker.
To do that, we will need to have installed (feel free to skip this step if you will install MySql without Docker):
In our case, I used this docker-compose.yml file to instantiate a mysql database with a persistent volume:
version: '3'

services:
  # MySQL
  mflow_models:
    container_name: mlflow_models
    image: mysql:8.0
    command: mysqld --default-authentication-plugin=mysql_native_password --character-set-server=utf8mb4 --collation-server=utf8mb4_unicode_ci
    environment:
      MYSQL_ROOT_PASSWORD: root
      MYSQL_DATABASE: mlflow_models
      MYSQL_USER: jsl
      MYSQL_PASSWORD: passpass
      MYSQL_ALLOW_EMPTY_PASSWORD: "yes"
    ports:
      - '3306:3306'
    volumes:
      - './docker/db/data:/var/lib/mysql'
      - './docker/db/my.cnf:/etc/mysql/conf.d/my.cnf'
      - './docker/db/sql:/docker-entrypoint-initdb.d'
Just by executing the following command in the folder where your docker-compose.yml file is, you will have your MySQL engine, with a mlflow_models database running and prepared for MLFlow Experiment Tracking:
!sudo docker-compose up -d .
Make sure it’s running using the following command: `!docker ps | grep -o mlflow_models
Connection string
You will need a connection string that will tell MLFlow (SQLAlchemy) how to reach that database.
Connections strings in SQLALchemy have this format:
<dialect>+<driver>://<username>:<password>@<host>:<port>/<database>
In our case, we declare a CONNECTION_STRING var as:
CONNECTION_STRING = f"mysql+pymysql://root:root@localhost:3306/mlflow_models"
Imports
Let’s now import all the libraries we will need.
Generic imports
import json
import os
from sklearn.metrics import classification_report
import time
import mlflow
from mlflow.models.signature import infer_signature
from urllib.parse import urlparse
import pandas as pd
import glob
Spark NLP imports
import sparknlp
from sparknlp.base import *
from sparknlp.annotator import *
from sparknlp.training import *
from pyspark.ml import Pipeline
import pyspark.sql.functions as F
from sparknlp.training import CoNLL
from pyspark.sql import SparkSession
Setting the connection string in MLFLow
Now that we have imported mlflow, let’s set the connection string we had prepared before.
mlflow.set_tracking_uri(CONNECTION_STRING)
mlflow.get_tracking_uri() # This checks if it was set properly
Constant with pip_requirements
MLFLow requires either a conda_env (conda environment) definition of the requirements of your models, or a pip_requirements list with all pip libraries. We will use this second way, so let’s prepare the list with Spark NLP and MLFlow:
PIP_REQUIREMENTS = [f"sparknlp=={sparknlp.version()}", f"mlflow=={mlflow.__version__}"]
PIP_REQUIREMENTS # This checks if it was set properly
Training a NERDLApproach()
We will be showcasing the serialization and experiment tracking of NERDLApproach().
There is one specific util that is able to parse the log of that approach in order to extract the metrics and charts. Let’s get it.
Ner Log Parser Util
!wget -q https://raw.githubusercontent.com/JohnSnowLabs/spark-nlp-workshop/master/tutorials/Certification_Trainings/Public/utils/ner_image_log_parser.py
Now, let’s import the library:
import ner_image_log_parser
Starting a SparkNLP session
It’s important we create a Spark NLP Session using the Session Builder, since we need to specify the jars not only of Spark NLP, but also of MLFlow.
def start():
    builder = SparkSession.builder \
        .appName("Spark NLP Licensed") \
        .master("local[80]") \
        .config("spark.driver.memory", "256G") \
        .config("spark.serializer", "org.apache.spark.serializer.KryoSerializer") \
        .config("spark.kryoserializer.buffer.max", "2000M") \
        .config("spark.driver.maxResultSize","4000M") \
        .config("spark.jars.packages", "com.johnsnowlabs.nlp:spark-nlp_2.12:3.3.2,org.mlflow:mlflow-spark:1.21.0")

    return builder.getOrCreate()

spark = start()
Training dataset preparation
Let’s download some training and test datasets:
!wget -q https://raw.githubusercontent.com/JohnSnowLabs/spark-nlp/master/src/test/resources/conll2003/eng.train
!wget -q https://raw.githubusercontent.com/JohnSnowLabs/spark-nlp/master/src/test/resources/conll2003/eng.testa

TRAIN_DATASET = "eng.train"
TEST_DATASET = "eng.testa"
Let’s read the training dataset:
training_data = CoNLL().readDataset(spark, TRAIN_DATASET)
training_data.show(3)
Let’s get the size:
%%time
TRAINING_SIZE = training_data.count()
TRAINING_SIZE
Hyperparameters configuration
Let’s configure our hyperparameter values.
MODEL_NAME = '' # Add your model name here. Example: clinical_ner
EXPERIMENT_NAME = '' # Add your experiment name here. Example: testing_dropout
OUTPUT_DIR = f"{MODEL_NAME}_{EXPERIMENT_NAME}_output" # Output folder of all your model artifacts
MODEL_DIR = f"model" # Name of the folder where the MLFlow model will be stored

MAX_EPOCHS = 10 # Adapt me to your experiment
LEARNING_RATE = 0.003 # Adapt me to your experiment
BATCH_SIZE = 2048 # Adapt me to your experiment
RANDOM_SEED = 0 # Adapt me to your experiment
VALIDATION_SPLIT = 0.1 # Adapt me to your experiment
Creating the experiment
Now, we are ready to instantiate an experiment in MLFlow
EXPERIMENT_ID = mlflow.create_experiment(f"{MODEL_NAME}_{EXPERIMENT_NAME}")
Each time you want to test a different thing, change the EXPERIMENT_NAME and rerun the line above to create a new entry in the experiment. By changing the experiment name, a new experiment ID will be generated. Each experiment ID groups all runs in separates folder inside ./mlruns.
Pipeline creation
document = DocumentAssembler()\
        .setInputCol("text")\
        .setOutputCol("document")

sentence = SentenceDetector()\
        .setInputCols(['document'])\
        .setOutputCol('sentence')

token = Tokenizer()\
        .setInputCols(['sentence'])\
        .setOutputCol('token')

embeddings = BertEmbeddings.pretrained("bert_base_cased", "en") \
      .setInputCols("sentence", "token") \
      .setOutputCol("embeddings")

ner_approach = NerDLApproach()\
      .setInputCols(["sentence", "token", "embeddings"])\
      .setLabelColumn("label")\
      .setOutputCol("ner")\
      .setMaxEpochs(MAX_EPOCHS)\
      .setLr(LEARNING_RATE)\
      .setBatchSize(BATCH_SIZE)\
      .setRandomSeed(RANDOM_SEED)\
      .setVerbose(1)\
      .setEnableOutputLogs(True)\
      .setIncludeConfidence(True)\
      .setIncludeAllConfidenceScores(True)\
      .setEvaluationLogExtended(True)\
      .setOutputLogsPath(OUTPUT_DIR)\
      .setValidationSplit(VALIDATION_SPLIT)
Let’s create a preprocessing pipeline without the NerDLApproach():
ner_preprocessing_pipeline = Pipeline(stages=[
    document,
    sentence,
    token,
    embeddings
 ])
And a training pipeline with it:
ner_training_pipeline = Pipeline(stages = ner_preprocessing_pipeline.getStages() + [ner_approach])
Preparing inference objects
Now, let’s prepare the inference as well, since we will train and infer afterwards, and store all the results of training and inference as artifacts in our MLFlow object.
Test dataset preparation
test_data = CoNLL().readDataset(spark, TEST_DATASET)
Setting the names of the inference objects
INFERENCE_NAME = "inference.parquet" # This is the name of the results inference on the test dataset, serialized in parquet,
CLASSIFICATION_REPORT_LOG_NAME = "classification_report.txt" # Name of the classification report from scikit-learn on Ner Entities
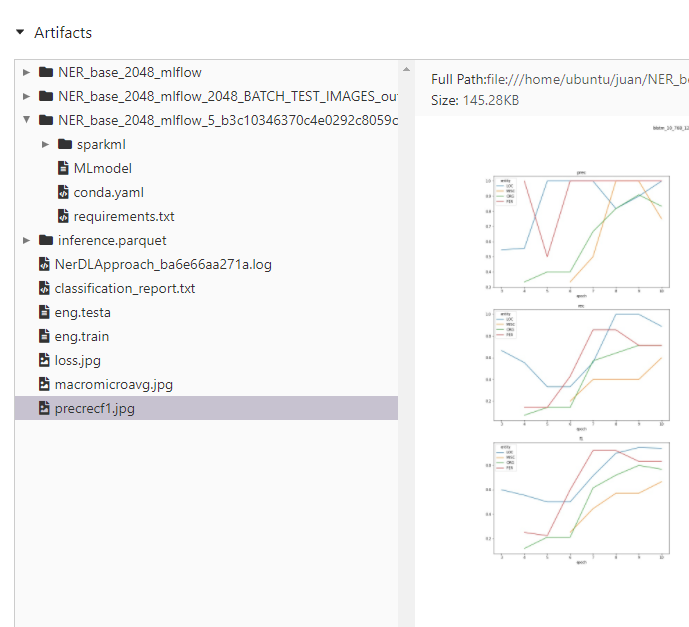
PREC_REC_F1_NAME = "precrecf1.jpg" # Name of the precision-recall-f1 file
MACRO_MICRO_AVG_NAME = "macromicroavg.jpg" # Name of the macro-micro-average file
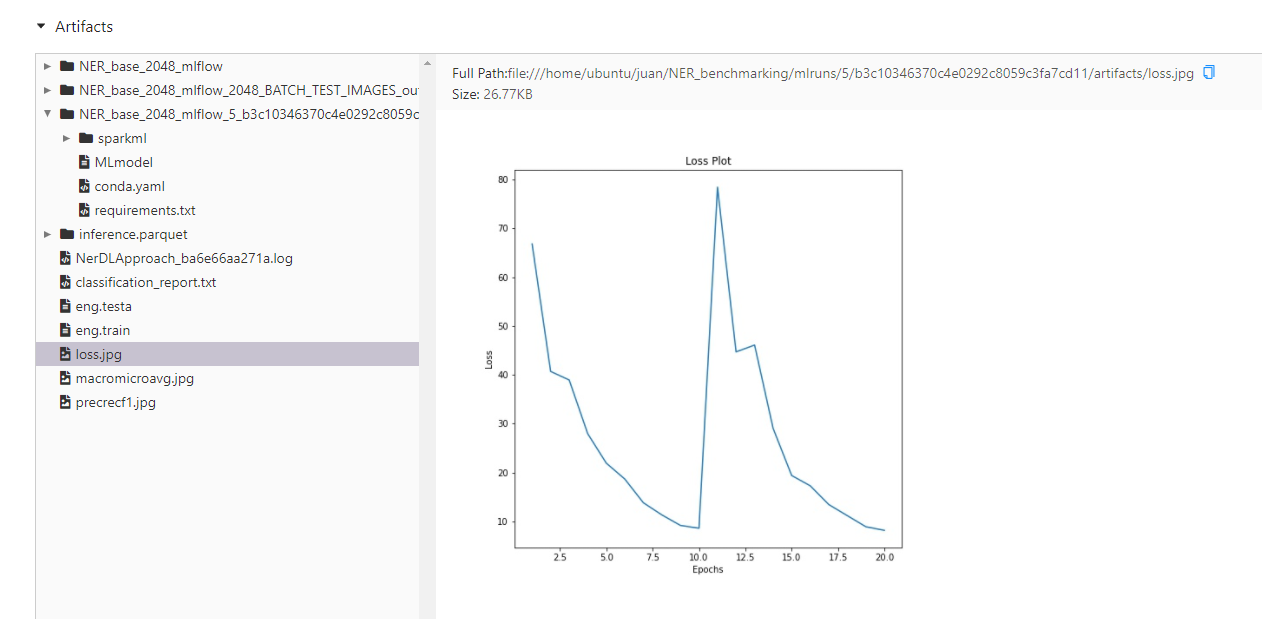
LOSS_NAME = "loss.jpg" # Name of the loss plot file
Now, let’s run the experiment
The experiment has already been created before (see “Creating the experiment” section). So we take the ID and start a run.
Each time you run execute this cell, you will get a different run for the same experiment. If you want to change the experiment id (and name), go back to “Hyperparameters configuration”. As mentioned before, by changing the experiment name, a new experiment ID will be generated. Each experiment ID groups all runs in separates folder inside ./mlruns.
with mlflow.start_run(experiment_id=EXPERIMENT_ID) as run:

    # Printing RUN and EXPERIMENT ID
	# ==============================
    print(f"Model name: {MODEL_NAME}")
    RUN_ID = run.info.run_id
    print(f"Run id: {RUN_ID}")
    EXPERIMENT_ID = run.info.experiment_id
    print(f"Experiment id: {EXPERIMENT_ID}")

    # Training the model
	# ==================
    print("Starting training...")
    start = time.time()
    ner_model = ner_training_pipeline.fit(training_data)
    end = time.time()
    ELAPSED_SEC_TRAINING = end - start
    print("- Finished!")

    # Saving the model in TensorFlow (ready to be loaded using NerDLModel.load)
	# ==============================
    print("Saving the model...")
    ner_model.stages[-1].write().overwrite().save(f"{OUTPUT_DIR}/{MODEL_DIR}/{MODEL_NAME}")
    print("- Finished!")

    # Loading the model (to check everything worked)
	# ==============================
    print("Loading back the model...")
    loaded_ner_model = NerDLModel.load(f"{OUTPUT_DIR}/{MODEL_DIR}/{MODEL_NAME}")\
        .setInputCols(["sentence", "token", "embeddings"])\
        .setOutputCol("ner")

	# Creating the inference pipeline with the loaded model
	# ==============================
    ner_prediction_pipeline = Pipeline(stages = ner_preprocessing_pipeline.getStages() + [loaded_ner_model])

    # Triggering inference
	# ==============================
    print("Starting inference...")
    prediction_data = spark.createDataFrame([[""]]).toDF("text")
    prediction_model = ner_prediction_pipeline.fit(prediction_data)
    start = time.time()
    prediction_model.transform(test_data).write.mode('overwrite').parquet(f"{OUTPUT_DIR}/{INFERENCE_NAME}")
    end = time.time()
    ELAPSED_SEC_INFERENCE = end - start
    print("- Finished!")

    # Calculating NER metrics from logs using scikit-learn 'classification_report'
	# ==============================
    print("Starting metric calculation...")
    predictions = spark.read.parquet(f"{OUTPUT_DIR}/{INFERENCE_NAME}")
    preds_df = predictions.select(F.explode(F.arrays_zip('token.result','label.result','ner.result')).alias("cols")) \
                      .select(F.expr("cols['0']").alias("token"),
                              F.expr("cols['1']").alias("ground_truth"),
                              F.expr("cols['2']").alias("prediction")).toPandas()
    preds_df = preds_df.fillna(value='O')
    with open(f'{OUTPUT_DIR}/{CLASSIFICATION_REPORT_LOG_NAME}', 'w') as f:
        metrics = classification_report(preds_df['ground_truth'], preds_df['prediction'])
        f.write(metrics)

    metrics_dict = classification_report(preds_df['ground_truth'], preds_df['prediction'], output_dict=True)
    print("- Finished!")

    # Printing metrics
	# ==============================
    print(f"Training dataset size: {TRAINING_SIZE}")
    print(f"Training time (sec): {ELAPSED_SEC_TRAINING}")
    print(f"Inference dataset size: {TEST_SIZE}")
    print(f"Inference time (sec): {ELAPSED_SEC_INFERENCE}")
    print(f"Metrics:\n")
    print(metrics)

    # Logging all our params, metrics, charts and artifacts using MLFlow
	# - log_param: logs a configuration param
	# - log_artifacts: logs a folder and all its files
	# - log_artifact: adds a file
	# - log_metric: logs a metric, what allows you use the MLFlow UI to visually compare results
	# ==============================
    print("Logging params, artifacts, metrics and charts in MLFlow")
    mlflow.log_param("training_size", TRAINING_SIZE)
    mlflow.log_param("training_time", ELAPSED_SEC_TRAINING)
    mlflow.log_param("model_name", MODEL_NAME)
    mlflow.log_param("test_size", TEST_SIZE)
    mlflow.log_param("test_time", ELAPSED_SEC_INFERENCE)
    mlflow.log_param("run_id", RUN_ID)
    mlflow.log_param("max_epochs", MAX_EPOCHS)
	mlflow.log_param("learning_rate", LEARNING_RATE)
	mlflow.log_param("batch_size", BATCH_SIZE)
	mlflow.log_param("random_seed", RANDOM_SEED)
	mlflow.log_param("validation_split", VALIDATION_SPLIT)

    for file in glob.glob(f"{OUTPUT_DIR}/*.log"):
        images = {}
        images.update(ner_image_log_parser.get_charts(file, img_prec_rec_f1_path=f"{OUTPUT_DIR}/{PREC_REC_F1_NAME}",
                                  img_macro_micro_avg_path=f"{OUTPUT_DIR}/{MACRO_MICRO_AVG_NAME}"))
        images.update(ner_image_log_parser.loss_plot(file, img_loss_path=f"{OUTPUT_DIR}/{LOSS_NAME}"))

    mlflow.log_artifacts(OUTPUT_DIR)
    mlflow.log_artifact(TRAIN_DATASET)
    mlflow.log_artifact(TEST_DATASET)

    for k,v in metrics_dict.items():
        if isinstance(v, dict):
            for kv, vv in v.items():
                mlflow.log_metric(f"{k}_{kv}", vv)
        else:
            mlflow.log_metric(k, v)
    print("- Finished!")

    print("Logging the model in MLFlow")
	# ==============================
    # Logging the model to be explored in the MLFLow UI
    tracking_url_type_store = urlparse(mlflow.get_tracking_uri()).scheme
    # Model registry does not work with file store
    if tracking_url_type_store != "file":

        # Register the model
        # There are other ways to use the Model Registry, which depends on the use case,
        # please refer to the doc for more information:
        # https://mlflow.org/docs/latest/model-registry.html#api-workflow
        mlflow.spark.log_model(ner_model, f"{MODEL_NAME}_{EXPERIMENT_ID}_{RUN_ID}", registered_model_name=MODEL_NAME, pip_requirements=PIP_REQUIREMENTS)
    else:
        mlflow.spark.log_model(ner_model, f"{MODEL_NAME}_{EXPERIMENT_ID}_{RUN_ID}", pip_requirements=PIP_REQUIREMENTS)
    print("- Finished!")

    # Saving the model, in case you want to export it
	# ==============================
    print("Saving the model...")
    input_example = predictions.select("sentence", "token", "embeddings").limit(1).toPandas()
    mlflow.spark.save_model(loaded_ner_model, MODEL_NAME, pip_requirements=PIP_REQUIREMENTS, input_example=input_example)
    print("- Finished!")
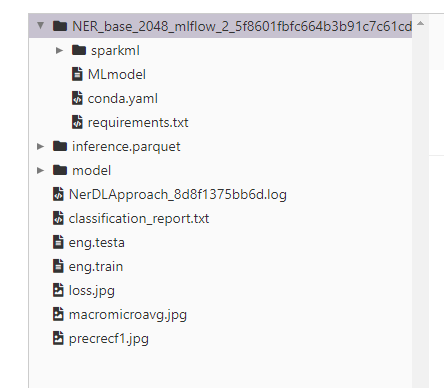
This is an example of the output generated:
Model name: NER_base_2048_mlflow
Run id: 5f8601fbfc664b3b91c7c61cde31e16d
Experiment id: 2
Starting training...
- Finished!
Saving the model...
- Finished!
Loading back the model...
Starting inference...
- Finished!
Starting metric calculation...
- Finished!
Training dataset size: 14041
Training time (sec): 12000.3835768699646
Inference dataset size: 3250
Inference time (sec): 2900.713200330734253
Metrics:

              precision    recall  f1-score   support

       B-LOC       0.85      0.82      0.83      1837
      B-MISC       0.86      0.83      0.81       922
       B-ORG       0.81      0.83      0.82      1341
       B-PER       0.86      0.81      0.80      1842
       I-LOC       0.80      0.80      0.80       257
      I-MISC       0.80      0.80      0.80       346
       I-ORG       0.83      0.89      0.80       751
       I-PER       0.86      0.83      0.82      1307
           O       0.81      0.98      0.84     43792

    accuracy                           0.87     52395
   macro avg       0.88      0.83      0.88     52395
weighted avg       0.84      0.87      0.85     52395

Logging params, artifacts, metrics and charts in MLFlow
- Finished!
Logging the model in MLFlow
Registered model 'NER_base_2048_mlflow' already exists. Creating a new version of this model...
2021/11/25 11:51:24 INFO mlflow.tracking._model_registry.client: Waiting up to 300 seconds for model version to finish creation.                     Model name: NER_base_2048_mlflow, version 2
Created version '2' of model 'NER_base_2048_mlflow'.
- Finished!
Saving the model...
- Finished!
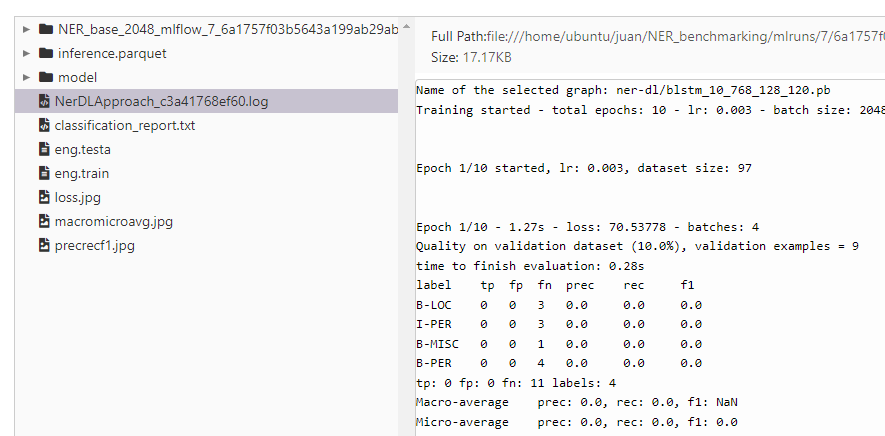
MLFLow UI to check results
Now, we just need to launch the MLFLow UI to see:
- All the experiments
- All the runs in each experiment
- The automatic versioning in the Tracking Server database in MySQL
- THe MLFlow model, and the TensorFlow version as well
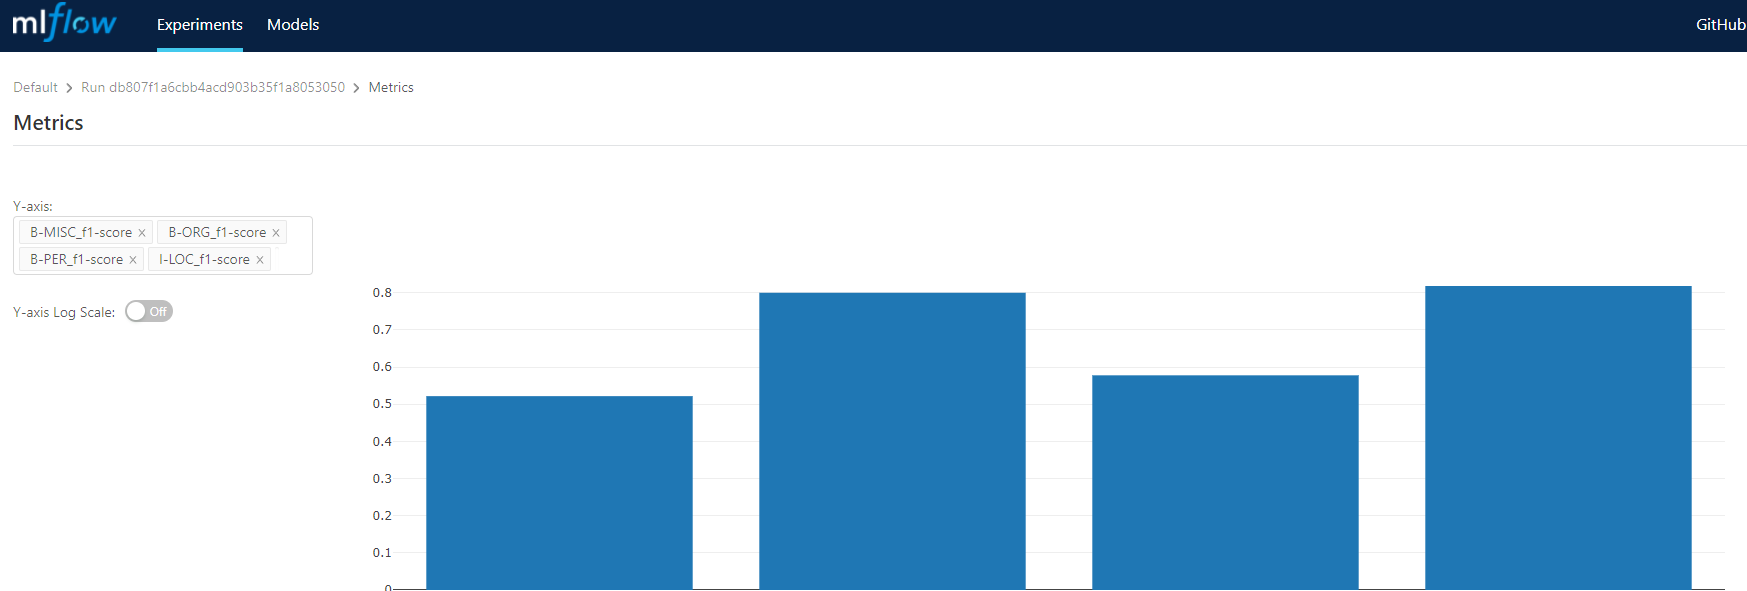
- The UI for comparing the metrics we set using log_metrics
- The UI for visualizing the image artifacts we have logged (charts)
- etc
!mlflow ui --backend-store-uri $CONNECTION_STRING
Some example screenshots